Written by Divine Uwimana ’27 and Alice Sore ’27.
Introduction
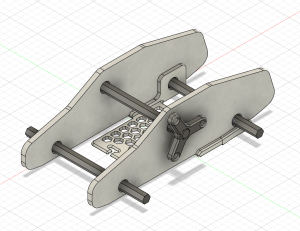
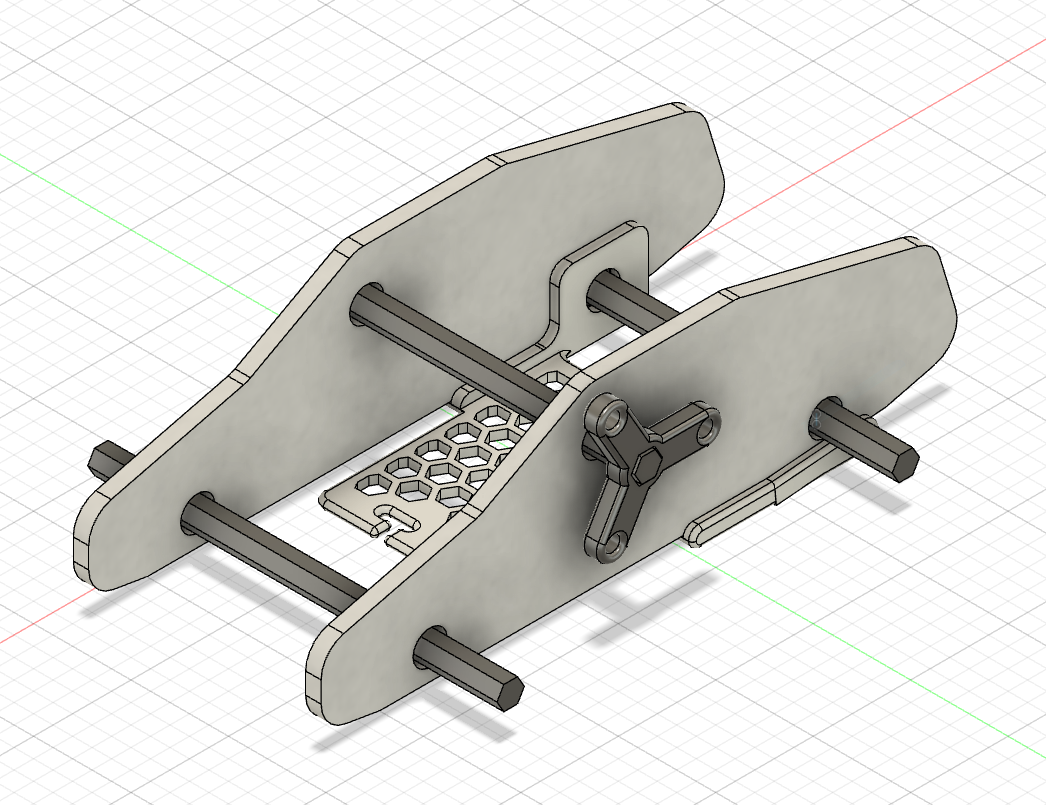
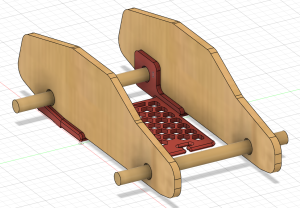
Our latest prototype of the car includes a winding mechanism, which will act as an additional modification of the base kit.
In an ideal world, students would have equal access to education, but that isn’t the case. While some schools have the latest learning technologies, hands-on opportunities, and all the funding they need, others are trying to give students the highest quality education they can without access to these resources. Worst of all, the schools negatively impacted are often in historically underrepresented communities, often ones with large populations of people of color, perpetuating a cycle of poverty. While brainstorming ways of helping our local communities as part of the TIDE Grant (Towards Inclusion, Diversity, and Equity Grant) proposal, providing more equitable access to STEM education was a clear way we thought we could make an impact. Building these STEM kits is a way we Williams students can use our education and access to help build up the community around us.
What is Hands-On STEM Education?
Hands-on STEM education uses physical interaction to provide real-world experiences that help reinforce the concepts being taught. While they can be helpful to the learning process, these experiences are often expensive. Whether it’s premade kits that can cost upwards of 40 dollars a student or involve costly field trips, these experiences often don’t fit within the budgets of schools. This disparity is critical to solve because studies have shown that hands-on learning opportunities help students retain what they learn better than standard learning methods such as lecturing. The problem is exacerbated in the education of younger students (K-6 range) because younger children’s lower attention spans can cause them to lose focus more quickly in the absence of active and experiential pedagogy.
This problem doesn’t only exist in a classroom setting. Many attempts have been made to bring hands-on learning to the home as supplemental education and homeschooling tools; however, cost is even more of a problem here. One of the largest companies currently producing these kits for home use is Crunch Labs. While they are similarly priced, averaging around $30 a kit, the requirement to purchase a monthly subscription typically results in costs of $300 or more per child. Also, Crunch Labs and other kits built for a home environment are often not reusable.
Access to hands-on STEM education is so important because high-quality STEM education improves students’ creativity and problem-solving skills. Research has shown that exposing kids to STEM in elementary school – especially between the first and third grades – provides students with the foundation they need to succeed in STEM-field careers. According to the research, U.S. adults with 1-2 years of experience in the workforce have reported the highest exposure to STEM concepts in elementary school. Between the ages of 5 and 8, 46% of this population experienced a STEM-related track in school and 53% of this population currently works in a job that is either entirely or heavily involves STEM – by far the largest percentage of any sector of jobs in the workforce. This suggests that exposing students to STEM at a young age captures their imagination and keeps them interested in science, technology, engineering, and math jobs early in their careers.
As student workers in the Makerspace, Divine Uwimana ‘27 and I, Alice Sore ‘27, met and collaborated with Paula Consolini, Adam Falk Director of the Center for Learning in Action, Tanja Srebotnjak (Director of the Zilkha Center for Environmental Initiatives), and David Keiser-Clark (Makerspace Program Manager). We identified a few critical criteria for STEM kits:
- Our STEM Kits need to be as low-cost as possible to produce. To ensure this, we must find creative ways to reduce material usage and implement supplies students may already have in their classrooms into the kits.
- We must design STEM kits to leverage existing lesson plans and learning requirements to ensure that the STEM kits fulfill the educational needs and standards set out by organizations like the Department of Education.
- The STEM Kits must be designed to be reusable, durable, and sustainable, using sustainably sourced and produced materials wherever possible.
Brainstorming
Divine and I began the brainstorming process by researching existing STEM kits currently available on the market and how we might further improve them for our demographic group with respect to the aforementioned criteria. Since we both had little experience in the field beforehand, we wanted to understand better the design features other organizations used to create highly engaging STEM kits. Some of the qualities we observed that we believe we should replicate are listed below:
- A good STEM kit is highly interactive. Parts of the kit, especially mechanical parts, should be designed so that students can visually see what is happening and how the action they are putting in is causing the final result.
- A good STEM kit should not be a “one and done.” Ideally, a STEM kit will have multiple stages that allow students to build upon a product in stages, introducing new concepts or building on previous concepts.
- A good STEM kit should be a manageable length. Even if students are having fun, dragging it out too long risks boring the students and causing the learning aspect to be ineffective.
- A good STEM kit should be fun yet educational. This means balancing the kit to both be rich in academic concepts and interesting to keep them engaged.
- A good STEM kit should encourage teamwork and cooperation. It should allow kids to work together to build their social skills while learning.
- A good STEM kit should allow “trial and error.” It should enable the kids to learn from mistakes and thus build their problem-solving skills.
- A good STEM kit should be simple yet visually complex. Just because the final mechanism is a complex contraption doesn’t mean the process of assembling it can’t be simplified and streamlined.

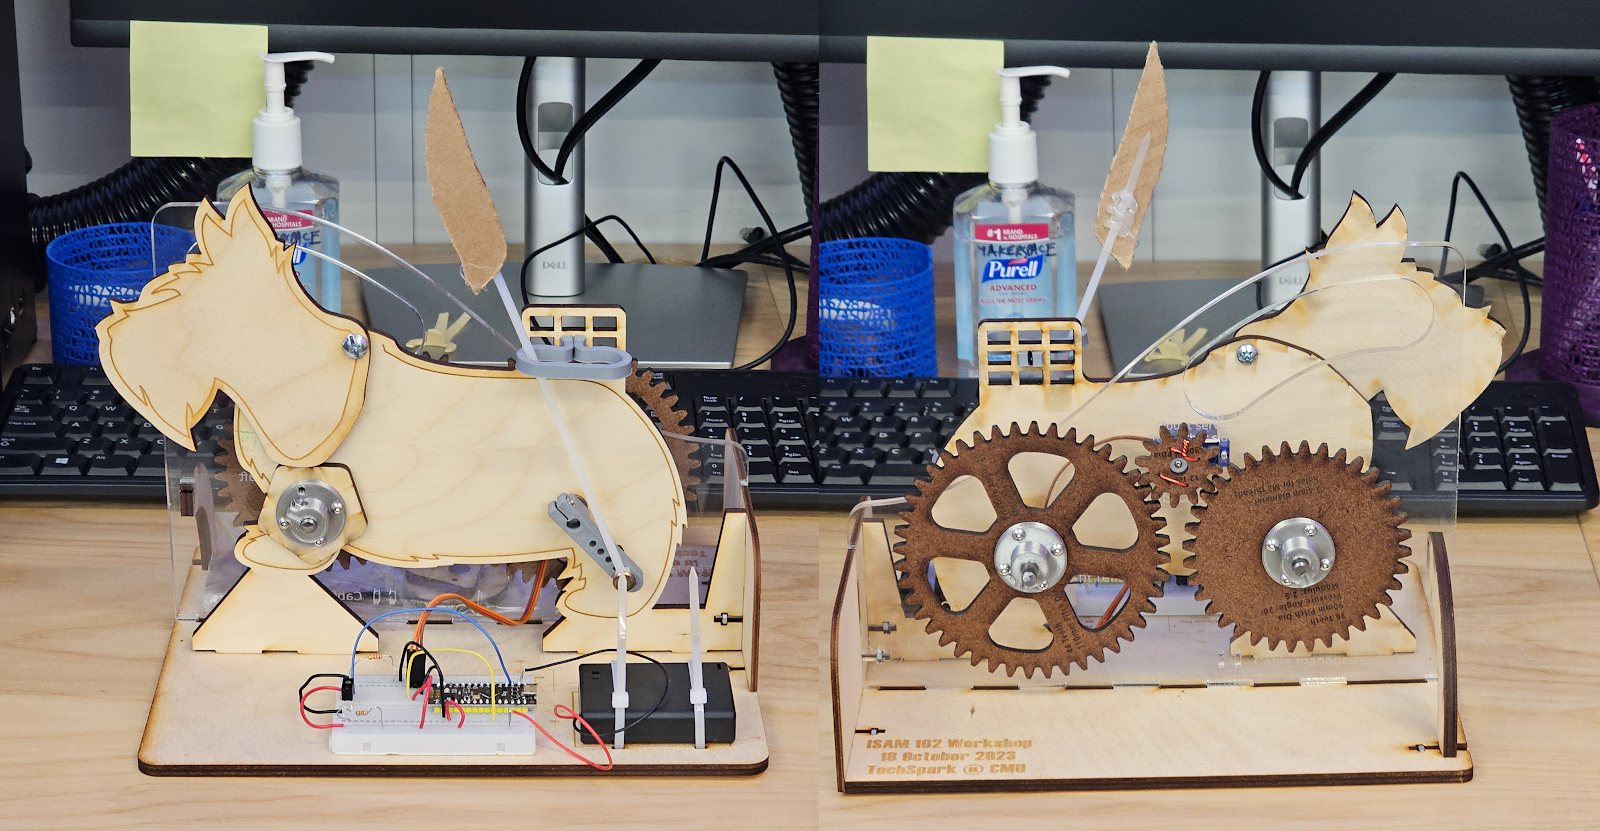
Front and back views of the mechanical scotty dog kit from Carnegie Mellon University.
During our design process, we also got to experience assembling a STEM kit first-hand, specifically the mechanical Scotty dog kit we received from Carnegie Mellon University, courtesy of Professor Bill Nace and Professor Robert Zacharias. The materials used to assemble it are easy to manufacture, primarily made of thin sheets of wood and acrylic with 3D-printed plastic parts. The design is simple but very interesting; a single motor in the middle drives both the tail wagging on the back and the head bobbing on the front through a system of gears on the back. The head is made to bob up and down in a specific pattern through the radius of the spinning piece increasing or decreasing as it turns, creating a pattern of head movements that feels random. The tail spins on an arm and is locked upright using a bracket, making the tail wag back and forth with a simple spinning motion. Finally, all of this is controlled with a light sensor, allowing the user to control the speed of the motion by raising or lowering their hand above it. All these mechanisms combined to create a fascinating kit from a design standpoint, with a lot of interactivity and interesting mechanisms on display while being very quick for us to reassemble, even without instructions.
From this experience, we better understood how to design an effective STEM kit. Then, we started brainstorming ideas for STEM kits that we could create. At the end of this brainstorming, we ended up with three designs we wanted to develop further. The first is a model car, which would use a wind-up mechanism built by students to showcase the properties of potential and kinetic energy. The second idea is an energy kit expansion for the car, allowing students to electrify it while teaching them the basics of electricity and explaining renewable solar energy concepts. Finally, the third idea is a solar system kit, which would be focused on having students assemble a solar system model to teach about the planets in our galaxy and our place in the universe. With these initial ideas, we started prototyping the model car kit.
Prototyping the Model Car Kit
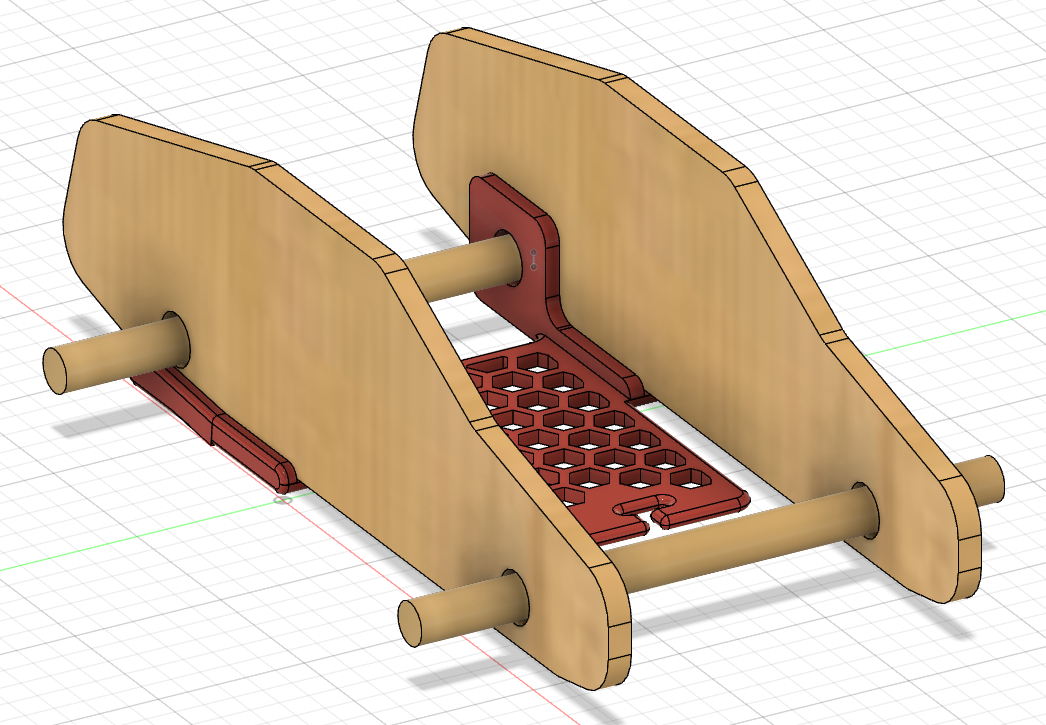
An initial prototype for the base car kit, giving us an idea of what the final product may look like.
The main idea of our wind-up car kit was simple. But, as with many projects, it quickly evolved into a complex design with many digital iterations and three 3D printed prototypes. For this first design, a 3D printed base would connect the two cardboard sides and help support the back axle, which would wind up using a rubber band attached to it and the frame. Wooden dowels would act as axles and bottle caps as wheels, so when you pulled it back, the car would launch forward using energy stored in the rubber band.
While this was a great initial idea, we encountered some problems. First, cutting out the sides made of cardboard proved difficult because two holes needed to be cut in the middle of it for axles. Ultimately, we decided that the side pieces should be replaced with laser-cut wood in the final design, which would be reusable and easier for kids to work with while providing more structural rigidity. Another issue we discovered was that the rubber band would stay on the axle instead of coming unhooked at the end, catching it, and abruptly stopping the car. Our solution was to move the hook point for the rubber band forward so it had enough energy to detach itself from the axle at the end. We also had to ensure this expansion didn’t use too much plastic, as we hope to create all the filament ourselves using recycled PET from locally gathered plastic bottles. We ended up using a honeycomb pattern, often seen in structures that use empty space to save material resources while retaining structural integrity, and by implementing this we were able to save sufficient plastic such that the larger prototypes consumed less plastic than our smaller initial prototype.

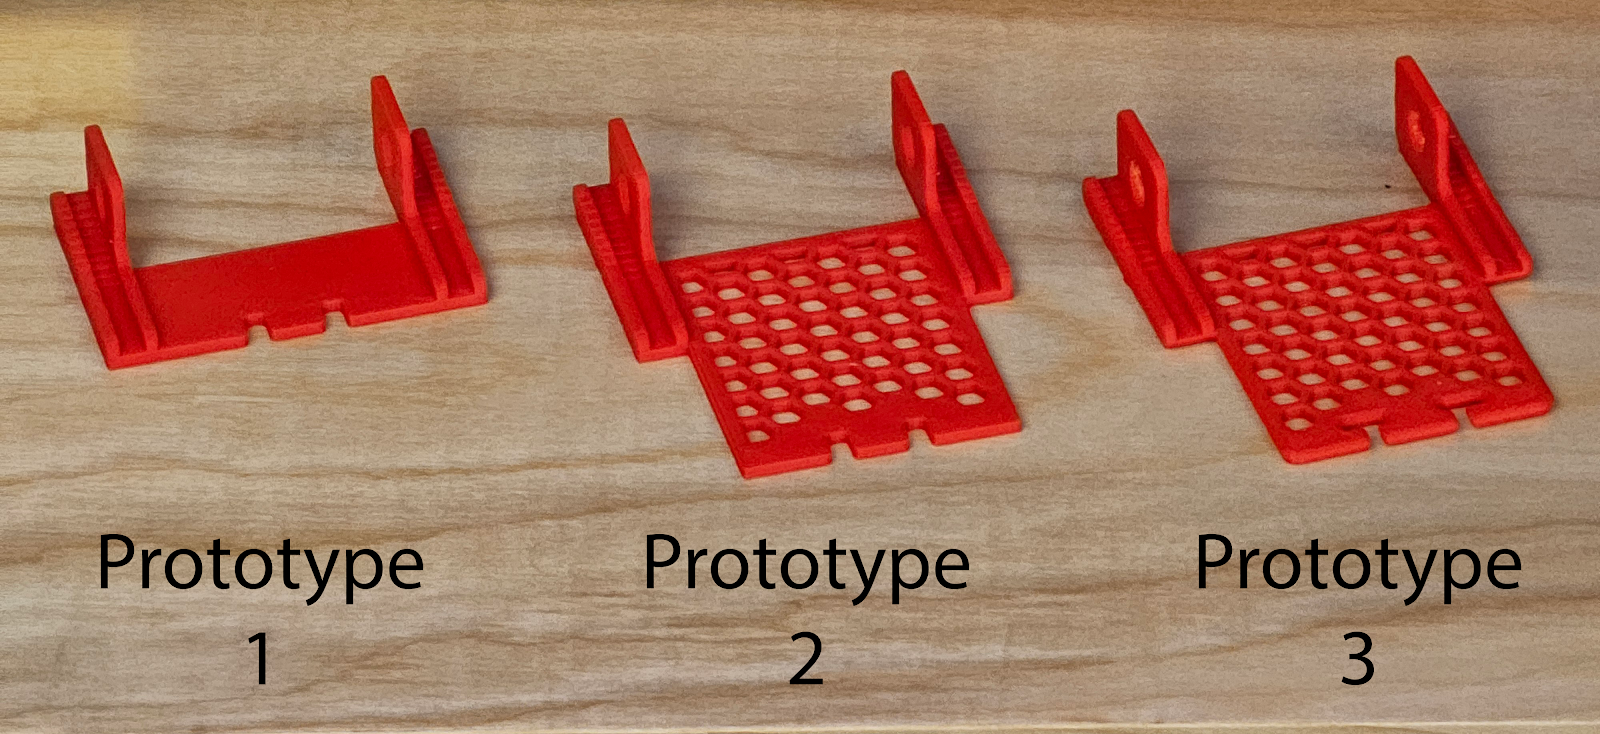
Our first three prototypes for the 3D printed base, showing how it evolved to meet the project’s needs while remaining efficient in plastic usage.
For our third prototype, we rounded and smoothed as many parts as possible to prevent sharp points or edges that can occur in 3D printing. We also did this to prevent sharp points from catching or breaking the rubber band. Finally, we modified the slot at the front for the rubber band to help the car retain it, even after it detaches from the axle.
The biggest problem we ran into was not with the design of the base but with the kit itself. Our initial idea was interesting but violated one of our initial design rules. The kit was just one thing: assembling the car with the rubber band. If we wanted to make an exciting kit, we had to make at least one additional stage involving more engineering and differently demonstrating the concepts of potential and kinetic energy.
While looking for inspiration, we stumbled upon a design by a maker named Greg Zumwalt for a 3D Printable Wind-Up Car that used a simple mechanism to limit the speed, allowing it to move farther and longer after windup as opposed to a design like ours, which simply went at top speed after release. Looking into this project’s mechanics, we realized that a similar design could be perfect to demonstrate the ways energy can be modified in the process of converting from potential to kinetic energy. So, to better understand how the mechanics worked, we downloaded the files and began printing them out to design a similar mechanism within the constraints of our model kit.
It was at this moment that the Office of Institutional Diversity, Equity, and Inclusion announced that our application for a TIDE grant was accepted and that our STEM kit project would be funded.
Next Steps
Our next steps are to complete the second expanded energy source for our car prototype, align that with curricular concepts, and then meet later this month with an elementary school teacher to share our project and hear initial feedback. We plan to incorporate that feedback into the car prototype and then next meet with that teacher’s class and observe student reactions to utilizing it. As we continue to build several STEM kits, our theme will be to test, demonstrate, observe, seek feedback, iterate, and repeat. We hope these kits might have a significant impact on elementary students’ education in the Berkshires.