Making Time: Reimagining Ancient Greek Paradigms through 3D Printing

ChatGPT-generated image of Chronos and symbols of linearized time such as the hourglass and clock gears

ChatGPT-generated image of Chronos and symbols of linearized time such as the hourglass and clock gears

For the final project of my Winter Study course, COGS 10: Minds, Machines, and the Making of Meaning taught by Dr. Charles Kaufmann, I was asked to “integrate the scientific, philosophical, computational, and experiential strands of the course into a single, coherent act of meaning-making.” Having recently read an article about bioprinting—a form of 3D printing that uses organic matter, often including living cells, to create new tissue—I was inspired to cap off my learning experience with some form of material creation.

A simple Google search of “Williams 3D printing” led me to the Makerspace, the on-campus hub for all things related to innovation, creativity, and hands-on learning. I was particularly moved by the idea of Critical Making which combines critical thinking and material design into a unified mode of expression and inquiry. I knew this was how I wanted to approach my culminating reflection.

Minds and Machines Behind the Project

The crux of my project was to explore how minds and machines interface to create meaning, specifically through the lens of different ancient Greek models of time as represented by three deities: Chronos, Aion, and Kairos. That process of intellectual discovery was enabled by the following:

Minds and Machines Behind the Project

Minds and Machines Behind the Project

Getting to Know the Space

At the outset of the project, I lacked confidence, having no prior training in 3D modeling of any kind. When I reached out to Mr. David to talk through the specifics of my project idea and gauge the possibility of its completion in a compressed timeframe, I feared that my inexperience would make my goals unfeasible. On my first tour of the Makerspace a few days later, however, my trepidation was quickly melted away by Mr. David’s nonpareil enthusiasm and encouragement. I was pleasantly surprised to hear that my idea was realistically achievable, that he would help through the entire process, and that I could learn first-hand to perform some of the techniques involved.

The Process: From Red Spaghetti to Hellenic Models

Left to Right: (1) ChatGPT-generated image of Chronos and symbols of linearized time such as the hourglass and clock gears; (2) 3D model of Chronos produced by MeshyAI and Hitem3D software, based on the original image; (3) Editing the 3D model in PrusaSlicer to achieve proper scale and supports

Left to Right:
(1) ChatGPT-generated image of Chronos and symbols of linearized time such as the hourglass and clock gears
(2) 3D model of Chronos produced by MeshyAI and Hitem3D software, based on the original image
(3) Editing the 3D model in PrusaSlicer to achieve proper scale and supports


Left to Right:; (1) Big red spaghetti ball: the colorful fun of a failed print; (2) Successfully printed model of Chronos with supports; (3) Finished print of Chronos with all supports removed

Left to Right:
(1) Big red spaghetti ball: the colorful fun of a failed print
(2) Successfully printed model of Chronos with supports
(3) Finished print of Chronos with all supports removed


Final Thoughts

Collaborating with the Makerspace was incredible! With the zealous help of Mr. David, I was able to transform my project idea into a reality in about one week. Creation has never felt so possible. I would encourage anybody and everybody to visit the Makerspace. You never know when immersing yourself in a new environment and connecting with the experts and student workers involved will spark the desire to make something new. While every creative endeavor has a unique set of technical demands, ranging in complexity, getting started really is as simple as dropping by during Open Hours or sending a friendly email. I found this process enriching, fun, and informative, and I will definitely be working with the Makerspace team again soon.

My finished prints! From left to right: Chronos, Aion, and Kairos. Below: red spaghetti :)

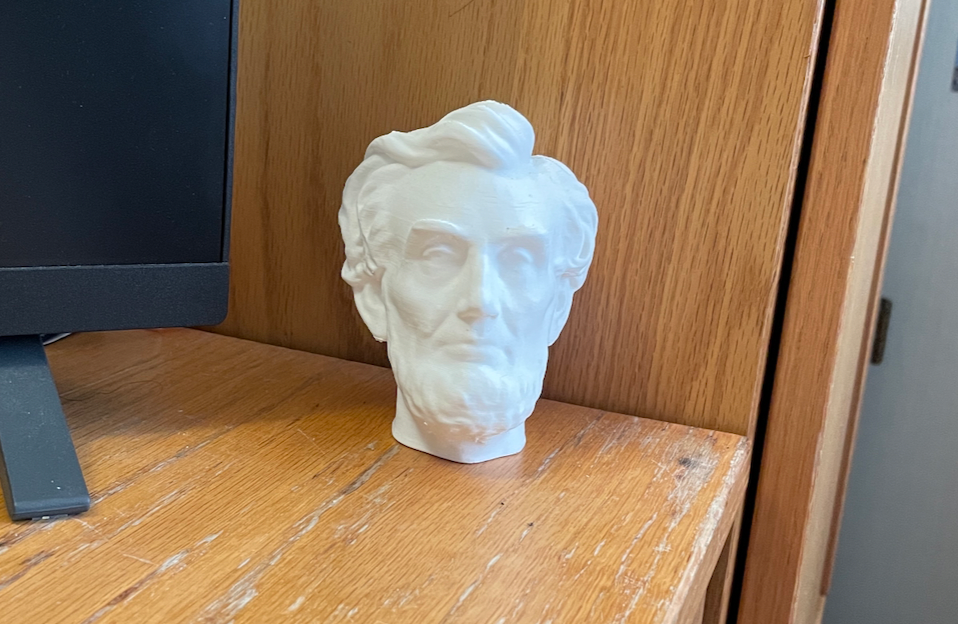
My finished prints! From left to right: Chronos, Aion, and Kairos. Below: red spaghetti 🙂


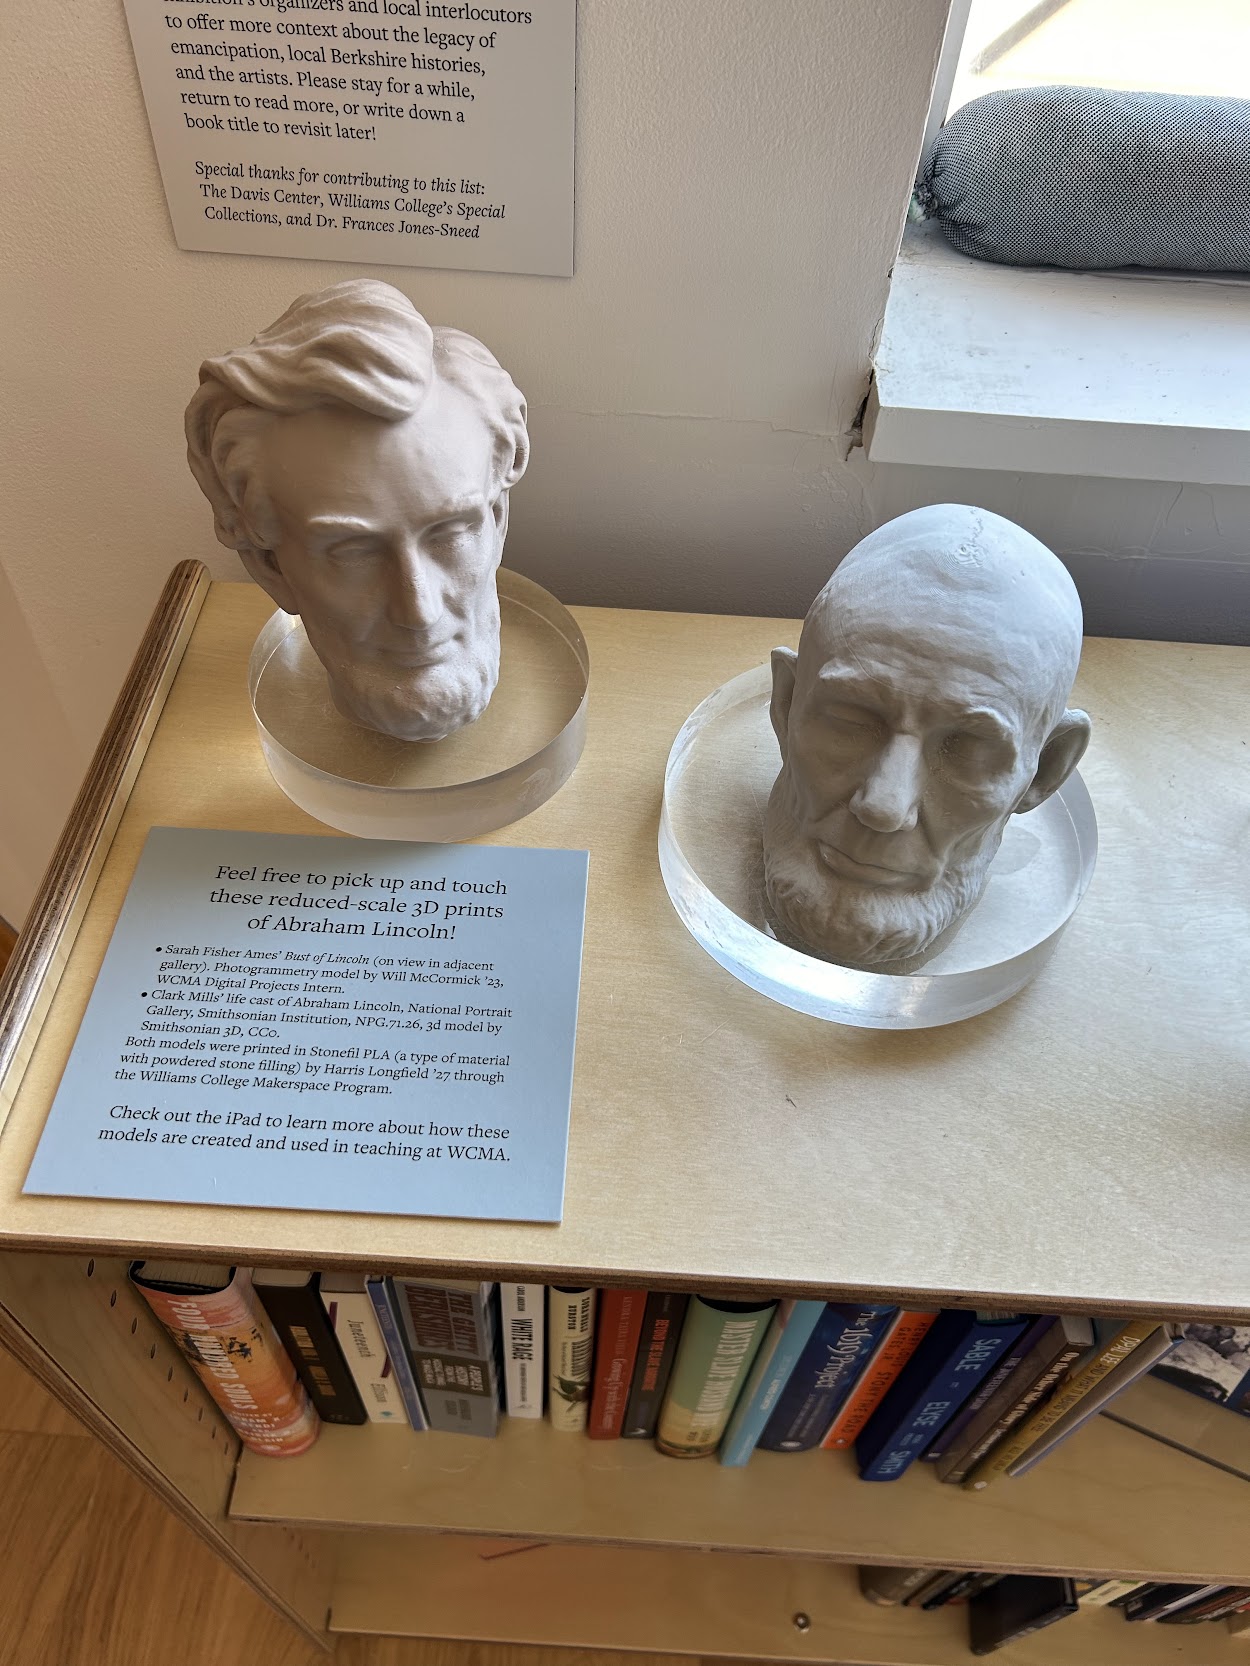
For explanations of the different paradigms of time these deities represent and the symbols included in the prints, please feel free to check out my final project!


Reviving an Ancient Way of Printing

What is this Block?

Tibetan printing block 3D printed using PLA filament

Tibetan printing block 3D printed using PLA filament

The Tibetan wooden printing block at the heart of this project is a rare artifact estimated to be 100-200 years old, historically used to create prayer flags. Printing blocks represent one of the most significant innovations of the Tang (618–906) and Song (960–1279) dynasties, revolutionizing knowledge-sharing by enabling the mass publication of texts and enhancing literacy (Asian Art Museum, n.d.).

This block was part of a large group of printing blocks that was acquired at auction from the estate of Philip Gould, who was a professor of Art History at Sarah Lawrence before his retirement in 1993. The existing information about the block is based on comparative research and conversations with faculty colleagues who have expertise in the history of the book in the Himalayas. Professor Xiaotian Yin, an art historian specializing in the art of Inner Asia and China wrote:

“The motif at the center visualizes the seed syllable of the Kalachakra system in Tibetan Buddhism, surrounded by the Tibetan transliteration of a Sanskrit Mantra.” The four mystical animals—Lion (seng), Tiger (stag), Garuda (khung), and Dragon (’brug)—adorn its corners, reaffirming the block’s spiritual significance.”

Why is it Substantive to Replicate this Block?

These historical artifacts are too delicate to use in practical demonstrations. Anne Peale, the Chapin Librarian for the Sawyer Special Collections, would like to create replica of the printing blocks to demonstrate how these would be used. A replica would allow the library to safely make many prints, using a variety of print materials, without worrying about damaging the original blocks.

Anne Peale is also the professor of ASIA 325: The Arts of the Book in Asia for Spring 2025. I asked her about the importance of replicating the printing block and she responded:

“Printing blocks carry the history of how they’ve been used in the ink traces on their surface. Moreover, some blocks become damaged or fragile over time, and we need to ensure that the blocks remain available for future generations of Williams students.”

There are a few features of the printing block that must be preserved. Preservation is a meticulous process, prioritizing the smoothness of the printable surface, the clarity of the text, and the precision of the carved motifs.

3D Scanning with CR-Scan Raptor

The CR-Scan Raptor is a 3D scanner with metrology-grade accuracy, with a maximum accuracy of 0.02mm. Using a blue parallel 7-line laser and a 2.3-megapixel high-resolution camera for scanning, it produces rich details, sharp edges, and restores the 3D shape of the object accurately (Creality, 2024).

Scan Configuration

  • Scanning Mode: Blue Light
  • Resolution: 0.1
  • Color Mapping: No
  • Turntable: No

Recommended System Operation

Windows

  • Windows 10/11 (64 bit)
  • i7-Gen7 CPU, Nvidia graphics card (6GB VRAM)
  • 16GB RAM or higher

MacOS

  • 7.7 and above (Big Sur/Monterey/Ventura)
  • Apple M1/M2/M3 series processors
  • 16GB RAM or higher
Tibetan printing block preparing to be 3D scanned.

Tibetan printing block preparing to be 3D scanned.

Step 1: Set-up the Printing Block to be Scanned

The printing block was placed on top of a scanning pad. I then arbitrarily surrounded with Creality’s reflective circular markers. These marker points were crucial in assisting the scanning process. The more markers, the better.


3D scan of the printing block in creality.

3D scan of the printing block in creality.

Step 2: Scan the Printing Block

I connected the CR-Scan Raptor USB cable to our relatively powerful desktop computer. Then, I started slowly scanning the printing block. During the scanning process, Creality Scan provides a colormap that indicates its confidence in the point clouds it is creating for the whether the current scan quality: red indicates a relatively poor quality of scanning, while an object that appears uniformly green, indicates a relatively good quality scan.


Optimized 3D scan of printing block.

Optimized 3D scan of printing block.

Step 3: Optimize the 3D Scanned Model  

After scanning the object, I initiated an optimization of the pointcloud. The smaller the point distance, the better the detail, but it requires more processing time and RAM.


Printing with Resin

Williams College 3D printed Tibetan printing block using resin.

Williams College 3D printed Tibetan printing block using resin.

The dimensions of the actual Tibetan printing block are as follows:

  • Length: 134.66mm
  • Width: 153.48mm
  • Height: 4.24mm

We coordinated with the Science Center to print the 3D scanned block with resin. Resin 3D printing has the advantage of producing higher resolution and finer details compared to 3D printing with the use of filaments. The printing process was handled by Jason Mativi, Senior Science Center Shop Engineer. Resin is expensive, and to reduce material costs we intentionally printed a very thin object — essentially just the raised print characters with maybe ⅛” backing — and then glued two pieces of custom cut ¼” acrylic plastic to create a rigid backing and protect the resin print.

Why It Matters: Preserving the Past for the Future

In today’s world, ancient artifacts face constant risks of damage or loss. Projects like this show how technology can help preserve cultural treasures while keeping them accessible. By using 3D scanning and resin printing, we can create accurate replicas that protect the original artifact while allowing people to engage with its history.

Replicating this Tibetan printing block doesn’t just save its physical form—it keeps its story alive, inspiring and educating future generations about the rich culture and artistry it represents.

Community

Exquisite ancient artistic artifacts like this Tibetan printing block are continuously depleting in terms of numbers. It is hard to maintain these numbers in place because it can only go down and never go up. This is something inevitable as we proceed in time.

“We anticipate using this block to demonstrate woodblock printing processes with ARTH 325: The Arts of the Book in Asia, and also to use it in co-curricular programming, since it is durable and easy to transport. Hands-on printing is a fantastic way of teaching book history to all kinds of learners,” said Professor Peale.

Why It Matters: Balancing Preservation and Accessibility

The replication of this block is more than a technical achievement—it’s a cultural imperative. In an era when ancient artifacts are steadily depleting, projects like this ensure their stories endure. By blending tradition with technology, we not only preserve history but also make it accessible to new generations.


The Lincoln Logs: Printing for the WCMA’s Emancipation Exhibition

My most recent Makerspace academic project was assisting Beth Fischer, Assistant Curator of Digital Learning and Research for the Williams College Museum of Art. My task was to 3D print replicas of two sculptures of President Lincoln—Sarah Fisher Ames’ bust of Lincoln and the iconic Abraham Lincoln Life Mask by Clark Mill—as part of the WCMA’s “Emancipation: The Unfinished Project of Liberation” exhibits. These two models complement the work of Hugh Hayden, also present at Emancipation, who incorporates PLA prints into his artistic process. The exhibit emphasizes 3D printing as a relatively accessible medium for creativity and showcases different ways it can assist other styles of art, particularly molds.

Setup

WCMA’s “Emancipation: The Unfinished Project of Liberation” exhibit

“Emancipation” exhibit

The two photogrammetry-based 3D models were gorgeous. They defined every ridge, bump, and strand of hair on Lincoln’s head while carrying the texture of the clay, but it was this beauty that posed a challenge. The multidimensional texture in clay is hard to depict using horizontal layers of filament, which is how 3D printers print. Although not a solution, a remedy to this problem was using a hybrid filament – part ceramic and part PLA. Although this filament can’t recreate the vertical complexity of a sculpted model’s texture, it provides a smoother, heavier finish that better resembles the original material. 

We had some leftover StoneFil filament from a previous project, but we knew we would need more to complete both prints. The question was how much more. We did not know how much filament remained on the spools and there was no specific size requested – simply that the two models remain proportional and be as large as possible. 

Naturally, as a math major, I took this as a challenge to maximize the size we could print with only one additional spool of filament. First, I printed two smaller models, noted their xyz scaling, and measured the distance from the nose to the chin. I then used those measurements to find the scale between the height of one and the length of the other. Then, given that scaling, I noted the estimated combined length of the models at a few different sizes and found the factor at which the necessary filament would scale in comparison to the size. In theory, I could approximate the maximum print size given the length of the filament we had left and the spool arriving soon. There was only one problem – we didn’t know how much filament we had. We could weigh the filament, but any statement on the spool-to-filament proportion would’ve been guesswork. 

That was when another Makerspace student worker, Alice Sore, had an idea to create a reference guide for the weight of empty filament spools. We use a variety of brands of filament, and each has a different sized spool. Now, when we finish a spool, we weigh it and enter it into a spreadsheet, allowing us to measure the amount of filament remaining on any given spool by subtracting the spool from the overall weight. 

Printing and Troubleshooting

The final bust with its supports still attached

The final bust with its supports still attached

The time came to print the models. I had decided on the heights 140mm and 93.15, which would give us just enough filament to print both models with enough to spare to be able to still print one more, just in case of failure. I sliced and started the print of the bust and 20 hours later, it came out well. There were a few small holes that indicated mild under-extrusion, but they were not too distracting and the WCMA was interested in showcasing the uniqueness of 3-D prints, so I was perfectly content with the model. 

The second print was not as fortunate. Externally, it looked fine, except the under-extrusion was more visible than the first model. Before removing the model from the plate, I started googling remedies for under-extrusion because I was concerned that I didn’t have enough filament to endure another failure. I recalibrated the printer, increased the nozzle temperature, slightly decreased the printing speed, and ran another mini model with ordinary PLA. It came out perfectly – and that worried me because I was nervous that the problem was with the ceramic filament, which was a requirement for the project. Eventually, I stumbled onto a solution by turning the StoneFil model upside down to examine the supports, and to my shock, I found that they were completely “spaghettified”. The supports had completely failed and were just a mess of tangled filament. I was impressed that the print had managed to build at all. 

The under-extrusion was far more noticeable on the first print of the mask than the bust.

The under-extrusion was far more noticeable on the first print of the mask than the bust.

Exhibition: “Feel free to pick up and touch these reduced-scale 3D prints of Abraham Lincoln!”

Exhibition: “Feel free to pick up and touch these reduced-scale 3D prints of Abraham Lincoln!”

I spent some time in different slicing softwares, trying to optimize the supports. It took (admittedly longer than it should have) to realize that with supports as dense as the model requested, this was a rare case where it would be more filament-efficient and less failure-prone to fill the space underneath the mask with infill, instead of supports. This was the solution we went with, and the bust printed perfectly.

While weighing the options for the final print, David Keiser-Clark, Makerspace Program Manager, and I brainstormed ways of filling in the holes caused by under-extrusion. Our favorite idea, and the only experiment we ran, was using a heat gun to melt a tiny bit of StoneFil filament into the hole and then sand down the excess. It was good in theory, and fun to try, but not entirely effective because it looked like a visible patch. This is because 3D printing filament solidifies incredibly fast after cooling, and we would have needed to either pour a liquid into the hold and/or do a tremendous amount of sanding afterward.

Conclusion

Coincidentally, as the final prints started, I again fell very ill and had to return home for the week and did not get to hand off the pieces. However, I did get the chance to go to the Emancipation exhibit and see the final results. The space itself was a moving experience, and I would strongly encourage anybody to visit or read about the exhibition and its incorporation of 3D printing. This was a fun project to complete during Winter Study, and I got the chance to answer a lot of looming questions about 3D printing during it. I learned a lot about the balance of layer height, print speed, and temperature, I’m excited to see what else we can do with our filament data log, and melting PLA with the heat gun was so much fun that I may try to find a way to make it practical. Although, I must admit, my favorite part of this project is the little Lincoln that found himself a home in my dorm.

An early, miniature prototype that now adorns my desk as a reminder of my work on this WCMA project!

An early, miniature prototype that now adorns my desk as a reminder of my work on this WCMA project!