Tag Archives: Macintosh

Mac – JAMF manual agent installation

Sometimes, (in my case when using DEP enrollment on a slow wifi connection) the Jamf agent doesn’t get installed properly during DEP enrollment. To fix that here is what I did:

I first ran the following commands to manually download and “install” the Jamf binary from the Jamf server – All commands must be run as root! (“#” indicates a comment in script fashion not a command to run. Also be sure to replace “<Your JAMF Server>” with the address of your Jamf server)

# Get the jamf agent binary to the right location
mkdir /usr/local/jamf
mkdir /usr/local/jamf/bin
mkdir /usr/local/bin
curl https://<Your JAMF Server>/bin/jamf -o /tmp/jamf
mv /tmp/jamf /usr/local/jamf/bin/

# Set the binary to be executable
chmod +x /usr/local/jamf/bin/jamf

# Create a symbolic link for the binary so the “jamf” command is in the default path
ln -s /usr/local/jamf/bin/jamf /usr/local/bin/jamf

# Create the configuration file the jamf binary uses to find the server
/usr/local/bin/jamf createConf -url https://<Your JAMF Server>

# Re-enroll computer to get the server certificate
/usr/local/bin/jamf -enroll -prompt

Once the Jamf agent is installed, the computer was checking into the Jamf server. However I wasn’t able to scope it to policies because it was listed as “unmanaged”.  To change that, on the Jamf server I edited the computer’s “General” information tab by checking the box to set it to “Managed”and entering a local administrative username and password on the computer for Jamf to use to mange the computer. Also, since we use “Sites”, I manually set the site for the computer as well.

Now that the Jamf agent was installed and I set the computer record to “managed”, I was able to scope policies, etc to the computer as I normally do.


MacOS – Add Active Domain group to local mac group

In testing, we found that remote connections from windows clients to the built-in macOS VNC server were not encrypted in any way. To resolve this we decided to use RealVNC as the screen sharing server on Macs. Also, since we envision making these remote lab computers available to only a few individuals that have no other way to access critical academic software, I needed a way to restrict which users could authenticate to create the VNC screen sharing sessions.

The following steps are how I enabled this access on our AD joined lab macs where our users are NOT given administrative rights on the macs with the AD join: (This was tested on MacOS 10.14.5 Mojave.)

1) Create the group in your Active Domain using Users and Groups. If you do not have access to AD Users and Groups, talk to your AD domain administrator BEFORE continuing this! Someone needs to be able to add users to the AD group that is created. If that isn’t going to be you figure that out before proceeding! This AD group should be a “global” group. In the example below I have used “LabUsers” as the AD group name.

2) Log into the mac that will be the VNC server with an administrative account.

3) If on, disable the default MacOS screen sharing and remote login in System Preferences.

4) Install RealVNC Server.

5) Create the local mac group. In the example below the local mac group I created was “RemoteUsers”.

6) In the options for the RealVNC server for Users and Permissions, add the local mac group “RemoteUsers” as a group that is authorized to open a screen sharing session. Also, so that you know, in the Security tab of RealVNC server options I use”Mac Password” for the authentication method with encryption “Always on”.

6) Open a Terminal window on the mac and give the following command: (This should NOT be done as super user! I don’t know why but that doesn’t work)

dseditgroup -o edit -n /Local/Default -u localadminusername -p -a "AD_Domaim\LabUsers" -t group RemoteUsers

( In the above command /Local/Default refers to the local directly node for authentication information. Also, the ” ” are required around the AD_Domain\LabUsers so that the \ isn’t interpreted as an escape and with “-p” this will prompt you for the password for your localadminusername which is required )

Note that you may never be able to see this AD group listed as a member of the local mac group! All I ever got was the above command to run without any errors or feedback.

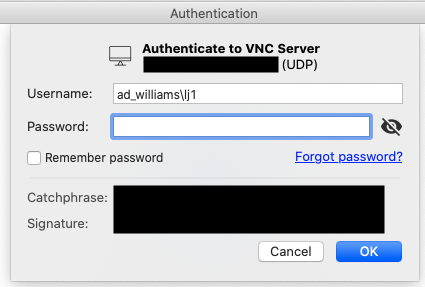
7) Once the command above completes without error, only those AD users that are listed in the AD group should be able to authenticate to the VNC server using the username format below.  All other users of the mac that would generally be able to log into the mac but that are not in the AD group, will get an “Access Denied” message when attempting to open the screen sharing connection.

Other useful commands: (using “RemoteUsers” as the example local mac group name)

To list local mac group membership: (this will not list the AD group! If you know of another way, please let me know!)
dscl . read /Groups/RemoteUsers GroupMembership

To list local mac Group properties:
dscl . -read /Groups/RemoteUsers

When researching this I found this post particularly useful:
https://blog.travismclarke.com/post/osx-cli-group-management/

MacOS – Disabling Sleep option from Finder menu

We find that if people manually sleep a mac running Mojave (10.14.5) from the Finder menu that mac is then nearly impossible to wake up. So, at least on lecterns, I am using this command to disable the sleep menu item –
defaults write /Library/Preferences/com.apple.PowerManagement.plist SystemPowerSettings -dict SleepDisabled -bool YES

For more details see:
https://derflounder.wordpress.com/2013/01/27/disabling-the-sleep-command-in-the-apple-menu/

Mac – Installing Spartan ’18 from JAMF

To install Spartan ’18 with a network license server correctly as a push from Jamf:

1) First create a package that installs the Spartan ’18 application to the /Applications folder and push that from Jamf
2) Create a script (example below) that calls the licensing script in that application
3) Create a policy to push the packaged application and then run the script

#!/bin/sh
cd /Applications/Spartan\ 18.app/Contents/Resources/Support
pwd
echo “running ./cliinstall.sh –network-server=lm3.williams.edu”
./cliinstall.sh –network-server=lm3.williams.edu

(You will want to change the network-server address to the correct address for you installation)

Mac – Use PMSET for Sleep timers and Power Management

On the Mac there are a number of ways to control the sleep timers.  Some seem to work better than others.  For Mojave (MacOS 10.14.x) I have switched to using the command peset.

peset -g      shows a list of settings

peset -a       allows you to change those settings

Example:

bash-3.2# pmset -a sleep 120

bash-3.2# pmset -a displaysleep 120

bash-3.2# pmset -a disksleep 120

bash-3.2# pmset -g

Additional details on this are available at:
https://eclecticlight.co/2017/01/20/power-management-in-detail-using-pmset/

Mac OS – SIP or System Integrity Protection

SIP (System Integrity Protection) isn’t a bad thing. It actually protects your mac from a whole host of otherwise nasty infections. However, it can sometimes get in the way of doing important mac management tasks.

To disable SIP:

  1. Boot the mac to recovery mode (boot while holding down control-R)
  2. In Terminal enter the command: csrutil disable
  3. Then reboot the mac to it’s normal OS.

Remember to re-enable SIP when you are done by booting back into recovery mode and giving the command: csrutil enable

Mac OS – Kernel Extensions

In 2018 Apple introduced secure kernel extensions to their MacOS. Earlier applications could install kernel extensions without the user knowing or specifically being required to “approve” that extension. Think of kernel extensions like drivers and other very deep operating system code that controls significant parts of the operating system. The increased awareness and security of kernel extensions is/was required because malware had begun to exploit these extensions.

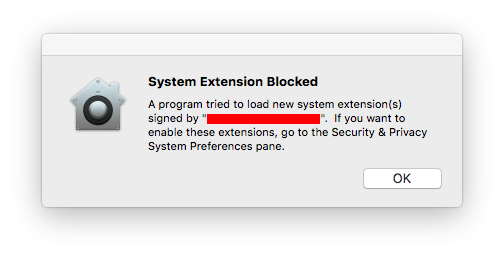
Since about MacOS 10.13.4, any kernel extension had to be “approved” by the administrative user of the mac. In general, users had 30 minutes after software install to “Allow” the installed Kernel Extension in the Security tab in System Preferences with a reboot or reload of the extension resetting that “Allow” clock.

Additionally, Macs that are enrolled in an MDM server can be configured to pre-approve Kernel extensions.

Several things to note:

Kernel Extensions MUST be pre-approved prior to a pushed application install
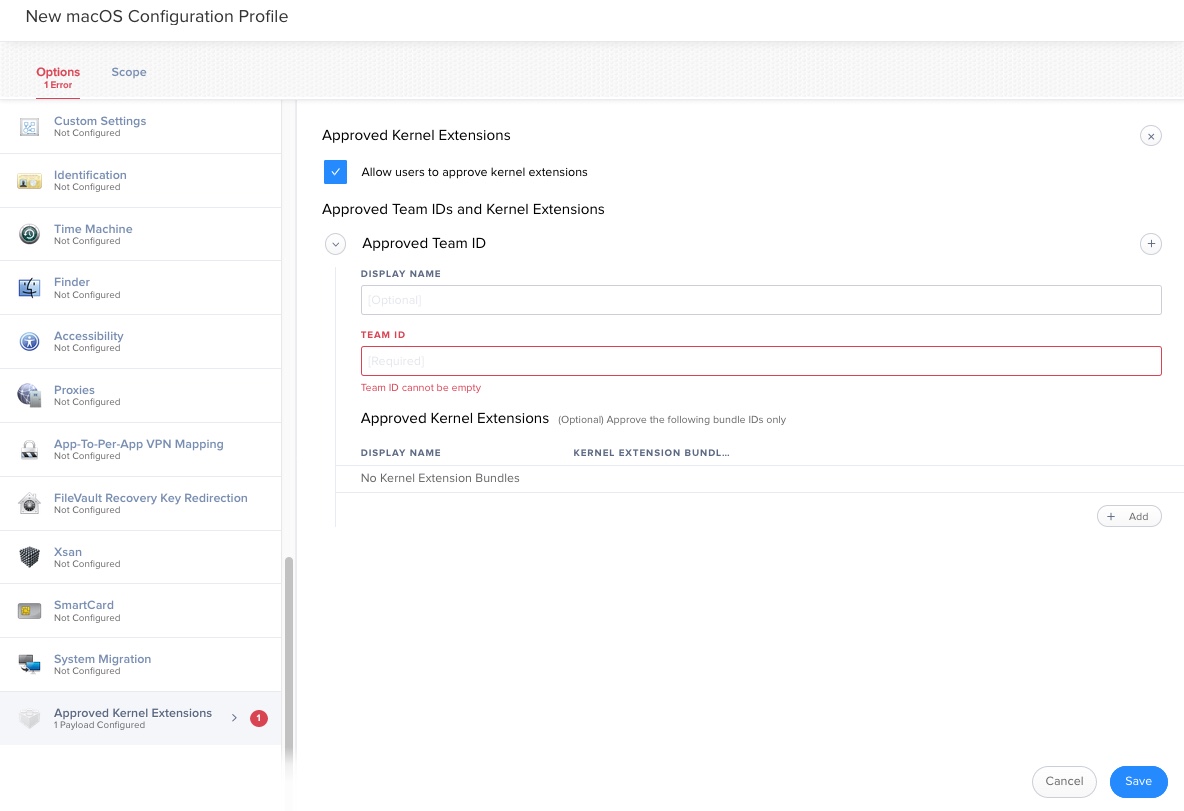
In order to correctly install software that requires kernel extensions using an MDM server like JAMF, you must first pre-approve the kernel extension before installing the software. There isn’t anyway, either manually or automated, to approve a kernel extension after the fact for software installed with the MDM. Conveniently, newer versions of JAMF provide a very easy way to create a configuration profile to approve the kernel extension just with the associated “Team_ID”.

DEP enrolled Macs happy to comply, User-enrolled macs must be sure to “approve” MDM
For MDM controlled macs, only DEP (Device Enrollment Program) enrolled macs can be reliably configured to avoid asking the user to “approve” the kernel Extension. Macs enrolled in the MDM with any other user-controlled enrollment process (i.e. install package, email invite, etc.) can be in a state where the configured pre-approval of kernel extensions will not work. For example, if the user never approved the MDM profile. Look at the Profiles tab in System Preferences.

Pre-approval isn’t installation

You can pre-approve a kernel extension using an MDM server and that will appear in the “Profiles” tab of System Preferences. However, the kernel extension isn’t actually installed until you install it with the installation process from the vendor. Meaning that it won’t show up in the KextStat or Sqlite commands below until it’s actually installed. (That is probably obvious to most but I spent a good 10 minutes on this before it dawned on me!) Pre-approval of the kernel extension essentially avoids asking the user to approve the kernel extension with the 30 minute timer mentioned above. Essentially, the pre-approval process doesn’t load the kernel extension onto the system it just says that once the kernel extension is loaded/installed no additional approval from the user will be needed.

Uninstalling doesn’t remove from sqlite database

When you uninstall a kernel extension, while the extension may be removed the entry in the kextpolicy database is typically not removed. It can become important to remove these database entries. We have found that kernel extensions, even if unapproved, that remain in the kextpolicy database can interfere with the system when new versions of software requiring kernel extensions are installed. Deleting entries from the kextpolicy database can only be done with SIP (system integrity protection) disabled. See below for the details of deleting these database entries.

Some Commands to know:

Kextstat
Displays all running kernel extensions

kextstat | grep -v1 apple
Displays all non-Apple (3rd party) running kernel extensions


/usr/bin/sqlite3 /var/db/SystemPolicyConfiguration/KextPolicy 'SELECT * FROM kext_policy;'

Displays kernel extensions that are installed by the user manually. The returned format begins:
Team_ID | Bundle_ID | Approved (1=approveded, 0=not approved)

/usr/bin/sqlite3 /var/db/SystemPolicyConfiguration/KextPolicy 'SELECT * FROM kext_policy_mdm;'
Displays kernel extensions that are installed by the MDM server as part of a pre-approval process. The returned format begins:
Team_ID | Bundle_ID | Approved (1=approveded, 0=not approved)

To delete a kernel extension from the kextpolicy database: First disable SIP.
Once booted back into the running MacOS:

> sudo -s
# /usr/bin/sqlite3 /var/db/SystemPolicyConfiguration/KextPolicy
sqlite> SELECT * FROM kext_policy;
OR
sqlite> SELECT * FROM kext_policy_mdm;
THEN
sqlite> DELETE FROM kext_policy WHERE team_id = displayed_team_id_from_above;
OR
sqlite> DELETE FROM kext_policy_mdm WHERE team_id = displayed_team_id_from_above;
sqlite> .quit
#
Remember to re-enable SIP!

MacOS – Create a Virtual from a fully loaded Mac

Virtuals are useful for so many things. I often use them to have a clean OS on which to test the installation of various software applications with an extremely fast and reliable way to revert back to the clean OS snapshot.

I recently discovered that using Parallels Desktop Lite (free from the app store) in addition to creating Windows and Linux virtuals on your MacOS host you can also easily create MacOS virtuals.

This Mac on Mac virtualization was documented here:
https://engineering.rallyhealth.com/tools/mac/virtualization/2018/04/27/mac-on-mac-virtualization.html

Using the above as a jumping off point, I was also able to create a MacOS virtual from a disk image of a fully-loaded source Mac using the following steps:

1) Create a basic MacOS virtual (see above) using the same version of the MacOS that is on the source mac. Also, be sure to set the settings to a disk size that will accommodate your disk image. I set my virtual to use 128 GBs since my disk image was close to 95 GBs! I also increased the memory from 2 GBs to 4 GBs at the same time.
2) Complete that entire setup and boot the resulting virtual to ensure it boots!
3) Shutdown that MacOS in that virtual (not suspend, not restart, I mean shutdown!). Use “Shutdown” from the Apple menu!
4) In the Parallels Desktop Lite configuration settings for the virtual you just created, choose to boot the virtual to your bootable, external USB drive that has both the disk image of your source mac and your imaging software of choice (I use Carbon Copy Cloner). Note that I use “read-only, compressed” disk images for this and just about everything else.
5) Once your virtual is booted to your external drive, follow your routine for restoring the disk image to the drive in the virtual. I always completely erase the target drive with something like Disk Utility before restoring a disk image to avoid any strangeness with merged systems!
6) When the restore is complete, shutdown your virtual again.
7) Once again, configure the virtual’s settings, this time to boot to the normal hard disk rather then the external drive that has your imaging software on it.
8) Boot your fully loaded and now virtualized mac desktop!

In my case, I also did a happy dance!