Category Archives: Articles

MacOS – Add Active Domain group to local mac group

In testing, we found that remote connections from windows clients to the built-in macOS VNC server were not encrypted in any way. To resolve this we decided to use RealVNC as the screen sharing server on Macs. Also, since we envision making these remote lab computers available to only a few individuals that have no other way to access critical academic software, I needed a way to restrict which users could authenticate to create the VNC screen sharing sessions.

The following steps are how I enabled this access on our AD joined lab macs where our users are NOT given administrative rights on the macs with the AD join: (This was tested on MacOS 10.14.5 Mojave.)

1) Create the group in your Active Domain using Users and Groups. If you do not have access to AD Users and Groups, talk to your AD domain administrator BEFORE continuing this! Someone needs to be able to add users to the AD group that is created. If that isn’t going to be you figure that out before proceeding! This AD group should be a “global” group. In the example below I have used “LabUsers” as the AD group name.

2) Log into the mac that will be the VNC server with an administrative account.

3) If on, disable the default MacOS screen sharing and remote login in System Preferences.

4) Install RealVNC Server.

5) Create the local mac group. In the example below the local mac group I created was “RemoteUsers”.

6) In the options for the RealVNC server for Users and Permissions, add the local mac group “RemoteUsers” as a group that is authorized to open a screen sharing session. Also, so that you know, in the Security tab of RealVNC server options I use”Mac Password” for the authentication method with encryption “Always on”.

6) Open a Terminal window on the mac and give the following command: (This should NOT be done as super user! I don’t know why but that doesn’t work)

dseditgroup -o edit -n /Local/Default -u localadminusername -p -a "AD_Domaim\LabUsers" -t group RemoteUsers

( In the above command /Local/Default refers to the local directly node for authentication information. Also, the ” ” are required around the AD_Domain\LabUsers so that the \ isn’t interpreted as an escape and with “-p” this will prompt you for the password for your localadminusername which is required )

Note that you may never be able to see this AD group listed as a member of the local mac group! All I ever got was the above command to run without any errors or feedback.

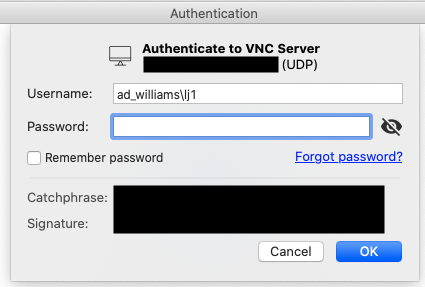
7) Once the command above completes without error, only those AD users that are listed in the AD group should be able to authenticate to the VNC server using the username format below.  All other users of the mac that would generally be able to log into the mac but that are not in the AD group, will get an “Access Denied” message when attempting to open the screen sharing connection.
Other useful commands: (using “RemoteUsers” as the example local mac group name)

To list local mac group membership: (this will not list the AD group! If you know of another way, please let me know!)
dscl . read /Groups/RemoteUsers GroupMembership

To list local mac Group properties:
dscl . -read /Groups/RemoteUsers

When researching this I found this post particularly useful:
https://blog.travismclarke.com/post/osx-cli-group-management/

Windows 10 – Creating Image for Windows to Go external disks

In 2018 we started using “Windows to Go” on externally boot-able disks to provide the “windows” half of a dual-boot mac. To make this work you need to do the following …

1) Purchase really fast external SSD drives of sufficient size. We choose 250 GBs Samsung T3 drives like:
https://www.samsung.com/us/computing/memory-storage/portable-solid-state-drives/portable-ssd-t3-250gb-mu-pt250b-am/

2) Create your windows environment on a computer that has a removable internal SSD drive. Check this carefully before you begin as most new hardware is coming with SSD system drives soldered to the motherboard! Also be sure that your image is “sysprepped”! See additional tips on preparing a system for imaging/cloning at: https://sites.williams.edu/lj1/labs/windows-10-imagining-tips/

3) Once sysprep has run and shutdown the system, remove the internal hard drive from the computer. Using a sata to usb hard drive docking station like: https://www.amazon.com/s?k=sata+to+usb+Hard+Drive+Docking+Station&i=electronics&ref=nb_sb_noss_2
Mount the sysprepped, internal drive on a different computer that has Microsoft WAIK installed. (Use the version of WAIK that matches the Windows version you are cloning!)

4) Attach another external SSD drive just regularly formatted for windows data. This will be a “Scratch” drive.

5) Run Windows update on your computer for any updates that could interrupt your process!

6) Set your Power and Sleep settings to NEVER sleep either computer or display. This process can take a long time!

7) Now determine all your drive letters. I will use C:\ for the current system where everything is attached, E:\ for the internal drive to take an image from in the drive dock, and S:\ for the scratch disk.

8) Create some directories. You will want to create:
C:\MyImageDir …. to receive the wim image you will be creating
S:\Scratch …. to hold the scratch files

9) With WAIK installed, the internal drive from your system to be cloned, and your scratch drive all attached ….
Find the Windows Kits in the Start Menu then open “Deployment and Imaging Tools Environment” with right-click and “Run as Administrator”. This opens a command window with elevated privileges.

10) To create the wim image in the opened command window you opened above, enter this command:

DISM /Capture-image /ImageFile:C:\MyImageDir\MyImage.wim /CaptureDir:E:\ /Name:"SomeNameForMyImage" /ScratchDir:S:\Scratch\

11) Wait a really, really long time ! Eventually you will see “Saving Image …” with a percentage in that command window.

12) Once that wim image is complete, you can use it as input to the Windows To Go disk creation process.

Windows – Windows 10 LTSC 2019 different versions

Apparently, there are a couple of different versions of Windows 10 LTSC (named recently changed from LTSB).  The “N” version is for European Union countries effected by anti-trust court cases. the “KN” version is for Korea.

See more details at:

https://www.itprotoday.com/windows-10/what-are-windows-10-n-and-kn-editions

MacOS – Create a Virtual from a fully loaded Mac

Virtuals are useful for so many things. I often use them to have a clean OS on which to test the installation of various software applications with an extremely fast and reliable way to revert back to the clean OS snapshot.

I recently discovered that using Parallels Desktop Lite (free from the app store) in addition to creating Windows and Linux virtuals on your MacOS host you can also easily create MacOS virtuals.

This Mac on Mac virtualization was documented here:
https://engineering.rallyhealth.com/tools/mac/virtualization/2018/04/27/mac-on-mac-virtualization.html

Using the above as a jumping off point, I was also able to create a MacOS virtual from a disk image of a fully-loaded source Mac using the following steps:

1) Create a basic MacOS virtual (see above) using the same version of the MacOS that is on the source mac. Also, be sure to set the settings to a disk size that will accommodate your disk image. I set my virtual to use 128 GBs since my disk image was close to 95 GBs! I also increased the memory from 2 GBs to 4 GBs at the same time.
2) Complete that entire setup and boot the resulting virtual to ensure it boots!
3) Shutdown that MacOS in that virtual (not suspend, not restart, I mean shutdown!). Use “Shutdown” from the Apple menu!
4) In the Parallels Desktop Lite configuration settings for the virtual you just created, choose to boot the virtual to your bootable, external USB drive that has both the disk image of your source mac and your imaging software of choice (I use Carbon Copy Cloner). Note that I use “read-only, compressed” disk images for this and just about everything else.
5) Once your virtual is booted to your external drive, follow your routine for restoring the disk image to the drive in the virtual. I always completely erase the target drive with something like Disk Utility before restoring a disk image to avoid any strangeness with merged systems!
6) When the restore is complete, shutdown your virtual again.
7) Once again, configure the virtual’s settings, this time to boot to the normal hard disk rather then the external drive that has your imaging software on it.
8) Boot your fully loaded and now virtualized mac desktop!

In my case, I also did a happy dance!

JAMF – Create Mac OS to deploy

To create an OS package to deploy one could:
1) download the OS installer from the App Store
2) this will put the installer in the /Applications folder
3) once the installer is completely downloaded it will start automatically so “quit” the installer from the file menu
4) Open AutoDMG and drag the installer from the /Applications folder to the AutoDMG window.
5) Add applications like GarageBand, iMovie, Keynote, Numbers, and Pages which are pre-installed on all new Macs but are left out of the Mac OS installer for some reason
6) Build the configuration to save the DMG file
7) Open Casper Admin and drag that DMG file into the window
8) Set the package priority to 1 so it installs first
9) Create a new configuration with this OS install and other things like casper enrollment

A helpful website with pictures is available at:
http://www.theinstructional.com/guides/build-deploy-os-x-images-with-autodmg