Tag Archives: Windows to Go

Windows – Windows to Go – Portable Windows on an external disk

“Windows To Go” is a portable windows environment that Microsoft developed. While Microsoft says they are no longer developing this, it is still available for use on recent versions of windows 10. For the Microsoft overview see: https://docs.microsoft.com/en-us/windows/deployment/planning/windows-to-go-overview

I have used this to specifically create “portable” windows environments that boot most hardware from an external SSD drive. I say portable meaning that with “windows to go”, the windows OS installed on the external drive drops back into a setup mode when it detects that it is being booted on different hardware. This setup mode at boot time then tries to bring in the needed hardware drivers auto-magically for the new hardware this disk is being booted on. This is largely successful on most hardware as long as the network driver is sufficient to get a network connection. I have booted the very same Windows to Go disk without having to install anything new on Dell precisions, Dell optiplexes, Apple iMacs, Apple mac minis, Apple Mac Pros, etc.

While there is a built in process to create a “Windows to Go” disk in Windows 10 (type “Windows to Go” in the start menu search box), I have most recently been using the free utility Rufus to build these disks directly from our institutional windows ISO. Rufus can be found at: https://rufus.ie/ and below is a screen shot of the settings I have been using.

You will also need a copy of the Windows ISO for your institution, and, if applicable, your windows activation key. (We use KMS servers at Williams to serve our Windows and other MS software license activations so we don’t need to hand out the windows activation keys!)

Anyway, with Rufus, your Windows ISO, and a fast external SSD drive (Samsung T3) use these settings to create your portable windows environment on a bootable external disk:
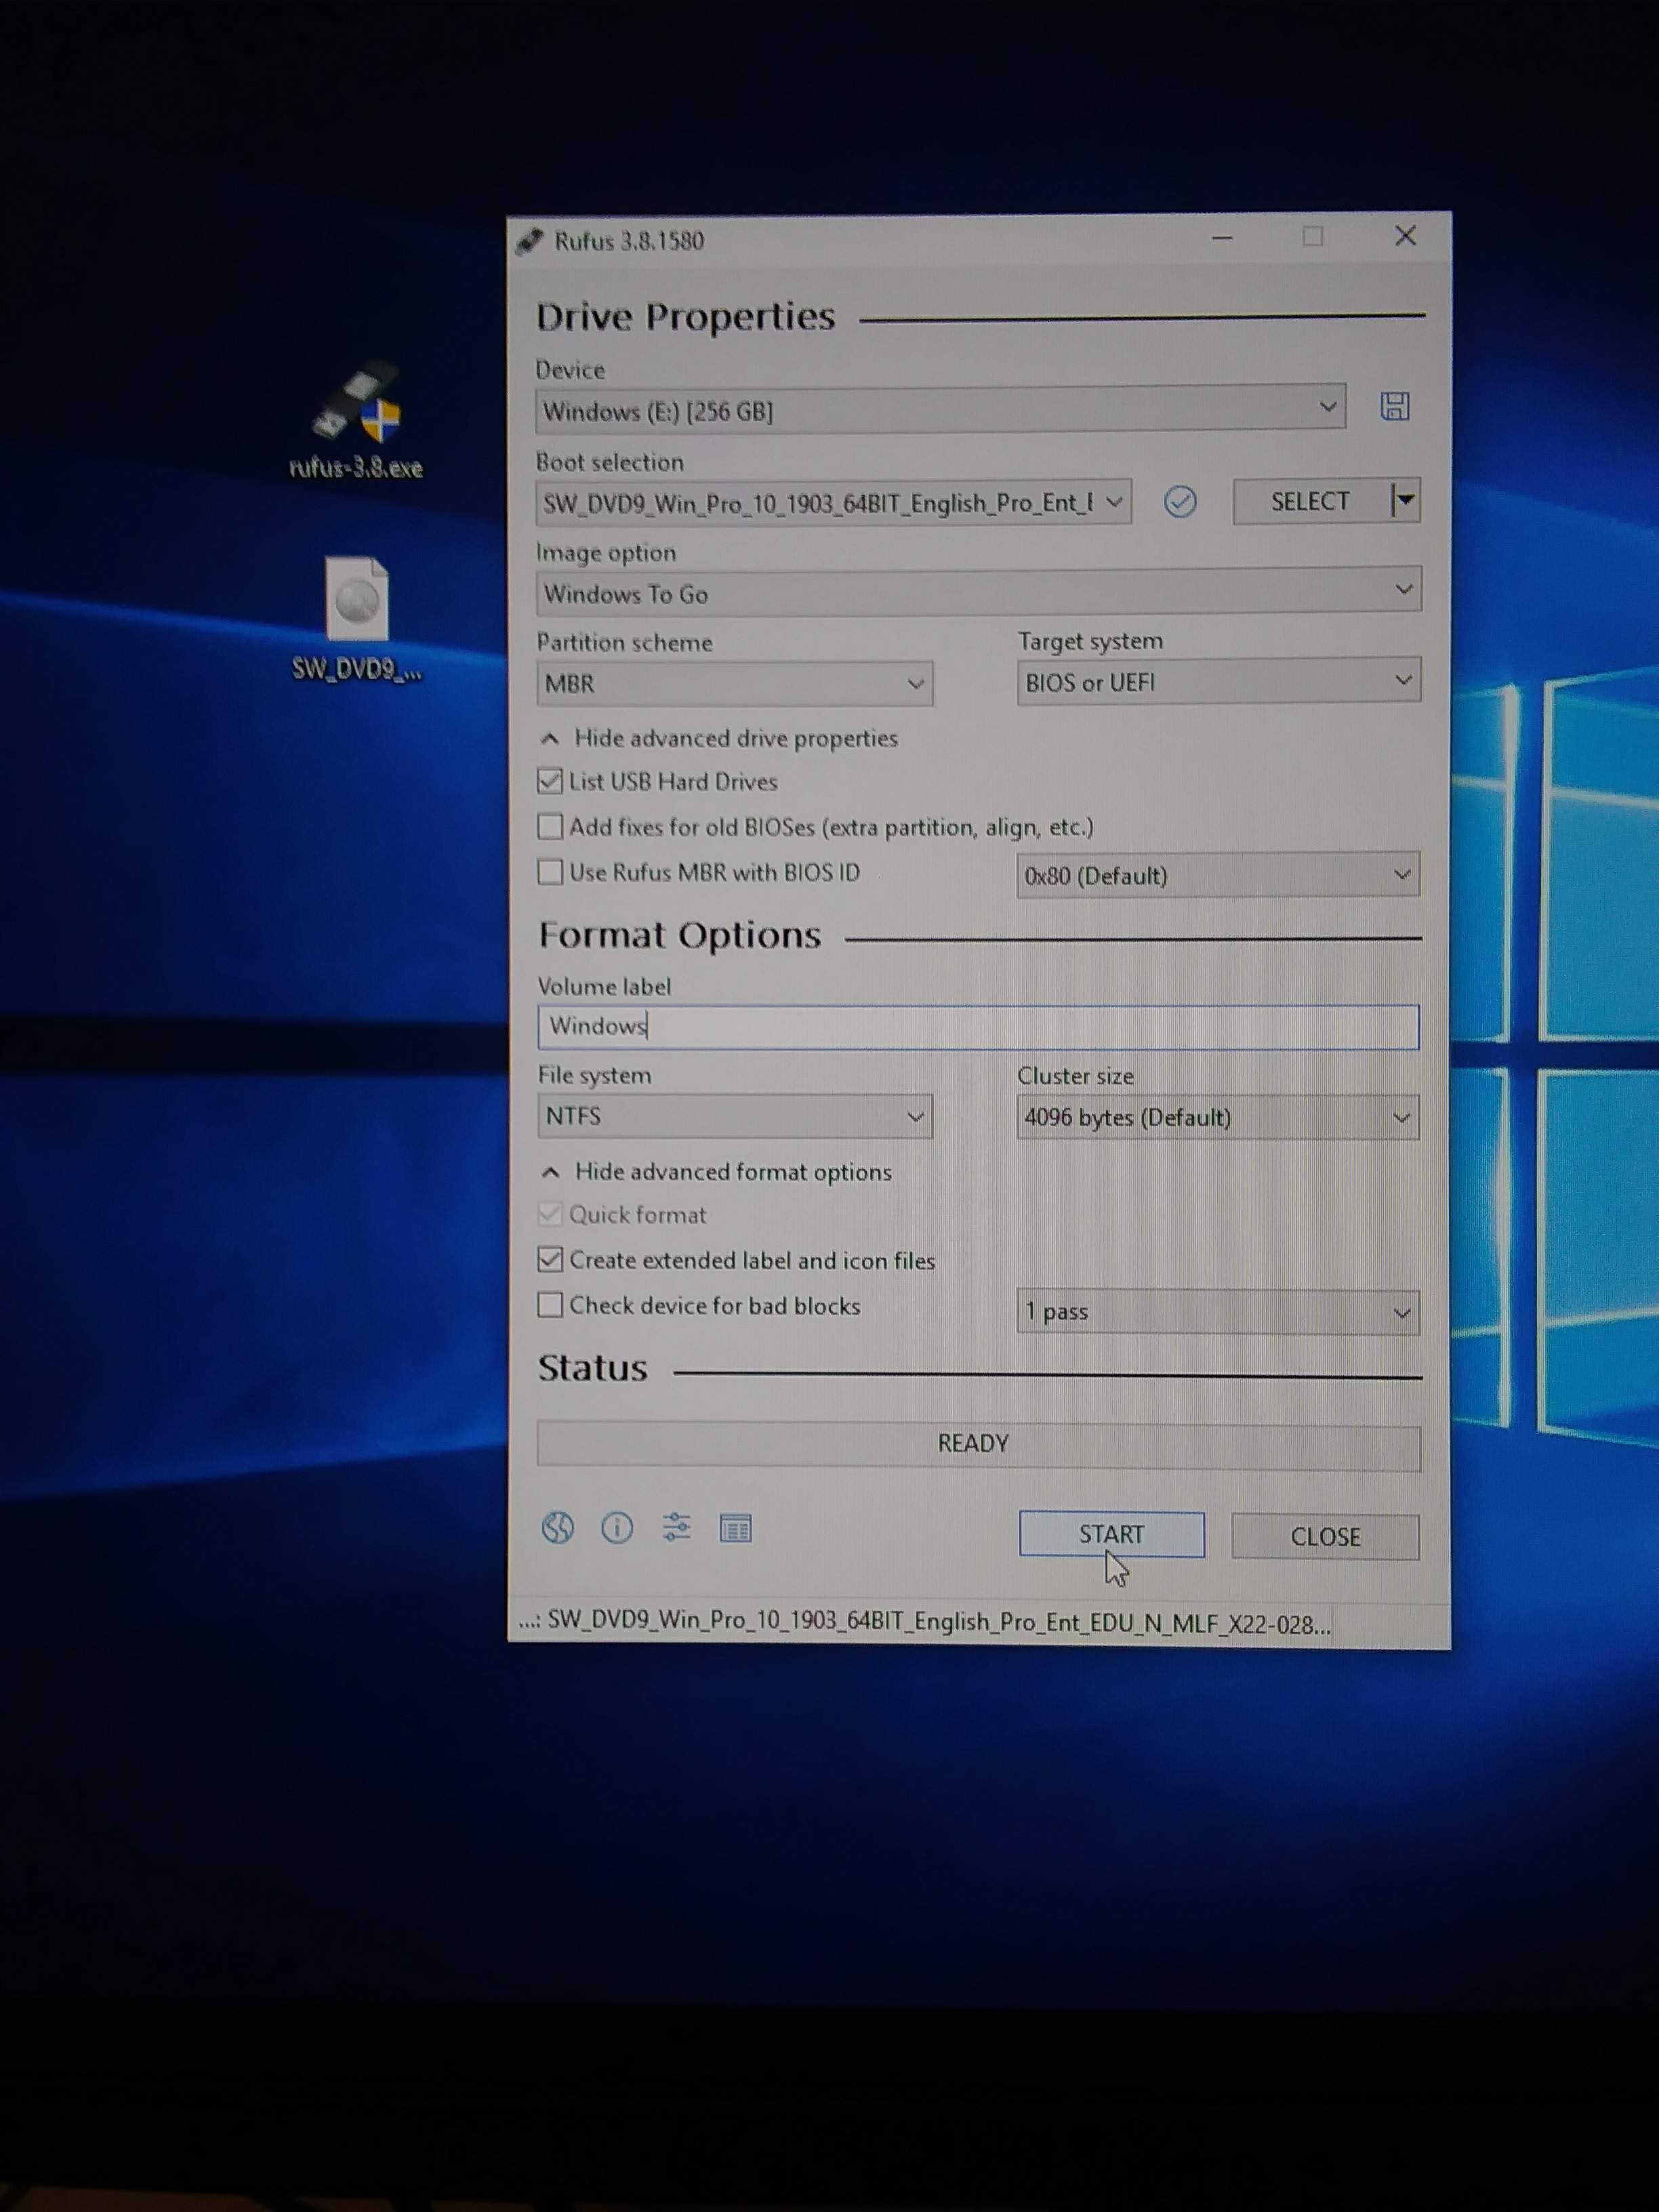
Windows 10 – Creating Image for Windows to Go external disks

In 2018 we started using “Windows to Go” on externally boot-able disks to provide the “windows” half of a dual-boot mac. To make this work you need to do the following …

1) Purchase really fast external SSD drives of sufficient size. We choose 250 GBs Samsung T3 drives like:
https://www.samsung.com/us/computing/memory-storage/portable-solid-state-drives/portable-ssd-t3-250gb-mu-pt250b-am/

2) Create your windows environment on a computer that has a removable internal SSD drive. Check this carefully before you begin as most new hardware is coming with SSD system drives soldered to the motherboard! Also be sure that your image is “sysprepped”! See additional tips on preparing a system for imaging/cloning at: https://sites.williams.edu/lj1/labs/windows-10-imagining-tips/

3) Once sysprep has run and shutdown the system, remove the internal hard drive from the computer. Using a sata to usb hard drive docking station like: https://www.amazon.com/s?k=sata+to+usb+Hard+Drive+Docking+Station&i=electronics&ref=nb_sb_noss_2
Mount the sysprepped, internal drive on a different computer that has Microsoft WAIK installed. (Use the version of WAIK that matches the Windows version you are cloning!)

4) Attach another external SSD drive just regularly formatted for windows data. This will be a “Scratch” drive.

5) Run Windows update on your computer for any updates that could interrupt your process!

6) Set your Power and Sleep settings to NEVER sleep either computer or display. This process can take a long time!

7) Now determine all your drive letters. I will use C:\ for the current system where everything is attached, E:\ for the internal drive to take an image from in the drive dock, and S:\ for the scratch disk.

8) Create some directories. You will want to create:
C:\MyImageDir …. to receive the wim image you will be creating
S:\Scratch …. to hold the scratch files

9) With WAIK installed, the internal drive from your system to be cloned, and your scratch drive all attached ….
Find the Windows Kits in the Start Menu then open “Deployment and Imaging Tools Environment” with right-click and “Run as Administrator”. This opens a command window with elevated privileges.

10) To create the wim image in the opened command window you opened above, enter this command:

DISM /Capture-image /ImageFile:C:\MyImageDir\MyImage.wim /CaptureDir:E:\ /Name:"SomeNameForMyImage" /ScratchDir:S:\Scratch\

11) Wait a really, really long time ! Eventually you will see “Saving Image …” with a percentage in that command window.

12) Once that wim image is complete, you can use it as input to the Windows To Go disk creation process.

Windows 10 – Windows To Go Enterprise Deployment Steps

Using a “Windows To Go” USB boot disk to provide course-specific windows programming environments

Microsoft’s overview is at: https://technet.microsoft.com/en-us/library/hh831833(v=ws.11).aspx

In the Fall of 2016 – Williams will be piloting one computer science programming course using windows to go drives.
In the Fall of 2018 – Williams also began using these to “Dual-Boot” macs!

To create the environment:

1) A very fast read/write USB drive is needed. In the above link Microsoft recommends certain devices, we used the Samsung T3 250 GB portable drives.

2) Create a windows to go drive using the windows to go control panel on any windows 10 computer. You can point this at a WIM file you created from a syspreped windows environment.

  • Do not encrypt the drive and do not set it to boot automatically

3) Once complete, boot that created disk on any device like an iMac.

For other ideas on deployments see the website at:
https://technet.microsoft.com/en-us/itpro/windows/deploy/deploy-windows-to-go