I recently came across a useful post to help diagnose when a mac doesn’t boot properly.
For the full link see: https://eclecticlight.co/2018/09/18/diagnosing-a-mac-which-cant-complete-booting/
Here is the extracted diagram:
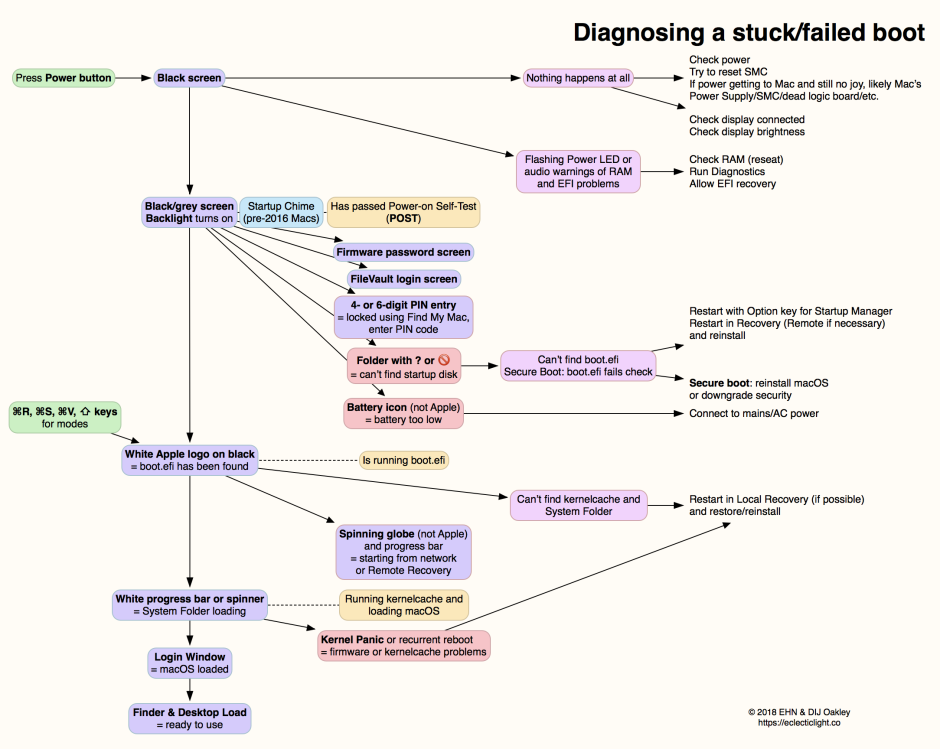
I recently came across a useful post to help diagnose when a mac doesn’t boot properly.
For the full link see: https://eclecticlight.co/2018/09/18/diagnosing-a-mac-which-cant-complete-booting/
Here is the extracted diagram:
The process we have been using to boot Dells to the K2000 imaging server requires PXE boot in “Legacy” boot mode. The optiplexes we received in the summer of 2017 came with “Secure boot enabled” and UEFI boot set in the BIOS. The following three BIOS settings had to be changed to get those models to boot PXE to the K2000 deployment server:
— Disable “Secure Boot” — (you may need to reboot to have this setting apply)
— Enable “Legacy ROM” —
— Select Legacy Boot not UEFI Boot —
To quote from the link below:
Bootability comes down to a few simple rules:
See the complete info at:
http://www.bombich.com/software/docs/CCC/en.lproj/troubleshooting/what-makes-a-volume-bootable.html
Sometimes, particularly on dual-boot macs, it is important to be able to set the boot volume from the mac command line. (Think Apple Remote Desktop!)
The command to do this as root is:
/usr/sbin/bless --device /dev/disk0s3 --setBoot --legacy
For details see:
http://hints.macworld.com/article.php?story=20110601220925705
It is always advisable to build images on the most recent mac hardware you have. Once in a while it is necessary to temporarily apply an “old” image to new mac hardware …
First, update the image to the most recent system update on old hardware. Then once you apply that image to the new hardware, if it doesn’t boot the new system, insert the hardware specific Mac OS installation DVD that came with them mac and boot it by holding down the “C” key while booting. Run the system installation to completion normally but without erasing the hard drive if that is part of your normal process.
Once complete your system should boot and should contain most of the software and data that you had on the “old” image. What will be missing are any modifications you made to system files such as those in /System/Library.
Why?
The mac is a file-based operating system. Meaning that everything is contained in discrete files. Reinstalling the hardware specific OS over the top of an existing OS, copies in any of the hardware-specific files needed for your new mac but doesn’t touch any of the non-system files already on the drive.
To create a bootable external driver for a mac follow the following steps …
* With Disk Utility – Partition the attached USB drive as one “GUID” partition. This setting is found in the “Options” button in the partition window. Name the partition something like “External Drive” so that it is easy to recognize later …
* Using a “retail” copy of the Mac OS installation disk, install the mac OS to this new disk
— A retail copy of the OS is important so that the new disk can boot all current mac hardware* Once the OS is installed, boot to the attached hard drive by holding down the “Option” key and selecting the external drive to boot from. (if you’ve named it “Macintosh HD” like your internal hard drive this may be a bit tricky … )
* Run Software Updates while booted to the external drive and add any additional applications or data you want.
I frequently create external boot disks so that I can “image” computers. One imaging tool is Carbon Copy Cloner.
You must download and install the correct version of the Windows 10 WAIK to create a WinPE installation environment. You should use the version of the WAIK that matches the version of windows you intend to install. This will install as a “Windows Kit” and includes a command-line interface called “Deploying and Imaging Tools” to run the commandd below. Be sure to open that command line with “run as admin” or the commands below will not work.
Also note that as part of the WAIK kit you get the “Windows System Image Manager” application which is used to create/update sysprep answer files used in the image preparation process.
Also, before getting started, however, you need to collect the drivers you will need in your boot environment into a single directory (my example below uses C:\Lab_x86_Drivers\ — the “x86” gives away the fact these are 32-bit drivers). Download the drivers you need to a temp directory one at a time. Then in that temp directory, expand the drivers. Since these are not drivers for the system you are building this on you should not expand these in the dell/drivers folder for example. Also, when the installation process starts – cancel it immediately. You’ll be left in that temp directory with the expanded, unzipped drivers which you should then move to your drivers directory of something like C:\Lab_x86_Drivers\. I keep individual drivers separated in different folders within this one root fold. The command below to incorporate the drivers into you boot environment will recurse the entire driver folder structure to find all the drivers you have stored there.
NOTE: Lines that begin with # are comments, all other lines are commands that you give in the command window opened as described above …
# Lynna Jackson’s – WinPE – Pre-Install Boot Environment build steps – 2017
# Creates USB and or CD bootable devices with custom menu
# Download and install windows 10 WAIK from microsoft
# Open Deployment Tools command prompt with admin privs# This creates a 32-bit boot environment which is needed for Ghost
# this is not an executable batch file ….
# execute commands below in order by manually copy/paste to the deployment tools cmd windows# Clean-up any left over crap
DISM /Cleanup-Wim# remove c:\winpe_x86 directory
rmdir /S c:\winpe_x86# creates/recreates a clean winpe_x86 directory at c:\ and copies winpe files into place
copype.cmd x86 c:\winpe_x86# mount the winpe wim file
Dism /Mount-Wim /WimFile:C:\winpe_x86\media\sources\boot.wim /index:1 /MountDir:C:\winpe_x86\mount# check on the packages loaded
Dism /image:c:\winpe_x86\mount /Get-Packages# Find and copy cab files – inthe windos 10 aik these were in:
# C:\Program Files (x86)\Windows Kits\10\Assessment and Deployment Kit\Windows Preinstallation Environment\x86\WinPE_OCs”
# copy the specifc cabs you need to the c:\lj1_winpe\windows10cabs\ folder# then add packages to the mounted image
Dism /image:C:\winpe_x86\mount /Add-Package /PackagePath:C:\LJ1_WinPe\windows10cabs\WinPE-HTA.cab
Dism /image:C:\winpe_x86\mount /Add-Package /PackagePath:”C:\LJ1_WinPe\windows10cabs\WinPE-HTA_en-us.cab”
Dism /image:C:\winpe_x86\mount /Add-Package /PackagePath:”C:\LJ1_WinPe\windows10cabs\WinPE-WMI.cab”
Dism /image:C:\winpe_x86\mount /Add-Package /PackagePath:”C:\LJ1_WinPe\windows10cabs\WinPE-WMI_en-us.cab”
Dism /image:C:\winpe_x86\mount /Add-Package /PackagePath:”C:\LJ1_WinPe\windows10cabs\WinPE-WDS-Tools.cab”
Dism /image:C:\winpe_x86\mount /Add-Package /PackagePath:”C:\LJ1_WinPe\windows10cabs\WinPE-WDS-Tools_en-us.cab”
Dism /image:C:\winpe_x86\mount /Add-Package /PackagePath:”C:\LJ1_WinPe\windows10cabs\WinPE-Scripting.cab”
Dism /image:C:\winpe_x86\mount /Add-Package /PackagePath:”C:\LJ1_WinPe\windows10cabs\WinPE-Scripting_en-us.cab”# check on the drivers loaded
Dism /image:c:\winpe_x86\mount /Get-Drivers# add drivers – (This is a 32-bit boot environment so you need 32-bit drivers … )
Dism /image:C:\winpe_x86\mount /Add-Driver /Recurse /driver:C:\lj1_winPe\x86_Drivers\# add custom scripts
xcopy /e /y “C:\lj1_winPe\Lab_winpe_scripts” C:\winpe_x86\mount\Windows\System32\# increase ram disk scratch space for application
dism /image:c:\winpe_x86\mount /Set-ScratchSpace:512# set the time zone
dism /image:c:\winpe_x86\mount /set-timezone:”Eastern Standard Time”# unmount win_pe image and commit changes
Dism /Unmount-Wim /MountDir:C:\winpe_x86\mount\ /Commit# copy customized winpe boot environment
copy c:\winpe_x86\winpe.wim c:\winpe_x86\ISO\sources\boot.wim /Y# create the ISO for the boot disk
oscdimg -n -bc:\winpe_x86\fwfiles\etfsboot.com c:\winpe_x86\media c:\winpe_x86\winpe_x86.iso# burn iso to cd
# and/or mount iso to copy contents to bootable USb devices (see notes below to format correctly)
# copy the ISO contents to formated USB stick (see notes about diskpart format below)
xcopy [mounted iso directory]*.* /e f:\# copy the ISO contents to the saved location on your hard drive to keep it safe
# the winpe_x86 directory is erased and recreated each time you run this process
copy c:\winpe_x86\winpe_x86.iso c:\lj1_WinPE\=======================================
Formatting a USB stick to make it bootable …
C:\diskpart
Microsoft DiskPart version 6.1.7600
Copyright (C) 1999-2008 Microsoft Corporation.
On computer: LAB-WIN7-DEVDISKPART> list disk
Disk ### Status Size Free Dyn Gpt
——– ————- ——- ——- — —
Disk 0 Online 149 GB 0 B
Disk 1 Online 1928 MB 0 BDISKPART> sel disk 1
Disk 1 is now the selected disk.
DISKPART> clean
DiskPart succeeded in cleaning the disk.
DISKPART> create parti prim
DiskPart succeeded in creating the specified partition.
DISKPART> active
DiskPart marked the current partition as active.
DISKPART> format fs=NTFS quick
100 percent completed
DiskPart successfully formatted the volume.
DISKPART> assign
DiskPart successfully assigned the drive letter or mount point.
DISKPART> exit
Leaving DiskPart…
To create a bootable, external USB device (hard drive or thumb drive) consider the following steps … WARNING: It is possible to format ANY drive with this process so be absolutely sure you target the correct drive!
C:\> diskpart
Microsoft DiskPart version 6.1.7600
Copyright (C) 1999-2008 Microsoft Corporation.
On computer: LAB-WIN7-DEVDISKPART> list disk
Disk ### Status Size Free Dyn Gpt
——– ————- ——- ——- — —
Disk 0 Online 149 GB 0 B
Disk 1 Online 1928 MB 0 BDISKPART> sel disk 1
Disk 1 is now the selected disk.
DISKPART> clean
DiskPart succeeded in cleaning the disk.
DISKPART> create parti prim
DiskPart succeeded in creating the specified partition.
DISKPART> active
DiskPart marked the current partition as active.
DISKPART> format fs=NTFS quick
100 percent completed
DiskPart successfully formatted the volume.
DISKPART> assign
DiskPart successfully assigned the drive letter or mount point.
DISKPART> exit
Leaving DiskPart…
Once the disk is formatted you have to install a windows operating system on it for it to actually be bootable. Most often I am creating such external bootable media so that I can “image” the computers I boot. In this case a full blown version of Windows is unnecessary. Instead, I create a “windows pre-install” boot environment using Microsoft’s Windows Automated Installation Kit or WAIK for short.