Tag Archives: Image

MacOS – Creating a clean initial image

To create a “clean” image –

Basic goal – you don’t want anything except the basic MacOS installed. So be certain that the mac serial number is not scoped to a JAMF pre-stage enrollment. You don’t want JAMF to install or anything else to install.

Take a mac out of shrink wrap (or use internet recovery (cmd-opt-R) to erase the internal hard drive and re-install a Mac OS).

Let the MacOS setup run and disable (or not enable) everything you can. Create an admin account that you want to use for all computers this will go on.

Run system updates and update all MacOS software.

If they are not installed, install iMovie, Pages, Keynote, Numbers, and GarageBand. Run GarageBand to make sure the required Apple Loops are downloaded and indexed.

In a terminal window switch to root (sudo -s) and give the following commands:

  • systemsetup -setcomputersleep 120
  • systemsetup -setdisplaysleep 120
  • systemsetup -setremotelogin on
  • softwareupdate –schedule off

These commands are useful when remotely connecting to the mac after imaging.

Once done, shutdown (not reboot) the mac. Then boot to an external disk that is loaded with the same or greater version of the MacOS and run an up-to-date cloning application like Carbon Copy Cloner. Take a read-only, compressed image of the internal hard drive “Macintosh HD”. Copy this into your image distribution system.

Since MacOS 10.13 – High Sierra – You must use an image taken from an APFS formatted drive to “image” other APSF drives. Likewise, use an image taken from an HFS drive for HFS drive imaging.

Also, you can not simply image an MacOS 10.12 or lower with a MacOS 10.13 image. The MacOS 10.12 mac must fist run the native MacOS 10.13 installer from Apple. That installer both installs firmware required for booting a 10.13 system and formats the drive as APFS or not depending on drive type. All SSDs are formatted to APFS without option. As of 10.13.5, Fusion drives and HDD drives are left as HFS.

Mac – 10.13.4 – Wipe and clean install of OS

On a mac that is already running 10.13.4 and that has an APFS drive you can wipe the drive and reinstall the OS without having to boot to anything external, external drive or netboot.

Get the MacOS 10.13.4 (or better) installer from the app store and put it in your /Applications folder. This is were it goes by default if you download it. Then give the following command and sit back:

/Applications/Install\ macOS\ High\ Sierra.app/Contents/Resources/startosinstall --applicationpath /Applications/Install\ macOS\ High\ Sierra.app --eraseinstall --agreetolicense --nointeraction

“–eraseinstall” is new in MacOS 10.13.4 and will ERASE the hard drive before installing the OS again.

“–nointeraction” is undocumented but causes this command to run without human intervention (and therefore can not be interrupted!)

This will but the mac back in the out-of-box shrink wrapped state with an erased drive just like the internet recovery process can do.  Once back to being shrink wrapped, you can, for example, let it run through your JAMF pre-stage enrollment process.

More details at: https://support.apple.com/en-us/HT208533

Windows – Creating a Sysprep answer file

Sysprep allows you to image a customized windows installation and “clone” that to other similar systems.  It is described in detail by Microsoft at: https://docs.microsoft.com/en-us/windows-hardware/manufacture/desktop/sysprep–system-preparation–overview

I have always used sysprep answer files when using sysprep. The process to create these answer files is a bit obtuse.

You first need to install the Windows WAIK that matches the version of windows you intend to image.  This installs as a windows kit and includes the “Deployment and Imaging Tools” command line need to create a WinPE installation environment.

You also need a copy of the installer for the windows version you intend to deploy on a burned DVD.

Then with the windows installer DVD in the drive, open the “Windows System Image Manger” in the Windows WAIK kit.

Now the trick to creating a good sysprep file is to ONLY include the components and packages from the windows installation DVD in the answer file that you absolutely need (There are thousands of components!). See the Sysprep best practices at: https://docs.microsoft.com/en-us/previous-versions/windows/it-pro/windows-8.1-and-8/hh825023(v=win.10)

Basically, you should expend out the components in the DVD in the bottom left window above.  Select the ones you really need and drag copy them into the sysprep step in the middle of the window above you want them in. Then once they are there, one can set the settings or parameters as you need to.

The complete sysprep technical reference is at: https://docs.microsoft.com/en-us/previous-versions/windows/it-pro/windows-8.1-and-8/hh825209(v=win.10)

There are also many examples of creating sysprep answer files on many different websites.  One that is a little older is at: http://sybaspot.com/the-complete-guide-to-preparing-a-windows-7-deployment-image-using-audit-mode-and-sysprep-with-an-unattend-xml-answer-file/

It is important in any of these to not blindly copy the sysprep settings that other people use.  You need to review the required settings and select only the optional ones you really need.  (For Williams College people – get a copy of the sysprep files that Lynna has on the winlab file server that netsys maintains at: \\winlab\images\Lab Image Work\Sysprep\).

Once you have a sysprep file you think you want to test load your windows version on a clean system.  Then:

Before sysprepping a computer make a backup image!
Incorrect Sysprep answer files can and often do result in an unbootable/unfixable windows install.

Be sure to completely shutdown the computer (not just reboot)

If using “CopyProfile” —- Log into the ProfileUser account and set it up the way you want it. Do not log into any other accounts.
(If you do log into other accounts you should shutdown the system completely before continuing to sysprep.)

Make sure the correct sysprep answer file is copied to “c:\windows\system32\sysprep\unattend.xml”

From the ProfileUser account:
Right click on cmd.exe and select “run as administrator” (type “cmd.exe” in the search windows)

Then use these commands:

cd c:\windows\system32\sysprep

sysprep /generalize /oobe /shutdown /unattend:c:\windows\system32\sysprep\unattend.xml


Since it can be a vector to compromise windows system security, After deploying computers using a sysprep answer file, a post-cloning task should be to remove the sysprep answer file from the cloned systems

Mac High Sierra – Imaging APFS formatted disks

Back when High Sierra (MacOS 10.13) was coming out we were all told that disk imaging would be dead because of the new APFS disk format.  And, while It is true that you can not/should not apply a High Sierra disk image to a Mac running an older OS and hope for that to boot correctly, apparently you can “image” a High Sierra disk and apply it to another Mac that has already been upgraded to High Sierra.

First things first – 

To upgrade a Mac to High Sierra you have to run the “Install High Sierra” update.  This is available from the App Store which places a copy of the install app in the Applications folder.  You can copy that to however many Macs you need to update. That update not only upgrades the OS but it also applies firmware that High Sierra needs to boot properly and, if the Mac has an SSD, if converts the disk format to APFS.

You will need to do this upgrade on all the Macs you will use in this process.  In other words, to take an image of an APFS High Sierra Mac you must be booted to an external drive or some other system that is also a High Sierra APFS formatted drive.

Next prepare your image –

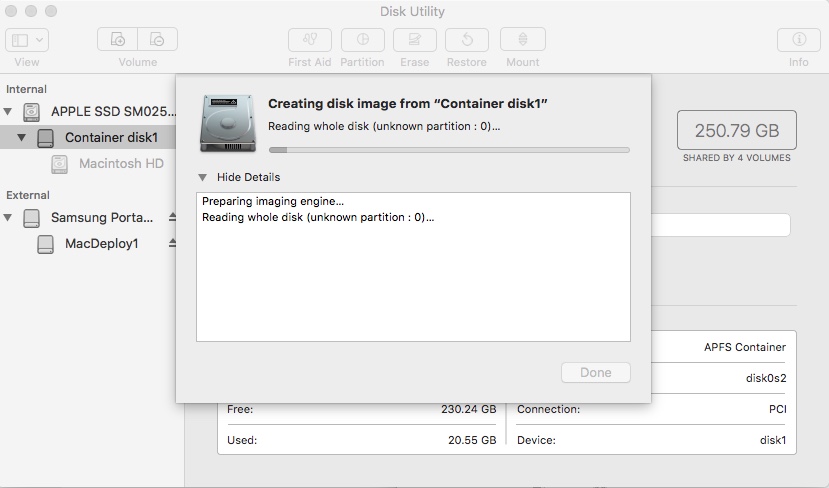
Using a Mac that has already been updated to High Sierra, do an internet recovery (hold command-R at boot) to first erase the hard drive and then reinstall the MacOS.  This gives you a completely clean copy of High Sierra.  You will then want to configure that as minimally as possible. Once configured, boot to an external drive with an up-to-date version of High Sierra installed and run Disk Utility.

In Disk Utility, click on View to “Show all Devices”. Then right-click on “container disk1” and select “Image …” ..

Once the image is created, transfer that to your JAMF server (or other image deployment server) and let it rip ….

A couple of final notes:

  • If you are like me and will have both APFS formatted and HFS+ (non-ssd) drives, you will need to take a similar image in the same way from a Mac with the legacy HFS+ drive format as well.  Apply the APFS image to APFS-only drives and HFS+ to your HFS+ drives.


Windows 10 – Prepare a system for cloning/Imagining with CopyProfile


My steps to prepare a Windows 10 system for cloning/imaging with COPYPROFILE:

Note: I make no claim that this is the recommended Microsoft way, I can only say this process worked for me!

  • I used a clean install on a formatted hard drive (custom install)
  • I choose the LTSB “servicing branch” for my highly controlled/managed computer lab environment. See the different servicing branches of windows 10 at: https://technet.microsoft.com/en-us/itpro/windows/manage/introduction-to-windows-10-servicing
  • I created a new windows 10 sysprep file from scratch that included the “COPYPROFILE” setting. (Specifically, I did’t have success using an upgraded windows 7 answer file. To create the sysprep answer file I used the windows 10 ADK and my windows 10 install media from step 1)
  • After I did the clean windows install, I installed the drivers for my hardware and then set the computer “sleep” value to never sleep, finally I let the computer sit for a week collecting windows updates. (I found the default “sleep” value is very low and in my experience that sleep state was preventing windows updates from completing! )
  • I created three administrative accounts. One for post-deployment automated scripts and management control. Another account for manual “admin” access when needed. The third admin account I used to create the default user profile so this was my “profile” account.
  • I logged into the “profile” admin account and set it up how I wanted the default user account to be. Config the start menu settings, pinned apps on the start menu and task bar, add icons to the desktop, change application settings like Chrome settings, etc.
  • I created a non-syspreped backup of my system on a device that I can use to quickly restore from. (i.e external usb 3 drive) It always takes a few tries before I get my sysprep answer file quite right and a bad sysprep file almost always causes an un-bootable system.
  • BEFORE syspreping the computer I do a complete shutdown. Not just log off or restart. I shut it all the way down. This was somewhat important in previous versions of windows, however, I now believe it might be a critical step for windows 10 to avoid a corrupted user profiles for any account you had logged into since the last full shutdown. I believe windows 10 has changed the way user profiles stay resident in memory after logouts and even during reboots.
  • After a complete shutdown, I restart and ONLY log into the “profile” administrative account. I opened an administrative command prompt, change directory to the sysprep directory and run sysprep. To do these two steps I use the commands in the admin command prompt:

    cd sysprep
    sysprep /generalize /oobe /shutdown /unattend:c:\windows\system32\sysprep\unattend.xml

    (You’ll need to change the sysprep command to point to your answer file. I’m not sure if it can live in any other directory. Also, remember the sysprep answer file is a vector for hacking, so you should do something to remove the sysprep answer file from your systems after you deploy your image …)

  • Sysprep completes by shutting down the system and I am now ready to capture an syspreped image.

Image Build – Mac – AFP location files for each graduating class

Students have network file space on our Achilles server based on their graduating year.  I presently provide links to these locations in a common area on the Mac image.

in /Library/Application Support/Williams/Network File Space/Achilles are a series of .afloc files based on student graduating year.  Each year when the image is created I have to add a file for the next class of students.

One way to do that is:

  • sudo -s
  • cd /Library/Application\ Support/Williams/Netowk\ File\ Space/Achilles
  • cp “2015 Students.afploc” “2016 Students.afploc”
  • vi  (or some other way edit) “2016 Students.afploc” to replace “15Students” with “16Students”

It is tempting to remove the older files but sometimes students start as in one class but then have to extend their stay so remove these with care.

KeyServer – Client specific files that should not be included in cloned image

Before Capturing any master image be sure to delete these files:

(For details see: http://www.sassafras.com/hrl/7.0/clone.html )
The following is from the above link …

Windows file list

The following files and directories should NOT be copied from one computer to another:

KeyAccess Audit, which is located in one of these directories depending on OS version and KeyAccess version:
C:\ProgramData\KeyAccess\
C:\Documents and Settings\All Users\Application Data\KeyAccess\
C:\Documents and Settings\All Users\Application Data\
C:\ProgramData\
C:\WINDOWS\
C:\WINNT\
KeyAccess Offline, which is located in one of these directories depending on OS version and KeyAccess version:
C:\ProgramData\KeyAccess\
C:\Documents and Settings\All Users\Application Data\KeyAccess\
[User Profile Dir]\Local Settings\Application Data\
C:\WINDOWS\
C:\WINNT\
portable.dir, which is a directory and is located in one of these directories depending on OS version and KeyAccess version:
C:\ProgramData\KeyAccess\
C:\Documents and Settings\All Users\Application Data\KeyAccess\
[User Profile Dir]\Local Settings\Application Data\
C:\WINDOWS\
C:\WINNT\
[Any Drive]:\portable.dir\

The following registry settings should NOT be copied from one computer to another:

registry: HKEY_CURRENT_USER\SOFTWARE\Sassafras\KeyAccess\Settings\pref
registry: HKEY_CURRENT_USER\SOFTWARE\Sassafras\KeyAccess\Settings\settings
registry: HKEY_LOCAL_MACHINE\SYSTEM\CurrentControlSet\Services\KeyAccess\Settings\pref
registry: HKEY_LOCAL_MACHINE\SYSTEM\CurrentControlSet\Services\KeyAccess\Settings\settings

Note: The KeyAccess client install creates a keyacc.ini file in the windows directory even when you accept the default, “store settings in registry”. The line, “registry=2” in keyacc.ini tells KeyAccess to consult the registry for additional settings, so keyacc.ini must be included in the cloned image. If you have customized the client install (using the k2clientconfig utility) so it stores all settings in the keyacc.ini, then this file must be edited before cloning. Remove all lines beginning “previd” or “prevhw”.
OS X file list

The following files should NOT be copied from one computer to another:

/var/root/Library/Preferences/KeyAccess Audit
/var/root/Library/Preferences/KeyAccess Offline
/var/root/Library/Preferences/KeyAccess Prefs
/var/root/Library/Preferences/Portable Keys (don???t move)/ — nothing in this directory should be copied to another computer
/Library/Preferences/KeyAccess/KeyAccess Audit
/Library/Preferences/KeyAccess/KeyAccess Offline
/Library/Preferences/KeyAccess/KeyAccess Prefs
/Library/Preferences/KeyAccess/Portable Keys/ — nothing in this directory should be copied to another computer

If you want cloned clients to point to the same KeyServer as the computer you took the image from, you should be sure to copy the file /Library/Preferences/com.sassafras.KeyAccess.plist

BootCamp – Imaging windows with winclone

Using a lab windows image on a dual boot mac —

  • Prepare a base windows image in Dell hardware and sysprep
  • Take an image with KACE/Ghost but don’t allow drive to boot after
    • With ghost you need to uncheck “Reboot” in the Misc Options before starting to take image
  • Physically remove hard drive from dell hardware and put it in a Mac Pro Tower but don’t let it boot yet
  • Use an external disk that has winclone loded on it to boot the mac
  • Take a winclone image
    • Before taking winclone image, set perferences to use the “special” format that is not mountable but is smaller and restores faster.

This image should then be restorable to any bootcamp windows partition using the external mac boot disk and winclone as above. After restore you’ll need to boot to the windows volume, letting sysprep complete and then run the bootcamp drivers disk for that mac model.

Add any additional software/settings, re-sysprep, and then take an image of the windows volume with DeployStudio.