Tag Archives: Deployment

k2000 – Update Drivers

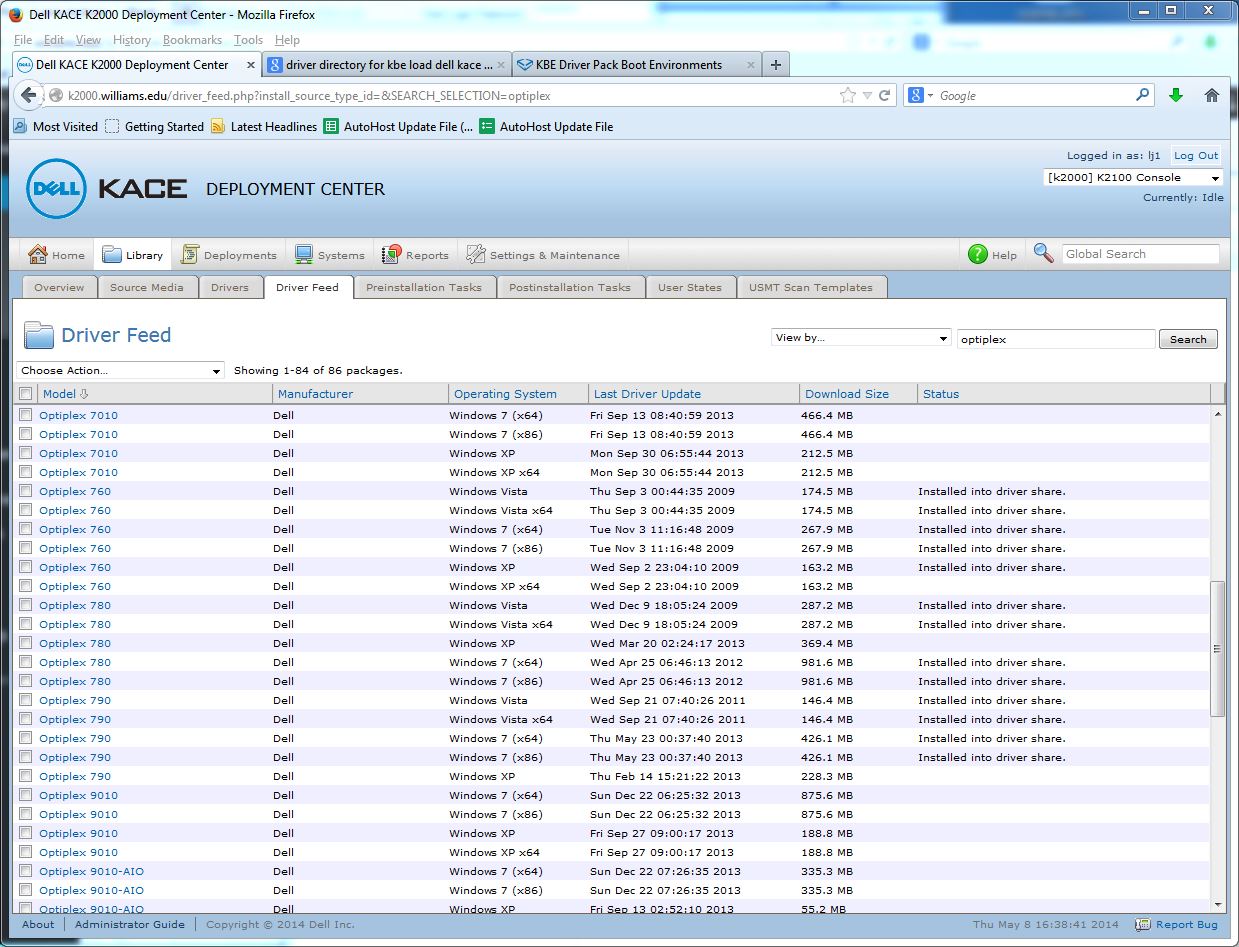
There are several places where you can “update” drivers in the Windows K2000 deployment server.  In “Library’ — “Driver Feed”  –  search for then click on a model and there is a drivers ‘download and install’ function which may be all you need …

driverk2000

If you need to add drivers that aren’t available through the driver feed mechanism you can add them to folders on the K2000 server …  My location is at:

\\k2000\drivers\kbe_windows_x64\lynna

Just connecting to \\k2000

giving the username  k2000\admin and the password that is set on the server for

“Settings – Maintenance” — “General Settings” —  “Driver/Restore Share password”


Image Build – Mac – AFP location files for each graduating class

Students have network file space on our Achilles server based on their graduating year.  I presently provide links to these locations in a common area on the Mac image.

in /Library/Application Support/Williams/Network File Space/Achilles are a series of .afloc files based on student graduating year.  Each year when the image is created I have to add a file for the next class of students.

One way to do that is:

  • sudo -s
  • cd /Library/Application\ Support/Williams/Netowk\ File\ Space/Achilles
  • cp “2015 Students.afploc” “2016 Students.afploc”
  • vi  (or some other way edit) “2016 Students.afploc” to replace “15Students” with “16Students”

It is tempting to remove the older files but sometimes students start as in one class but then have to extend their stay so remove these with care.

Software – MatLab install “archives” folder structure


The MatLab distribution from MatWorks tries to save space on the disk and time for the download transfer.  For the products you are licensed for they send you a “common” file and also a CPU-specific file.  When installing MatLab on a particular CPU you need to format the “archives” folder carefully.

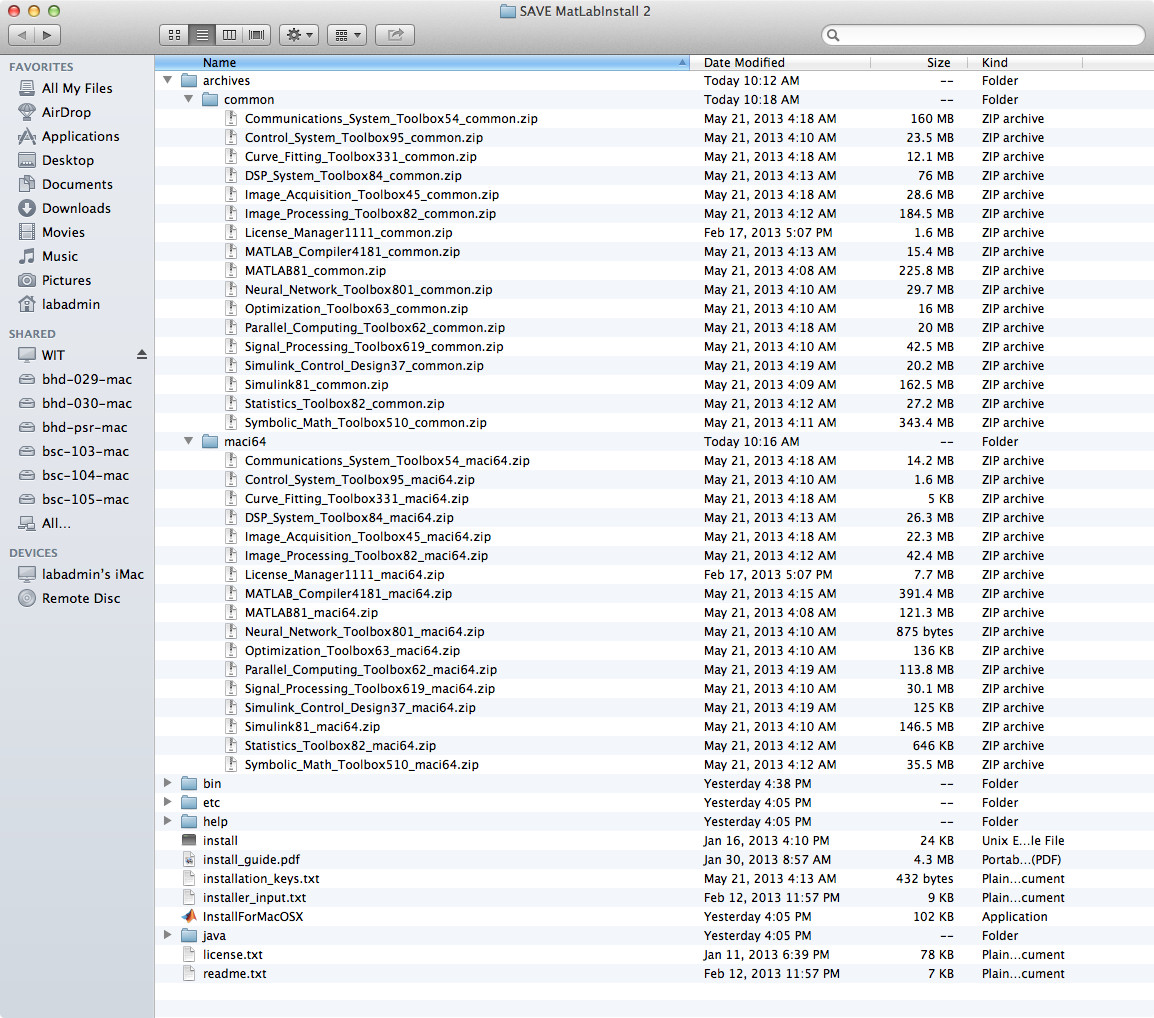
The archive folder should contain two other folders, “common” and, depending on your OS, one of “maci64″(Mac), “glnxa64” (linux), “win64” (windows).

For each product that needs to be installed there should be a zip file in the “common” folder and a corresponding  zip file in the OS-specific folder.  Leave these files in “zip” format.  If they have been unzipped auto-magically by your browser or other download tools you’ll need to re-download them forcing them to remain “zip” files.

Example for a Mac:

  • “Communications_System_Toolbox54_common.zip”  goes in the “common” folder
  • “Communications_System_Toolbox54_maci64.zip” goes in the “maci64” folder

Here is a screen capture of a install directory structure that works on a Mac:

Matlab_Install_Folder_Setup

Software – Endnote Deployment

Windows:

Like other software, you need to run a utility program supplied by the vendor “Admin.exe” to convert the installer to the deploy-able site-licensed version of the installer.  To get the Admin.zip folder see the web site at:

https://support.clarivate.com/Endnote/s/article/EndNote-Volume-License-Install-Steps?language=en_US

After adding the license data and creating a new installer, you can install this with the following command:

msiexec.exe /passive /i EN20Inst.msi INSTALLDIR=”C:\Program Files\EndNote” FFTUSEOPENURL=T FFTOPENURLRESOLVER=https://na02.alma.exlibrisgroup.com/view/uresolver/01_WIL_INST/openurl

This command installs EndNote With the correct Find Full text Url preset for all users.

Mac:

  1. Make sure Microsoft Word is already installed
  2. Install EndNote from vendor supplied, Williams’ licensed dmg
  3. Create a Preference file for the Find Full Text URL
    1. defaults write /Library/Preferences/com.ThomsonResearchSoft.EndNote.plist openURLPath https://na02.alma.exlibrisgroup.com/view/uresolver/01_WIL_INST/openurl
  4. Open EndNote – To Add EndNote menu to Microsoft Word
    1. Run “Customizer” and select CWYW then  install
  5. Using Jamf Composer or any other package tool, package:
    1. /Apllications/EndnNote 20
    2. /Library/Preferences/com.ThomsonResearchSoft.EndNote.plist
    3. /Library/Application Support/Microsoft/Office365/User Content.localized/Startup.localized/Word/EndNote CWYW Word 16.bundle

\

KeyServer – Client specific files that should not be included in cloned image

Before Capturing any master image be sure to delete these files:

(For details see: http://www.sassafras.com/hrl/7.0/clone.html )
The following is from the above link …

Windows file list

The following files and directories should NOT be copied from one computer to another:

KeyAccess Audit, which is located in one of these directories depending on OS version and KeyAccess version:
C:\ProgramData\KeyAccess\
C:\Documents and Settings\All Users\Application Data\KeyAccess\
C:\Documents and Settings\All Users\Application Data\
C:\ProgramData\
C:\WINDOWS\
C:\WINNT\
KeyAccess Offline, which is located in one of these directories depending on OS version and KeyAccess version:
C:\ProgramData\KeyAccess\
C:\Documents and Settings\All Users\Application Data\KeyAccess\
[User Profile Dir]\Local Settings\Application Data\
C:\WINDOWS\
C:\WINNT\
portable.dir, which is a directory and is located in one of these directories depending on OS version and KeyAccess version:
C:\ProgramData\KeyAccess\
C:\Documents and Settings\All Users\Application Data\KeyAccess\
[User Profile Dir]\Local Settings\Application Data\
C:\WINDOWS\
C:\WINNT\
[Any Drive]:\portable.dir\

The following registry settings should NOT be copied from one computer to another:

registry: HKEY_CURRENT_USER\SOFTWARE\Sassafras\KeyAccess\Settings\pref
registry: HKEY_CURRENT_USER\SOFTWARE\Sassafras\KeyAccess\Settings\settings
registry: HKEY_LOCAL_MACHINE\SYSTEM\CurrentControlSet\Services\KeyAccess\Settings\pref
registry: HKEY_LOCAL_MACHINE\SYSTEM\CurrentControlSet\Services\KeyAccess\Settings\settings

Note: The KeyAccess client install creates a keyacc.ini file in the windows directory even when you accept the default, “store settings in registry”. The line, “registry=2” in keyacc.ini tells KeyAccess to consult the registry for additional settings, so keyacc.ini must be included in the cloned image. If you have customized the client install (using the k2clientconfig utility) so it stores all settings in the keyacc.ini, then this file must be edited before cloning. Remove all lines beginning “previd” or “prevhw”.
OS X file list

The following files should NOT be copied from one computer to another:

/var/root/Library/Preferences/KeyAccess Audit
/var/root/Library/Preferences/KeyAccess Offline
/var/root/Library/Preferences/KeyAccess Prefs
/var/root/Library/Preferences/Portable Keys (don???t move)/ — nothing in this directory should be copied to another computer
/Library/Preferences/KeyAccess/KeyAccess Audit
/Library/Preferences/KeyAccess/KeyAccess Offline
/Library/Preferences/KeyAccess/KeyAccess Prefs
/Library/Preferences/KeyAccess/Portable Keys/ — nothing in this directory should be copied to another computer

If you want cloned clients to point to the same KeyServer as the computer you took the image from, you should be sure to copy the file /Library/Preferences/com.sassafras.KeyAccess.plist

BootCamp – Imaging windows with winclone

Using a lab windows image on a dual boot mac —

  • Prepare a base windows image in Dell hardware and sysprep
  • Take an image with KACE/Ghost but don’t allow drive to boot after
    • With ghost you need to uncheck “Reboot” in the Misc Options before starting to take image
  • Physically remove hard drive from dell hardware and put it in a Mac Pro Tower but don’t let it boot yet
  • Use an external disk that has winclone loded on it to boot the mac
  • Take a winclone image
    • Before taking winclone image, set perferences to use the “special” format that is not mountable but is smaller and restores faster.

This image should then be restorable to any bootcamp windows partition using the external mac boot disk and winclone as above. After restore you’ll need to boot to the windows volume, letting sysprep complete and then run the bootcamp drivers disk for that mac model.

Add any additional software/settings, re-sysprep, and then take an image of the windows volume with DeployStudio.

KACE – Software installs from alternative download

Using the KACE 1000 server to install software from the “Alternative” download share … (This preserves disk space on the server for the patch feed.)

1) Create zip file of install files. (Be sure to just zip the files and not the enclosing folder. The install process is going to be looking to work with something like “.\install.exe”)

2) Copy that zip file to \\kstore\apps (Gabe needs to give your account write permission to that share.)

3) Create a dummy zip file which has only one small file but has the exact same name as the zip file you just copied to the \\kstore share (be careful not to overwrite and/or confuse these 2 zip files.)

4) Map a drive on a windows box that is running the KACE 1000 client to the \\kstore\apps share

5) Create the checksum for the zip file stored in the \\kstore\apps location with the command:
"C:\Program Files (x86)\Dell\KACE\KDeploy.exe" -hash=k:\FILENAME.ZIP

6) Log into the KACE 1000 server and go to Inventory – Software – Choose Action – Create New Item …
Enter a relevant Display Name, Select the target Operating Systems, and choose the small dummy zip file as the file to upload and associate with this software item. Save this item.

7) Next go to Distribution – Managed Installations – Choose Action – Create New Item …
Select the software item you just saved above. Leave everything blank till the “Installation Command” section. I select “Configure Manually” and enter the exact install command as in “setup.exe /S” and then check off “Run Command Only” and “Don’t Prepend msiexec”. Also check off “Use Alternative Download” which opens a couple more boxes. In the first, put your share location, mine is: \\kstore\apps, next paste in the checksum you generated earlier, be sure to carefully delete the extra crap at the beginning and end of the actual checksum. Enter the username and password for an account on the share that has read access to the share location. (Gabe is the keeper of these accounts) Enter any notes you may want, also select the target computers which should get the install and set the installation time frame and lastly for the Managed Action: select “Execute Anytime”. Then save the item.

Now – as the targeted computers check-in – they should see that they have an installation waiting and they should attempt the install. Assuming everything is correct above the installs should proceed.

Troubleshooting —

1) Be sure that the install command is absolutely correct. To do this test the install command in a command window on a test computer or VM.
2) Be sure the name of the dummy zip file and the real zip file are identical.
3) Be sure the checksum is created against the real zip file stored on the share.