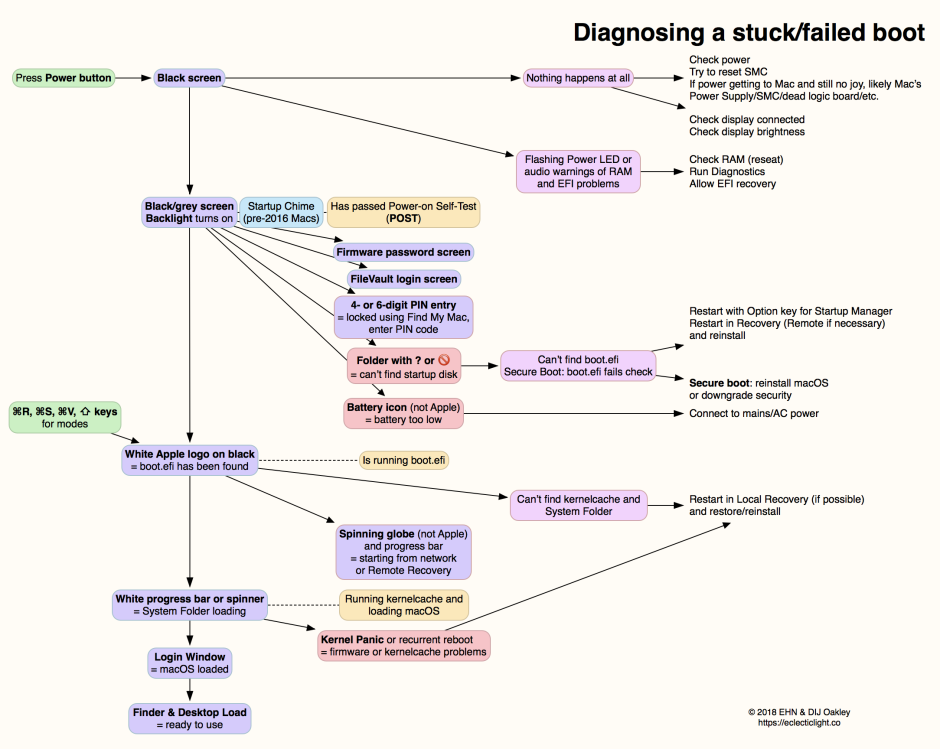
I recently came across a useful post to help diagnose when a mac doesn’t boot properly.
For the full link see: https://eclecticlight.co/2018/09/18/diagnosing-a-mac-which-cant-complete-booting/
Here is the extracted diagram:
I recently came across a useful post to help diagnose when a mac doesn’t boot properly.
For the full link see: https://eclecticlight.co/2018/09/18/diagnosing-a-mac-which-cant-complete-booting/
Here is the extracted diagram:
To create a “clean” image –
Basic goal – you don’t want anything except the basic MacOS installed. So be certain that the mac serial number is not scoped to a JAMF pre-stage enrollment. You don’t want JAMF to install or anything else to install.
Take a mac out of shrink wrap (or use internet recovery (cmd-opt-R) to erase the internal hard drive and re-install a Mac OS).
Let the MacOS setup run and disable (or not enable) everything you can. Create an admin account that you want to use for all computers this will go on.
Run system updates and update all MacOS software.
If they are not installed, install iMovie, Pages, Keynote, Numbers, and GarageBand. Run GarageBand to make sure the required Apple Loops are downloaded and indexed.
In a terminal window switch to root (sudo -s) and give the following commands:
These commands are useful when remotely connecting to the mac after imaging.
Once done, shutdown (not reboot) the mac. Then boot to an external disk that is loaded with the same or greater version of the MacOS and run an up-to-date cloning application like Carbon Copy Cloner. Take a read-only, compressed image of the internal hard drive “Macintosh HD”. Copy this into your image distribution system.
Since MacOS 10.13 – High Sierra – You must use an image taken from an APFS formatted drive to “image” other APSF drives. Likewise, use an image taken from an HFS drive for HFS drive imaging.
Also, you can not simply image an MacOS 10.12 or lower with a MacOS 10.13 image. The MacOS 10.12 mac must fist run the native MacOS 10.13 installer from Apple. That installer both installs firmware required for booting a 10.13 system and formats the drive as APFS or not depending on drive type. All SSDs are formatted to APFS without option. As of 10.13.5, Fusion drives and HDD drives are left as HFS.
The SMC (System Management Controller) controls a number of things related to power management on a mac. If it isn’t working properly it can cause fans to run, the cpu to run slow, and/or, the mac not to wake from sleep when it is supposed to.
On most mac desktop (not the new imac pro), you reset the SMC by:
More Details:
https://support.apple.com/en-us/HT201295
It isn’t always easy to get all of the right pieces for a particular MacOS update/install. For example, if you are running MacOS 10.13.5 already the traditional ways of going to the Map App Store or doing system updates won’t offer you MacOS 10.13.4.
Thanks to dedicated mac folks on the interwebs we now have a tool. See:
and
https://github.com/munki/macadmin-scripts/blob/master/installinstallmacos.py
On a mac that is already running 10.13.4 and that has an APFS drive you can wipe the drive and reinstall the OS without having to boot to anything external, external drive or netboot.
Get the MacOS 10.13.4 (or better) installer from the app store and put it in your /Applications folder. This is were it goes by default if you download it. Then give the following command and sit back:
/Applications/Install\ macOS\ High\ Sierra.app/Contents/Resources/startosinstall --applicationpath /Applications/Install\ macOS\ High\ Sierra.app --eraseinstall --agreetolicense --nointeraction
“–eraseinstall” is new in MacOS 10.13.4 and will ERASE the hard drive before installing the OS again.
“–nointeraction” is undocumented but causes this command to run without human intervention (and therefore can not be interrupted!)
This will but the mac back in the out-of-box shrink wrapped state with an erased drive just like the internet recovery process can do. Once back to being shrink wrapped, you can, for example, let it run through your JAMF pre-stage enrollment process.
More details at: https://support.apple.com/en-us/HT208533
Commands to remove JAMF management and client from local computer: (you must remove the the MDM management profile BEFORE deleting the JAMF client)
jamf removeMDMProfile
jamf removeFramework
Command to remove a computer from the JSS:
set JSSMAC=$(networksetup -getmacaddress en0)
curl -k -v -u username:password https://yourjss.server.url:8443/JSSResource/computers/macaddress/$JSSMAC -X DELETE
This can be useful when resetting a computer back to an original state.
Back when High Sierra (MacOS 10.13) was coming out we were all told that disk imaging would be dead because of the new APFS disk format. And, while It is true that you can not/should not apply a High Sierra disk image to a Mac running an older OS and hope for that to boot correctly, apparently you can “image” a High Sierra disk and apply it to another Mac that has already been upgraded to High Sierra.
First things first –
To upgrade a Mac to High Sierra you have to run the “Install High Sierra” update. This is available from the App Store which places a copy of the install app in the Applications folder. You can copy that to however many Macs you need to update. That update not only upgrades the OS but it also applies firmware that High Sierra needs to boot properly and, if the Mac has an SSD, if converts the disk format to APFS.
You will need to do this upgrade on all the Macs you will use in this process. In other words, to take an image of an APFS High Sierra Mac you must be booted to an external drive or some other system that is also a High Sierra APFS formatted drive.
Next prepare your image –
Using a Mac that has already been updated to High Sierra, do an internet recovery (hold command-R at boot) to first erase the hard drive and then reinstall the MacOS. This gives you a completely clean copy of High Sierra. You will then want to configure that as minimally as possible. Once configured, boot to an external drive with an up-to-date version of High Sierra installed and run Disk Utility.
In Disk Utility, click on View to “Show all Devices”. Then right-click on “container disk1” and select “Image …” ..
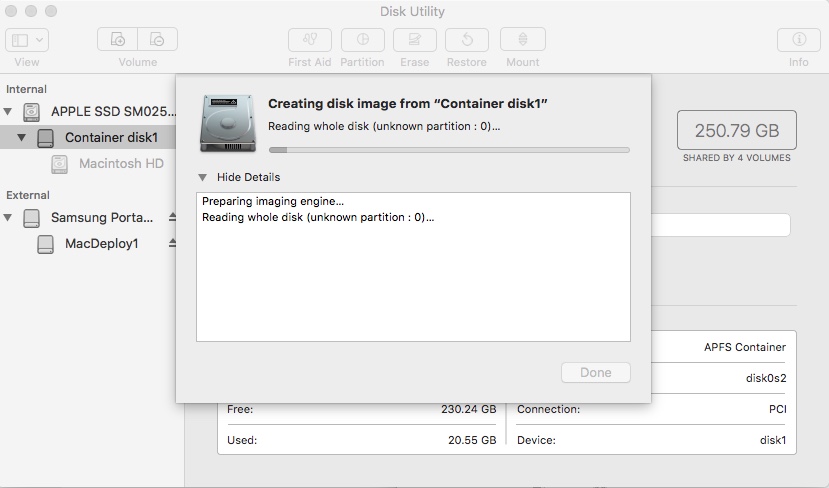
Once the image is created, transfer that to your JAMF server (or other image deployment server) and let it rip ….
A couple of final notes:
To “netboot” a mac, you need to setup a netboot server AND create a netboot image that is capable of running on the macs that you plan to netboot.
For a NetBoot server see:
https://github.com/jamf/NetSUS/tree/master/docs
To create a netboot image:
Start with a MacOS installer from the App Store like “Install MacOS High Sierra”.
Use the application AutoDMG to turn that installer into a DMG – disk image.
For AutoDMG see: https://www.jamf.com/jamf-nation/third-party-products/324/autodmg?view=info
Next use the application AutoCasperNBI to turn that DMG disk image into an Netboot Image or “.nbi” file.
For AutoCasperNBI see: https://www.jamf.com/jamf-nation/third-party-products/363/autocaspernbi?view=info
After that, copy the .nbi folder to your netboot server.
Lately I have been running a NetBoot server on a NetSus server on ubuntu 16.04 (see above). On that server, you connect to the web portal and select netboot. There “upload a netboot image”. This should open an SMB connection to the netboot smb share and you copy the “.nbi” file to that location. Copy the “.nbi” file not the folder that contains it. By the way – I had to change the smbuser password in the web interface for the server before I could mount this share correctly.
Once the .nbi file is copied up you should be able to enable that netboot image in the web interface. Then it becomes available to macs on the vlan to boot to.
For sanity sake:
On MacOS netboot servers which are going away the netboot images live in: /Library/NetBoot/NetBootSP0/
On Ubuntu servers the netboot images live in: /srv/NetBoot/NetBootSP0/
The High Sierra installer not only installs the new OS but it also changes the disk format form HFS to APFS on SSD drives. Additionally, it does the required firmware updates for the model of mac that the installer is being run on. Therefore, it may be necessary/easiest to run this installer on each mac before applying a High Sierra image to the mac. The command to do that is:
/Applications/Install\ macOS\ High\ Sierra.app/Contents/Resources/startosinstall --applicationpath /Applications/Install\ macOS\ High\ Sierra.app --agreetolicense --nointeraction
(obviously you have the “install macOS High Sierra.app” in the /Applications folder for this to work)
A great little tool to burn ISOs to external USB disks:
Etcher
Use Disk Utility to format the external as Fat 32 (may have to format as Mac OS first).
If Etcher doesn’t see the drive at first, use the gear to turn on “Unsafe” mode which lists all attached disks. Then choose your disk with care. “Etching” the ISO to the disk REPLACES the contents of the disk with the ISO image!!!