Tag Archives: JAMF

Mac – JAMF manual agent installation

Sometimes, (in my case when using DEP enrollment on a slow wifi connection) the Jamf agent doesn’t get installed properly during DEP enrollment. To fix that here is what I did:

I first ran the following commands to manually download and “install” the Jamf binary from the Jamf server – All commands must be run as root! (“#” indicates a comment in script fashion not a command to run. Also be sure to replace “<Your JAMF Server>” with the address of your Jamf server)

# Get the jamf agent binary to the right location
mkdir /usr/local/jamf
mkdir /usr/local/jamf/bin
mkdir /usr/local/bin
curl https://<Your JAMF Server>/bin/jamf -o /tmp/jamf
mv /tmp/jamf /usr/local/jamf/bin/

# Set the binary to be executable
chmod +x /usr/local/jamf/bin/jamf

# Create a symbolic link for the binary so the “jamf” command is in the default path
ln -s /usr/local/jamf/bin/jamf /usr/local/bin/jamf

# Create the configuration file the jamf binary uses to find the server
/usr/local/bin/jamf createConf -url https://<Your JAMF Server>

# Re-enroll computer to get the server certificate
/usr/local/bin/jamf -enroll -prompt

Once the Jamf agent is installed, the computer was checking into the Jamf server. However I wasn’t able to scope it to policies because it was listed as “unmanaged”.  To change that, on the Jamf server I edited the computer’s “General” information tab by checking the box to set it to “Managed”and entering a local administrative username and password on the computer for Jamf to use to mange the computer. Also, since we use “Sites”, I manually set the site for the computer as well.

Now that the Jamf agent was installed and I set the computer record to “managed”, I was able to scope policies, etc to the computer as I normally do.


Mac – JAMF – Command to delete computer on JSS

Commands to remove JAMF management and client from local computer: (you must remove the the MDM management profile BEFORE deleting the JAMF client)

jamf removeMDMProfile

jamf removeFramework


Command to remove a computer from the JSS:

set JSSMAC=$(networksetup -getmacaddress en0)

curl -k -v -u username:password https://yourjss.server.url:8443/JSSResource/computers/macaddress/$JSSMAC -X DELETE

This can be useful when resetting a computer back to an original state.


Mac High Sierra – Imaging APFS formatted disks

Back when High Sierra (MacOS 10.13) was coming out we were all told that disk imaging would be dead because of the new APFS disk format.  And, while It is true that you can not/should not apply a High Sierra disk image to a Mac running an older OS and hope for that to boot correctly, apparently you can “image” a High Sierra disk and apply it to another Mac that has already been upgraded to High Sierra.

First things first – 

To upgrade a Mac to High Sierra you have to run the “Install High Sierra” update.  This is available from the App Store which places a copy of the install app in the Applications folder.  You can copy that to however many Macs you need to update. That update not only upgrades the OS but it also applies firmware that High Sierra needs to boot properly and, if the Mac has an SSD, if converts the disk format to APFS.

You will need to do this upgrade on all the Macs you will use in this process.  In other words, to take an image of an APFS High Sierra Mac you must be booted to an external drive or some other system that is also a High Sierra APFS formatted drive.

Next prepare your image –

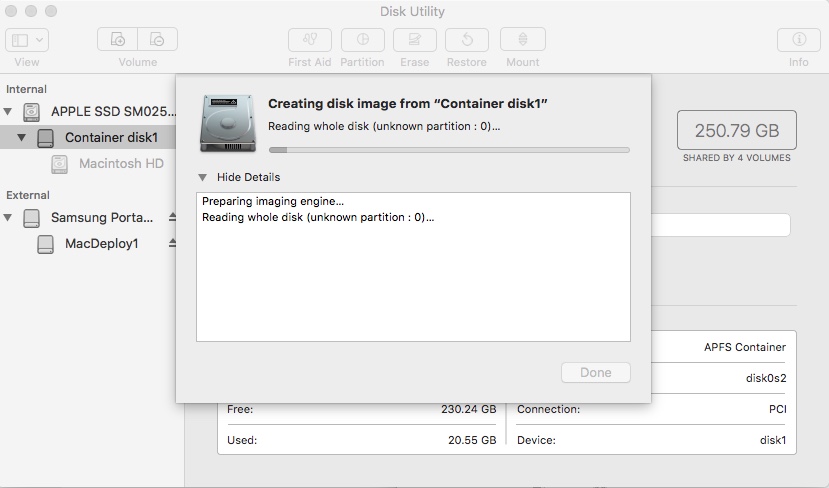
Using a Mac that has already been updated to High Sierra, do an internet recovery (hold command-R at boot) to first erase the hard drive and then reinstall the MacOS.  This gives you a completely clean copy of High Sierra.  You will then want to configure that as minimally as possible. Once configured, boot to an external drive with an up-to-date version of High Sierra installed and run Disk Utility.

In Disk Utility, click on View to “Show all Devices”. Then right-click on “container disk1” and select “Image …” ..

Once the image is created, transfer that to your JAMF server (or other image deployment server) and let it rip ….

A couple of final notes:

  • If you are like me and will have both APFS formatted and HFS+ (non-ssd) drives, you will need to take a similar image in the same way from a Mac with the legacy HFS+ drive format as well.  Apply the APFS image to APFS-only drives and HFS+ to your HFS+ drives.


JAMF – DEP and VPP Certificate Renewal

For the JAMF server we have yearly renewing certificates that connect our JAMF server to Apple’s servers for our hardware (DEP) and software (VPP) purchases.

Here is how I did this process in May 2017:

  • 1) Log into our JAMF server ( https://casper.williams.edu:8443 ) with a full admin account
  • 2) Navigate to Management SettingsGlobal SettingsDevice Enrollment Program
  • 3) Click on Public Key to download our JSS key to the local computer
  • 4

  • ) Sign into our Apple School Manager account at https://school.apple.com/ with our AppleID of: [email protected]
  • 5) Click on MDMUpload Key
  • 6) Once uploaded you should be able to click on Get Token to download the new token
  • 7) Go back to our JAMF ServerManagement SettingsGlobal SettingsDevice Enrollment Program
  • 8) Click on Williams JSS and then Edit
  • 9) Then Upload Server Token

Remain logged into our JAMF server to update the VPP Certificate:

  • 1) Log into the [email protected] AppleId at the website: https://volume.itunes.apple.com/
  • 2) In the upper right corner click on [email protected] for a drop down menu, select Account Summary
  • 3) In the MDM section, click on Download Token
  • 4) While still logged into our JAMF Server navigate to Management
  • SettingsGlobal SettingsVPP Accounts

  • 5) Click on Williams VPP then Edit
  • 6) Finally click on “Renew Service Token” to upload the token you just downloaded from Apple

Phew. Done.
Log out of all accounts.

JAMF – Create Mac OS to deploy

To create an OS package to deploy one could:
1) download the OS installer from the App Store
2) this will put the installer in the /Applications folder
3) once the installer is completely downloaded it will start automatically so “quit” the installer from the file menu
4) Open AutoDMG and drag the installer from the /Applications folder to the AutoDMG window.
5) Add applications like GarageBand, iMovie, Keynote, Numbers, and Pages which are pre-installed on all new Macs but are left out of the Mac OS installer for some reason
6) Build the configuration to save the DMG file
7) Open Casper Admin and drag that DMG file into the window
8) Set the package priority to 1 so it installs first
9) Create a new configuration with this OS install and other things like casper enrollment

A helpful website with pictures is available at:
http://www.theinstructional.com/guides/build-deploy-os-x-images-with-autodmg