Logged into the computer and/or account that is misbehaving:
gpresult /h <path>outputfile.html
(open the resulting html file with a browser …)
There are ways to do this remotely as well … Details at:
gpresult /h <path>outputfile.html
Commands to remove JAMF management and client from local computer: (you must remove the the MDM management profile BEFORE deleting the JAMF client)
jamf removeMDMProfile
jamf removeFramework
Command to remove a computer from the JSS:
set JSSMAC=$(networksetup -getmacaddress en0)
curl -k -v -u username:password https://yourjss.server.url:8443/JSSResource/computers/macaddress/$JSSMAC -X DELETE
This can be useful when resetting a computer back to an original state.
Sysprep allows you to image a customized windows installation and “clone” that to other similar systems. It is described in detail by Microsoft at: https://docs.microsoft.com/en-us/windows-hardware/manufacture/desktop/sysprep–system-preparation–overview
I have always used sysprep answer files when using sysprep. The process to create these answer files is a bit obtuse.
You first need to install the Windows WAIK that matches the version of windows you intend to image. This installs as a windows kit and includes the “Deployment and Imaging Tools” command line need to create a WinPE installation environment.
You also need a copy of the installer for the windows version you intend to deploy on a burned DVD.
Then with the windows installer DVD in the drive, open the “Windows System Image Manger” in the Windows WAIK kit.

Now the trick to creating a good sysprep file is to ONLY include the components and packages from the windows installation DVD in the answer file that you absolutely need (There are thousands of components!). See the Sysprep best practices at: https://docs.microsoft.com/en-us/previous-versions/windows/it-pro/windows-8.1-and-8/hh825023(v=win.10)
Basically, you should expend out the components in the DVD in the bottom left window above. Select the ones you really need and drag copy them into the sysprep step in the middle of the window above you want them in. Then once they are there, one can set the settings or parameters as you need to.
The complete sysprep technical reference is at: https://docs.microsoft.com/en-us/previous-versions/windows/it-pro/windows-8.1-and-8/hh825209(v=win.10)
There are also many examples of creating sysprep answer files on many different websites. One that is a little older is at: http://sybaspot.com/the-complete-guide-to-preparing-a-windows-7-deployment-image-using-audit-mode-and-sysprep-with-an-unattend-xml-answer-file/
It is important in any of these to not blindly copy the sysprep settings that other people use. You need to review the required settings and select only the optional ones you really need. (For Williams College people – get a copy of the sysprep files that Lynna has on the winlab file server that netsys maintains at: \\winlab\images\Lab Image Work\Sysprep\).
Once you have a sysprep file you think you want to test load your windows version on a clean system. Then:
Before sysprepping a computer make a backup image!
Incorrect Sysprep answer files can and often do result in an unbootable/unfixable windows install.
Be sure to completely shutdown the computer (not just reboot)
If using “CopyProfile” —- Log into the ProfileUser account and set it up the way you want it. Do not log into any other accounts.
(If you do log into other accounts you should shutdown the system completely before continuing to sysprep.)
Make sure the correct sysprep answer file is copied to “c:\windows\system32\sysprep\unattend.xml”
From the ProfileUser account:
Right click on cmd.exe and select “run as administrator” (type “cmd.exe” in the search windows)
Then use these commands:
cd c:\windows\system32\sysprep
sysprep /generalize /oobe /shutdown /unattend:c:\windows\system32\sysprep\unattend.xml
Since it can be a vector to compromise windows system security, After deploying computers using a sysprep answer file, a post-cloning task should be to remove the sysprep answer file from the cloned systems
Back when High Sierra (MacOS 10.13) was coming out we were all told that disk imaging would be dead because of the new APFS disk format. And, while It is true that you can not/should not apply a High Sierra disk image to a Mac running an older OS and hope for that to boot correctly, apparently you can “image” a High Sierra disk and apply it to another Mac that has already been upgraded to High Sierra.
First things first –
To upgrade a Mac to High Sierra you have to run the “Install High Sierra” update. This is available from the App Store which places a copy of the install app in the Applications folder. You can copy that to however many Macs you need to update. That update not only upgrades the OS but it also applies firmware that High Sierra needs to boot properly and, if the Mac has an SSD, if converts the disk format to APFS.
You will need to do this upgrade on all the Macs you will use in this process. In other words, to take an image of an APFS High Sierra Mac you must be booted to an external drive or some other system that is also a High Sierra APFS formatted drive.
Next prepare your image –
Using a Mac that has already been updated to High Sierra, do an internet recovery (hold command-R at boot) to first erase the hard drive and then reinstall the MacOS. This gives you a completely clean copy of High Sierra. You will then want to configure that as minimally as possible. Once configured, boot to an external drive with an up-to-date version of High Sierra installed and run Disk Utility.
In Disk Utility, click on View to “Show all Devices”. Then right-click on “container disk1” and select “Image …” ..
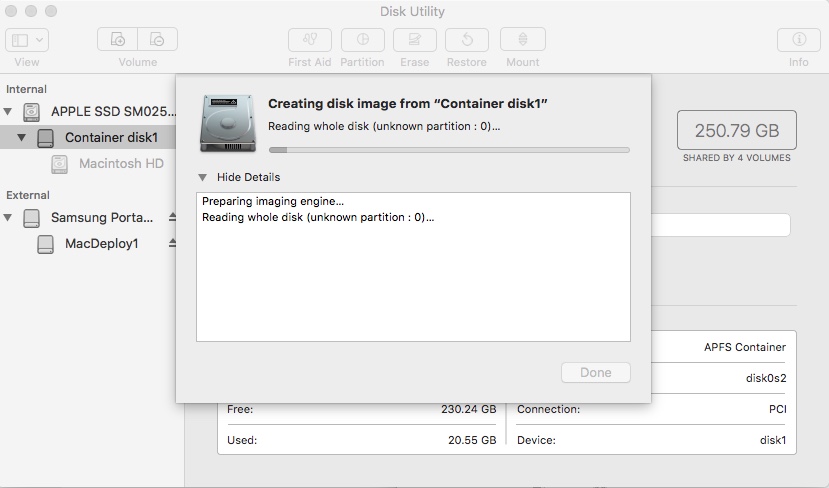
Once the image is created, transfer that to your JAMF server (or other image deployment server) and let it rip ….
A couple of final notes:
To “netboot” a mac, you need to setup a netboot server AND create a netboot image that is capable of running on the macs that you plan to netboot.
For a NetBoot server see:
https://github.com/jamf/NetSUS/tree/master/docs
To create a netboot image:
Start with a MacOS installer from the App Store like “Install MacOS High Sierra”.
Use the application AutoDMG to turn that installer into a DMG – disk image.
For AutoDMG see: https://www.jamf.com/jamf-nation/third-party-products/324/autodmg?view=info
Next use the application AutoCasperNBI to turn that DMG disk image into an Netboot Image or “.nbi” file.
For AutoCasperNBI see: https://www.jamf.com/jamf-nation/third-party-products/363/autocaspernbi?view=info
After that, copy the .nbi folder to your netboot server.
Lately I have been running a NetBoot server on a NetSus server on ubuntu 16.04 (see above). On that server, you connect to the web portal and select netboot. There “upload a netboot image”. This should open an SMB connection to the netboot smb share and you copy the “.nbi” file to that location. Copy the “.nbi” file not the folder that contains it. By the way – I had to change the smbuser password in the web interface for the server before I could mount this share correctly.
Once the .nbi file is copied up you should be able to enable that netboot image in the web interface. Then it becomes available to macs on the vlan to boot to.
For sanity sake:
On MacOS netboot servers which are going away the netboot images live in: /Library/NetBoot/NetBootSP0/
On Ubuntu servers the netboot images live in: /srv/NetBoot/NetBootSP0/
The process we have been using to boot Dells to the K2000 imaging server requires PXE boot in “Legacy” boot mode. The optiplexes we received in the summer of 2017 came with “Secure boot enabled” and UEFI boot set in the BIOS. The following three BIOS settings had to be changed to get those models to boot PXE to the K2000 deployment server:
— Disable “Secure Boot” — (you may need to reboot to have this setting apply)
— Enable “Legacy ROM” —
— Select Legacy Boot not UEFI Boot —
The High Sierra installer not only installs the new OS but it also changes the disk format form HFS to APFS on SSD drives. Additionally, it does the required firmware updates for the model of mac that the installer is being run on. Therefore, it may be necessary/easiest to run this installer on each mac before applying a High Sierra image to the mac. The command to do that is:
/Applications/Install\ macOS\ High\ Sierra.app/Contents/Resources/startosinstall --applicationpath /Applications/Install\ macOS\ High\ Sierra.app --agreetolicense --nointeraction
(obviously you have the “install macOS High Sierra.app” in the /Applications folder for this to work)
Note one – To install the correct boot loaders and hardware drivers, I recommend doing the actual Linux install on the type of computer you plan to run Linux on. Meaning that, I think, the installer will put boot loaders specific for the hardware you are running the installer on in the boot drive of the newly created Linux external disk. For example, I created an Linux (Ubuntu) disk on a Dell precision tower but it could not boot a Dell Optiplex of the same era!
Note two – Always use USB3 ports (marked SS for “SuperSpeed”) for all connections!
Note three – In the following steps you will be using two different USB drives. One to use as the Linux installer “media” (the thing to install from) and another to actually install Linux on. It is extremely helpful to use two different drives of different sizes and manufacturers. This will help tell them apart so that you can choose the correct disk when installing. In this example, I used a 1 TB “Seagate” drive for the first “Linux Installer” disk and a 250 GB “Samsung” drive for the second disk to actually install and run Linux from.
First – Create a bootable DVD/CD/USB disk with the Linux installer on it. To do that download the Ubuntu ISO or the Linux Mint ISO to a computer and then burn that ISO to disk. (On a Mac you can use Etcher to burn the ISO to a USB drive.) This process does NOT install Linux. It only creates the media from which you are going to install Linux in the next step.
Second – (No matter what computer you used above to create the Linux install disk, move to the type of computer you want to run Linux on before proceeding. This is tested on both a Dell Optiplex and a Dell Precision. Mac hardware will require extra steps to fix the boot loader after install. ) With the SSD external disk you actually want to run Linux on attached to a second USB3 port, boot to the Linux installer ISO disk you created above. This will bring up the “Grub” boot menu.
Third – Choose “Install … “. Follow the prompts slowly and carefully. Before running the actual install step, select “Something Else” first and set the option to install the boot loaders to the external disk you will actually be installing Linux on. If you don’t do this you could screw up the internal drive’s boot loaders causing that computer not to be able to boot! Then click on “Back” and select “Erase drive and install …” . Then again be careful to select the external drive you want to actually install Linux on. An erased, internal drive will probably make your day a bit harder then you wanted it to be!
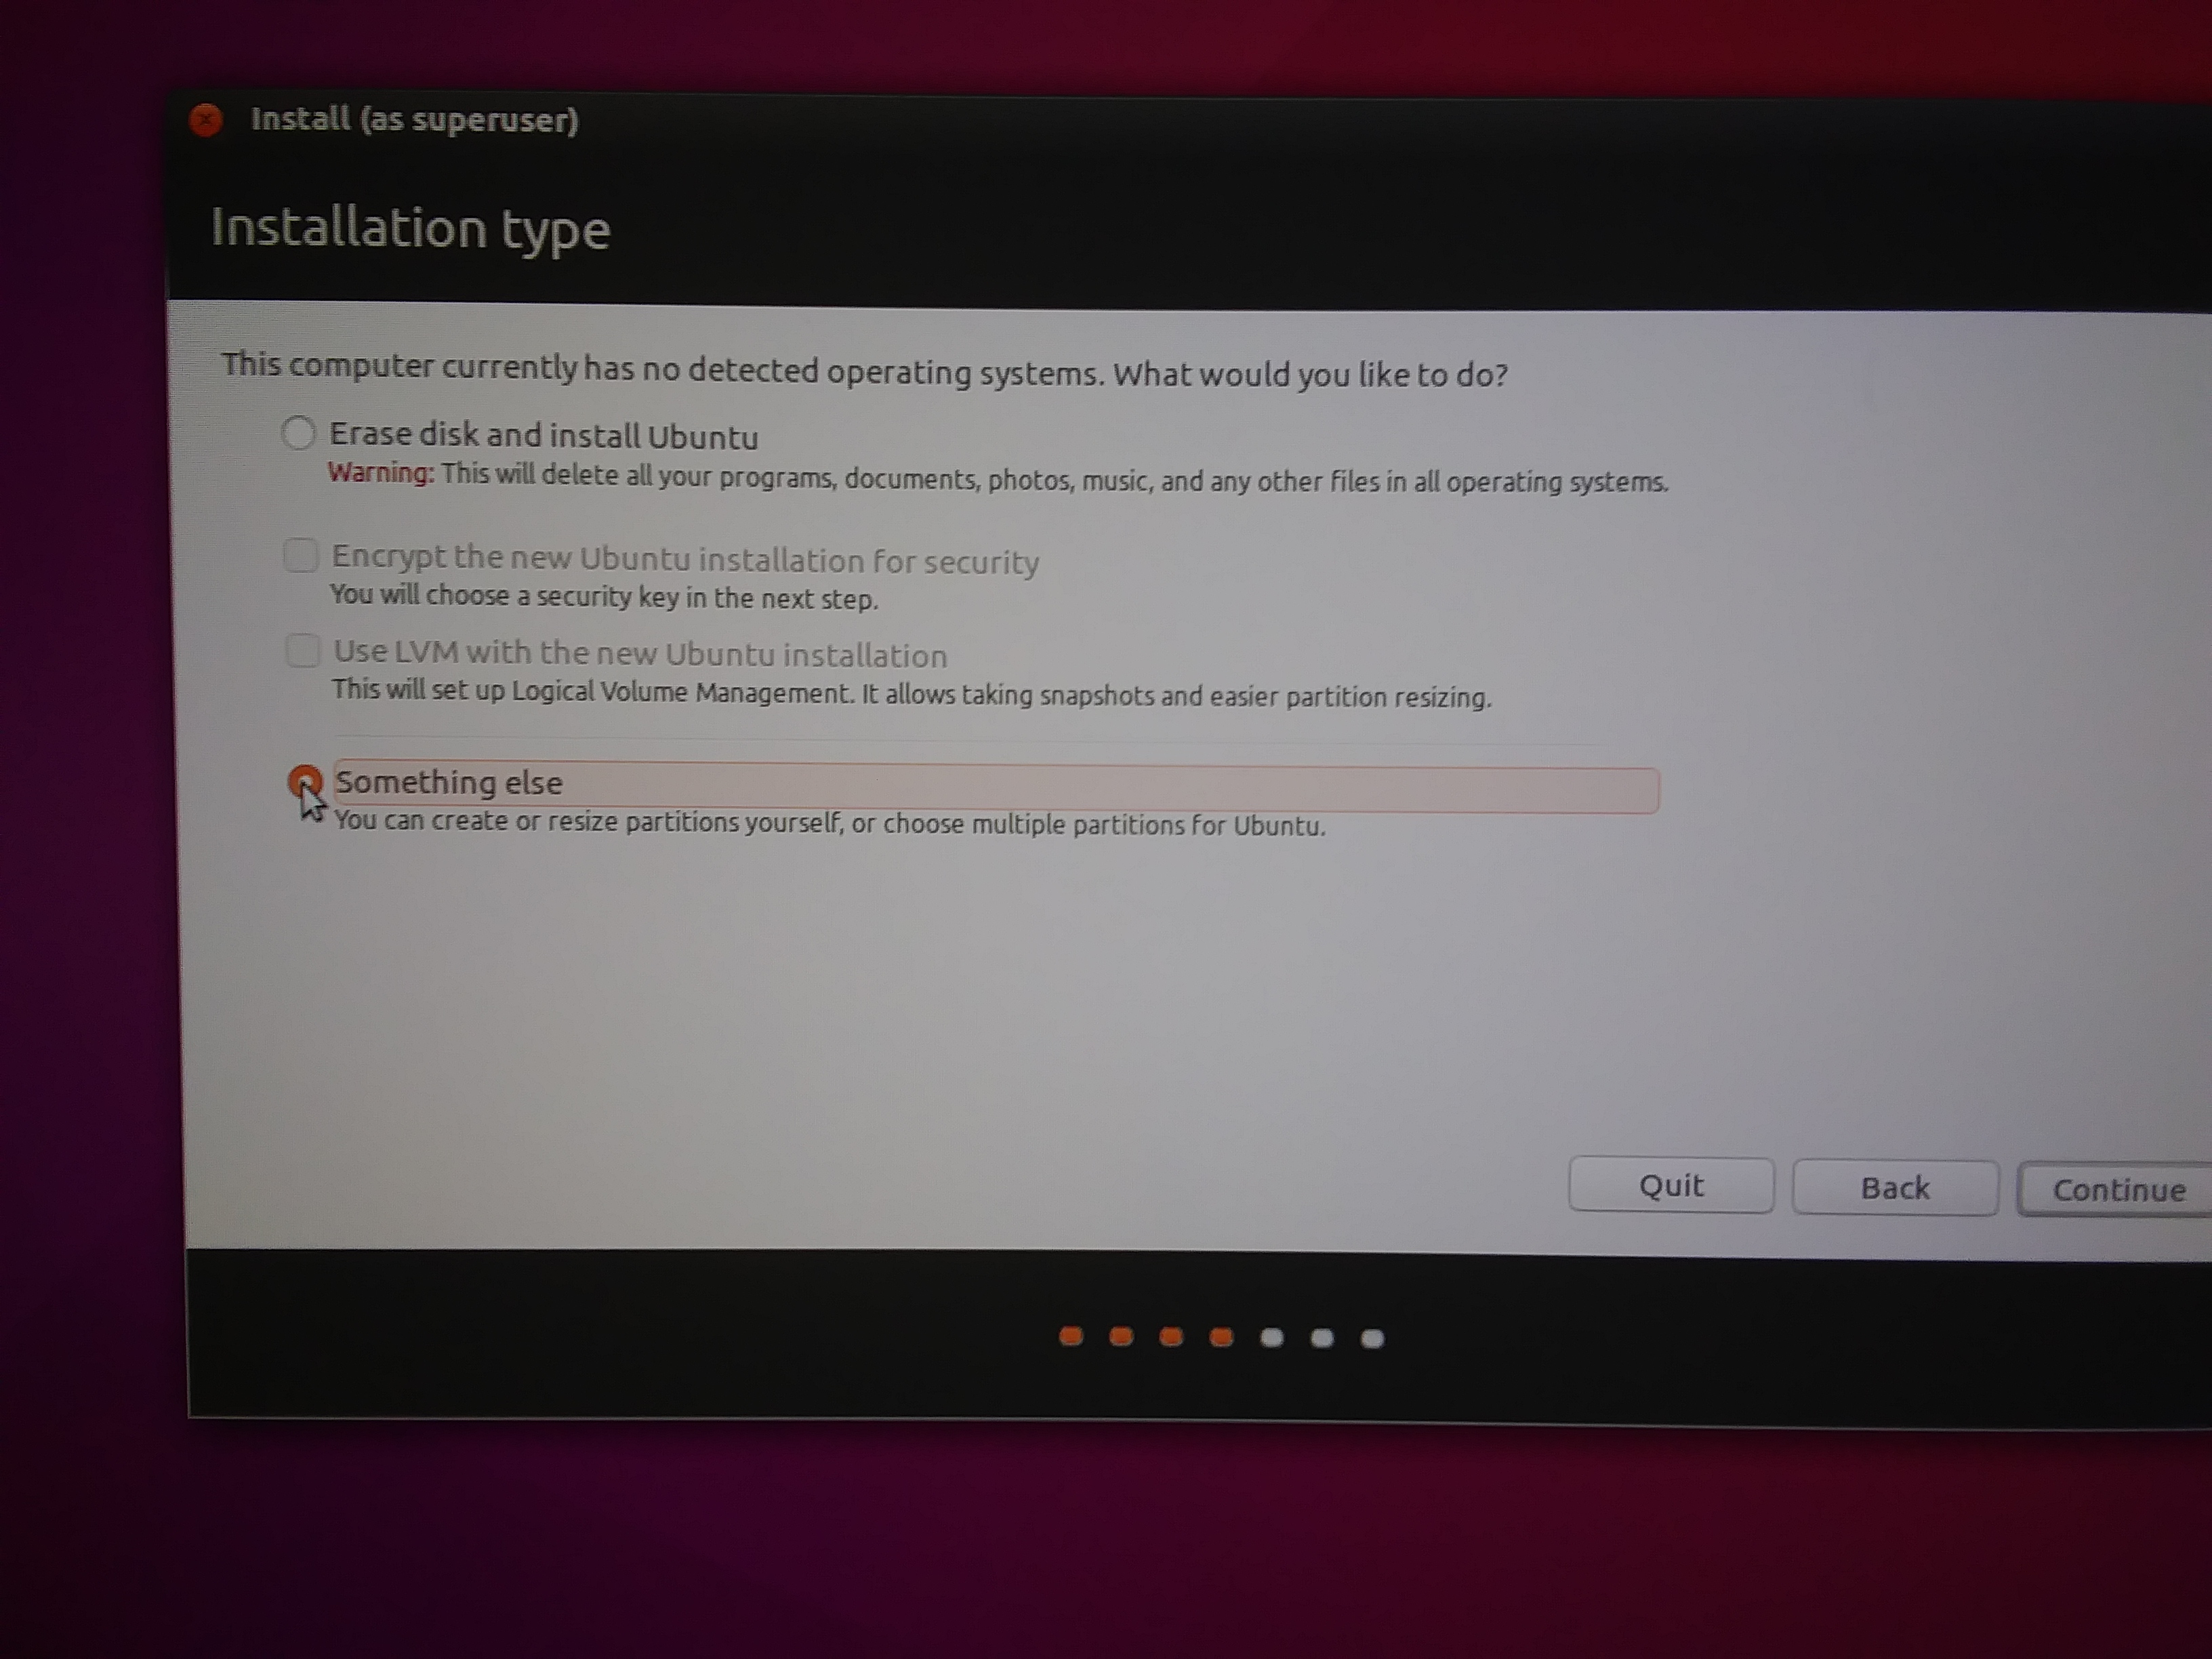
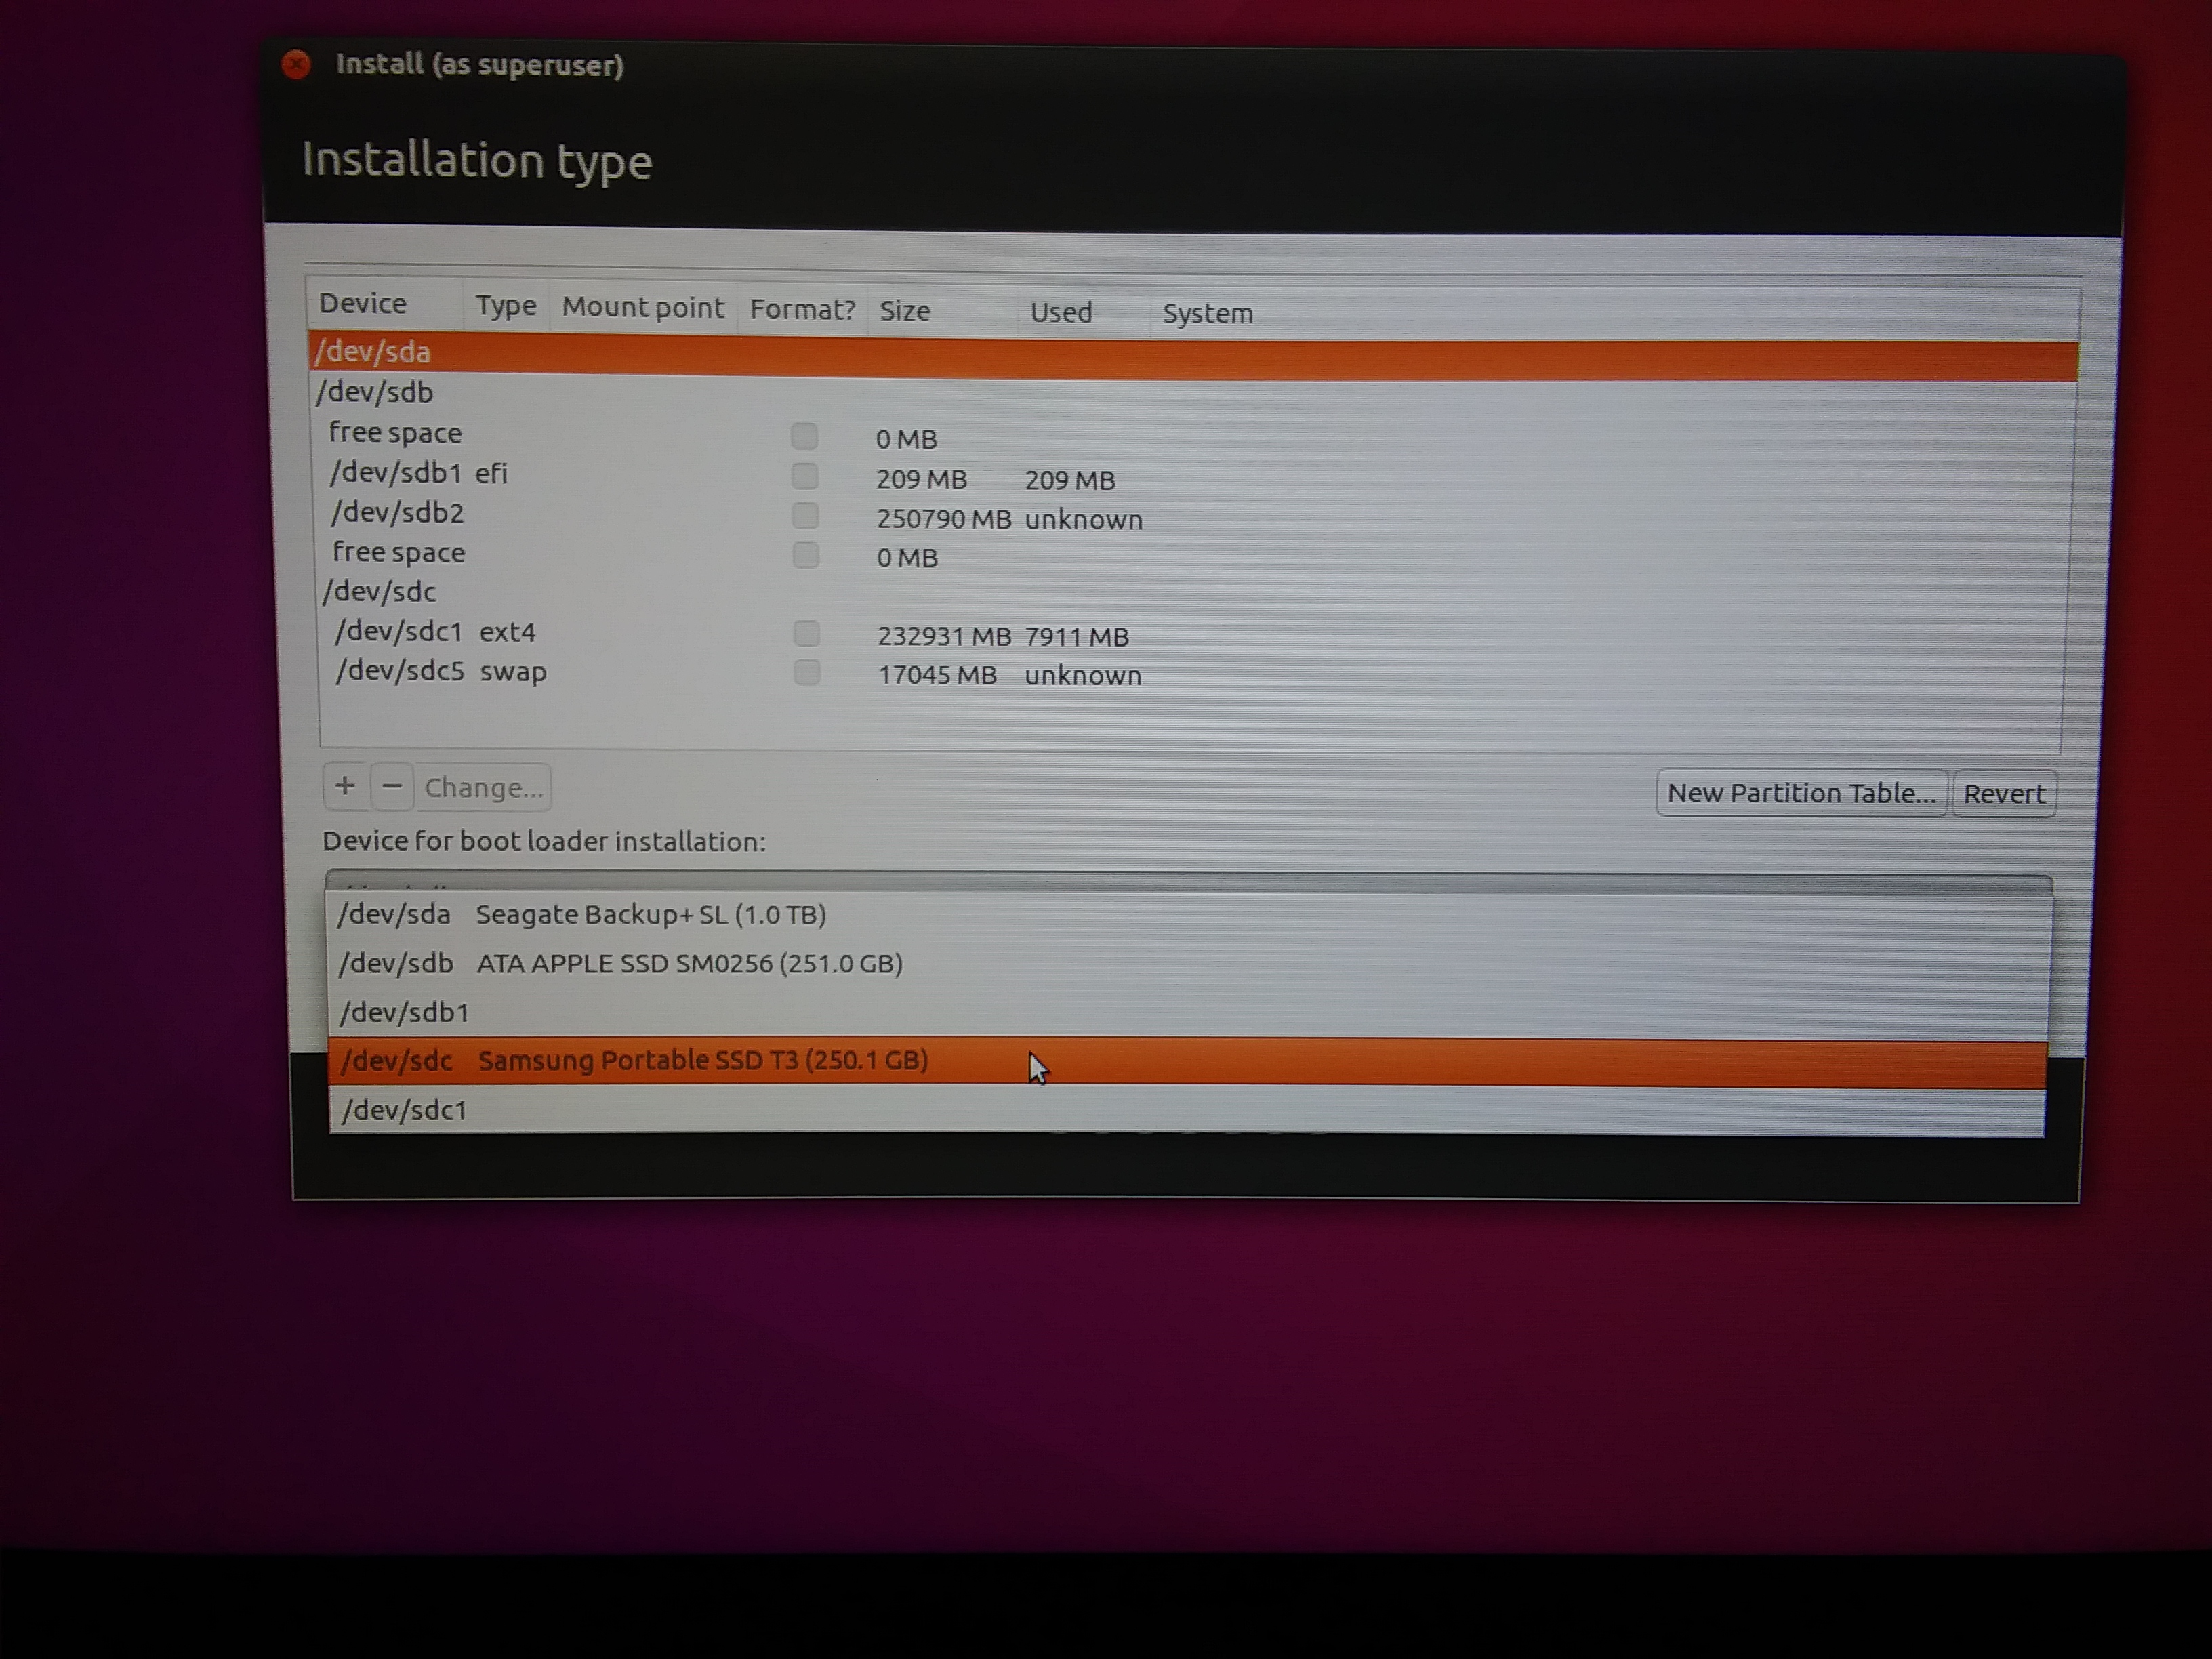
Finally – Boot to the new, fully installed, external SSD Linux disk.
A great little tool to burn ISOs to external USB disks:
Etcher
Use Disk Utility to format the external as Fat 32 (may have to format as Mac OS first).
If Etcher doesn’t see the drive at first, use the gear to turn on “Unsafe” mode which lists all attached disks. Then choose your disk with care. “Etching” the ISO to the disk REPLACES the contents of the disk with the ISO image!!!
for /F “tokens=3 delims=: ” %%H in (‘sc query “MyServiceName” ^| findstr ” STATE”‘) do (
if /I “%%H” NEQ “RUNNING” (
REM Put your code you want to execute here
REM For example, the following line
net start “MyServiceName”
))