Category Archives: Labs

Posts about computer labs and classrooms at Williams College

Mac – Use PMSET for Sleep timers and Power Management

On the Mac there are a number of ways to control the sleep timers.  Some seem to work better than others.  For Mojave (MacOS 10.14.x) I have switched to using the command peset.

peset -g      shows a list of settings

peset -a       allows you to change those settings

Example:

bash-3.2# pmset -a sleep 120

bash-3.2# pmset -a displaysleep 120

bash-3.2# pmset -a disksleep 120

bash-3.2# pmset -g

Additional details on this are available at:
https://eclecticlight.co/2017/01/20/power-management-in-detail-using-pmset/

Windows – Finding the right Windows ADK

When building a Windows PE (Preinstall Environment) or prepping systems to be imaged and cloned you are going to need a set of tools in the Windows ADK (or older versions of Windows AIK). The trick is that you have to use the correct version of these tools that matches the version of the Windows OS that you eventually want to deploy.

First find which version of the Windows OS you are planning to deploy. Right click on the start menu and select “System”. Find your system version in the “Windows Specifications” section near the bottom of the window.

Next, head over to the Microsoft Windows ADK website and download the corresponding ADK.
https://docs.microsoft.com/en-us/windows-hardware/get-started/adk-install

Once downloaded, go on to install the tools. Accepting the defaults is probably your best bet at least for your first try at this.

Mac OS – SIP or System Integrity Protection

SIP (System Integrity Protection) isn’t a bad thing. It actually protects your mac from a whole host of otherwise nasty infections. However, it can sometimes get in the way of doing important mac management tasks.

To disable SIP:

  1. Boot the mac to recovery mode (boot while holding down control-R)
  2. In Terminal enter the command: csrutil disable
  3. Then reboot the mac to it’s normal OS.

Remember to re-enable SIP when you are done by booting back into recovery mode and giving the command: csrutil enable

Mac OS – Kernel Extensions

In 2018 Apple introduced secure kernel extensions to their MacOS. Earlier applications could install kernel extensions without the user knowing or specifically being required to “approve” that extension. Think of kernel extensions like drivers and other very deep operating system code that controls significant parts of the operating system. The increased awareness and security of kernel extensions is/was required because malware had begun to exploit these extensions.

Since about MacOS 10.13.4, any kernel extension had to be “approved” by the administrative user of the mac. In general, users had 30 minutes after software install to “Allow” the installed Kernel Extension in the Security tab in System Preferences with a reboot or reload of the extension resetting that “Allow” clock.
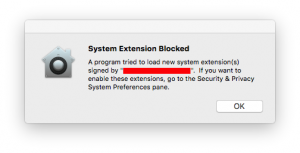
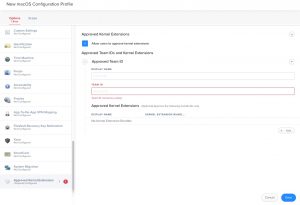
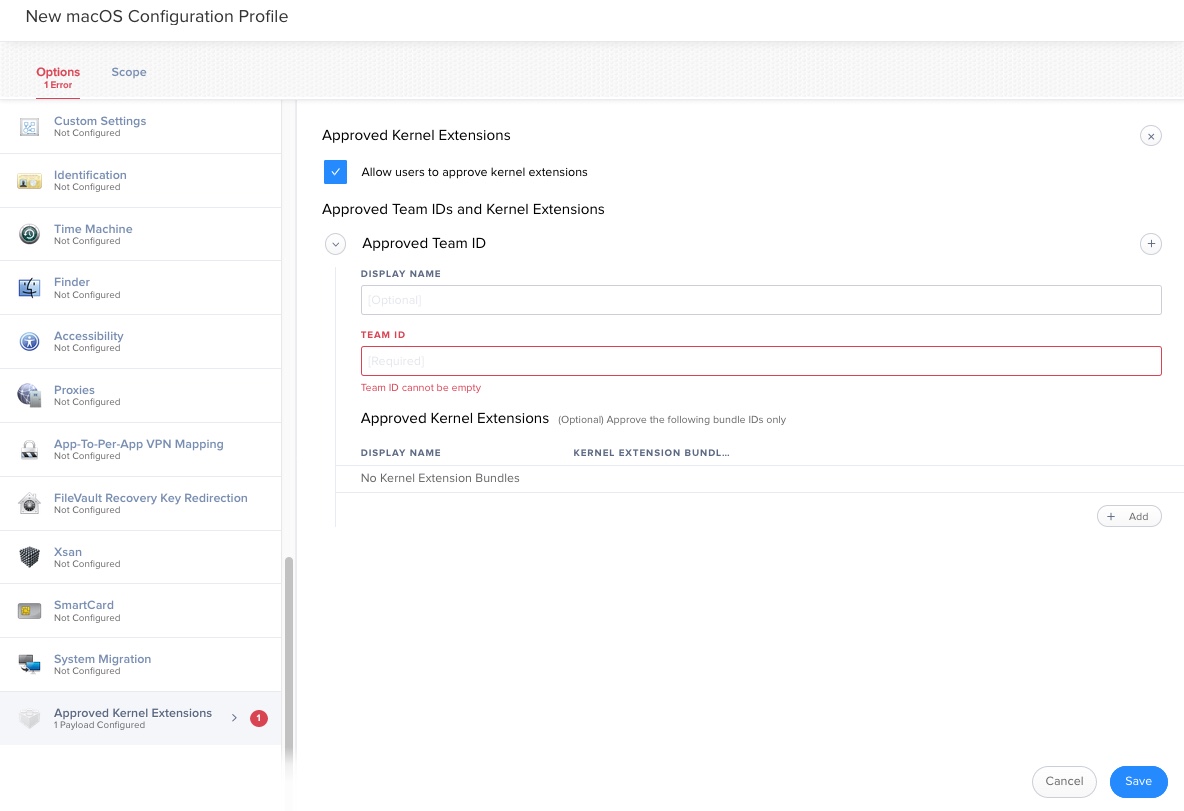
Additionally, Macs that are enrolled in an MDM server can be configured to pre-approve Kernel extensions.

Several things to note:

Kernel Extensions MUST be pre-approved prior to a pushed application install
In order to correctly install software that requires kernel extensions using an MDM server like JAMF, you must first pre-approve the kernel extension before installing the software. There isn’t anyway, either manually or automated, to approve a kernel extension after the fact for software installed with the MDM. Conveniently, newer versions of JAMF provide a very easy way to create a configuration profile to approve the kernel extension just with the associated “Team_ID”.
DEP enrolled Macs happy to comply, User-enrolled macs must be sure to “approve” MDM
For MDM controlled macs, only DEP (Device Enrollment Program) enrolled macs can be reliably configured to avoid asking the user to “approve” the kernel Extension. Macs enrolled in the MDM with any other user-controlled enrollment process (i.e. install package, email invite, etc.) can be in a state where the configured pre-approval of kernel extensions will not work. For example, if the user never approved the MDM profile. Look at the Profiles tab in System Preferences.

Pre-approval isn’t installation

You can pre-approve a kernel extension using an MDM server and that will appear in the “Profiles” tab of System Preferences. However, the kernel extension isn’t actually installed until you install it with the installation process from the vendor. Meaning that it won’t show up in the KextStat or Sqlite commands below until it’s actually installed. (That is probably obvious to most but I spent a good 10 minutes on this before it dawned on me!) Pre-approval of the kernel extension essentially avoids asking the user to approve the kernel extension with the 30 minute timer mentioned above. Essentially, the pre-approval process doesn’t load the kernel extension onto the system it just says that once the kernel extension is loaded/installed no additional approval from the user will be needed.

Uninstalling doesn’t remove from sqlite database

When you uninstall a kernel extension, while the extension may be removed the entry in the kextpolicy database is typically not removed. It can become important to remove these database entries. We have found that kernel extensions, even if unapproved, that remain in the kextpolicy database can interfere with the system when new versions of software requiring kernel extensions are installed. Deleting entries from the kextpolicy database can only be done with SIP (system integrity protection) disabled. See below for the details of deleting these database entries.

Some Commands to know:

Kextstat
Displays all running kernel extensions

kextstat | grep -v1 apple
Displays all non-Apple (3rd party) running kernel extensions


/usr/bin/sqlite3 /var/db/SystemPolicyConfiguration/KextPolicy 'SELECT * FROM kext_policy;'

Displays kernel extensions that are installed by the user manually. The returned format begins:
Team_ID | Bundle_ID | Approved (1=approveded, 0=not approved)

/usr/bin/sqlite3 /var/db/SystemPolicyConfiguration/KextPolicy 'SELECT * FROM kext_policy_mdm;'
Displays kernel extensions that are installed by the MDM server as part of a pre-approval process. The returned format begins:
Team_ID | Bundle_ID | Approved (1=approveded, 0=not approved)

To delete a kernel extension from the kextpolicy database: First disable SIP.
Once booted back into the running MacOS:

> sudo -s
# /usr/bin/sqlite3 /var/db/SystemPolicyConfiguration/KextPolicy
sqlite> SELECT * FROM kext_policy;
OR
sqlite> SELECT * FROM kext_policy_mdm;
THEN
sqlite> DELETE FROM kext_policy WHERE team_id = displayed_team_id_from_above;
OR
sqlite> DELETE FROM kext_policy_mdm WHERE team_id = displayed_team_id_from_above;
sqlite> .quit
#
Remember to re-enable SIP!
MacOS – Creating a clean initial image

To create a “clean” image –

Basic goal – you don’t want anything except the basic MacOS installed. So be certain that the mac serial number is not scoped to a JAMF pre-stage enrollment. You don’t want JAMF to install or anything else to install.

Take a mac out of shrink wrap (or use internet recovery (cmd-opt-R) to erase the internal hard drive and re-install a Mac OS).

Let the MacOS setup run and disable (or not enable) everything you can. Create an admin account that you want to use for all computers this will go on.

Run system updates and update all MacOS software.

If they are not installed, install iMovie, Pages, Keynote, Numbers, and GarageBand. Run GarageBand to make sure the required Apple Loops are downloaded and indexed.

In a terminal window switch to root (sudo -s) and give the following commands:

  • systemsetup -setcomputersleep 120
  • systemsetup -setdisplaysleep 120
  • systemsetup -setremotelogin on
  • softwareupdate –schedule off

These commands are useful when remotely connecting to the mac after imaging.

Once done, shutdown (not reboot) the mac. Then boot to an external disk that is loaded with the same or greater version of the MacOS and run an up-to-date cloning application like Carbon Copy Cloner. Take a read-only, compressed image of the internal hard drive “Macintosh HD”. Copy this into your image distribution system.

Since MacOS 10.13 – High Sierra – You must use an image taken from an APFS formatted drive to “image” other APSF drives. Likewise, use an image taken from an HFS drive for HFS drive imaging.

Also, you can not simply image an MacOS 10.12 or lower with a MacOS 10.13 image. The MacOS 10.12 mac must fist run the native MacOS 10.13 installer from Apple. That installer both installs firmware required for booting a 10.13 system and formats the drive as APFS or not depending on drive type. All SSDs are formatted to APFS without option. As of 10.13.5, Fusion drives and HDD drives are left as HFS.

Mac – Reset SMC for slowness or wake/sleep issues

The SMC (System Management Controller) controls a number of things related to power management on a mac. If it isn’t working properly it can cause fans to run, the cpu to run slow, and/or, the mac not to wake from sleep when it is supposed to.

On most mac desktop (not the new imac pro), you reset the SMC by:

  1. shut down the computer
  2. unplug the power cord
  3. wait at least 15 minutes
  4. plug the power cord back in wait 5 seconds more
  5. turn the computer on

More Details:
https://support.apple.com/en-us/HT201295

Mac – Tool to help download specific macos installers

It isn’t always easy to get all of the right pieces for a particular MacOS update/install.  For example, if you are running MacOS 10.13.5 already the traditional ways of going to the Map App Store or doing system updates won’t offer you MacOS 10.13.4.

Thanks to dedicated mac folks on the interwebs we now have a tool. See:

https://derflounder.wordpress.com/2018/02/27/using-installinstallmacos-py-to-download-macos-high-sierra-installers/

and

https://github.com/munki/macadmin-scripts/blob/master/installinstallmacos.py

Mac – 10.13.4 – Wipe and clean install of OS

On a mac that is already running 10.13.4 and that has an APFS drive you can wipe the drive and reinstall the OS without having to boot to anything external, external drive or netboot.

Get the MacOS 10.13.4 (or better) installer from the app store and put it in your /Applications folder. This is were it goes by default if you download it. Then give the following command and sit back:

/Applications/Install\ macOS\ High\ Sierra.app/Contents/Resources/startosinstall --applicationpath /Applications/Install\ macOS\ High\ Sierra.app --eraseinstall --agreetolicense --nointeraction

“–eraseinstall” is new in MacOS 10.13.4 and will ERASE the hard drive before installing the OS again.

“–nointeraction” is undocumented but causes this command to run without human intervention (and therefore can not be interrupted!)

This will but the mac back in the out-of-box shrink wrapped state with an erased drive just like the internet recovery process can do.  Once back to being shrink wrapped, you can, for example, let it run through your JAMF pre-stage enrollment process.

More details at: https://support.apple.com/en-us/HT208533