Tag Archives: Windows

Kace – Windows software installs from Network Share

I had been testing using KACE to do software installs from it’s “alternative” download feature but it seemed easier just to run the software installs from a network file server …

Here is a process that is working for me ….

1) Copy the install files to \\kstore\apps (Gabe needs to give your AD account write permission to that share.)

2) Write a batch file that mounts that network share and runs the installer … an example using Sophos 10 is below.

3) Distribute that batch file with Kace a file distributionto a known location on the target computer and then call that batch file with a Kace Script.  (One may be able to combine these two steps into one …)

@echo off
rem network file server sophos 10 install - Lynna Jackson, Williams College, 2012

rem mount network file share read-only 
rem using the IP numeric address seems faster, replace XXXX with real pword
net use s: \\137.165.4.80\apps /user:kstore\kuser XXXX

rem run sophos install in silent mode
s:\sophos10\sophos10\setup.exe -s -updp http://sophos.williams.edu/SophosUpdate/CIDs/S027/SAVSCFXP/

rem wait awhile so that sophos has a chance to update
ping 127.0.0.1 -n 360 >nul

rem dismount the network drive
net use s: /delete
Windows 8 – Deleting windows.old and temp install files

When doing an upgrade to windows 8 the installer can leave behind a large amount of data in a few locations.  To remove these use Disk Cleanup with the option to clean-up system files. I have gained back more than 30 GB with this process.

Go to the Desktop and open Windows Explorer, then right-click on the system drive (usually C: or D:) and select Properties.  Then click on Disk Clean-up.  In that window click on “Clean Up System Files”.  This will add to the list of files that can be deleted.   In the new, expanded list be sure to select windows.old and the windows install files.  Then let the disk cleanup happen.

For another reference see:

http://www.jstawski.com/archive/2012/06/01/Deleting-the-Windows-old-directory-after-upgrading-to-Windows-8.aspx


Windows – Novell settings for Lab image

Novell Client Settings used on 2013 Windows Lab image (the novell client is not used on Mac OS)

set novell client login link on users desktop to a shortcut to c:\windows\system32\loginw32.exe

In Novell Client Properties …

Set Client Props –

LDAP Contextless Login Tab:

  • Enable LDAP Contexteless login
  • Enable LDAP Treeless login
  • Enable LDAP Context Search Scope
  • Trees = o=williams
    • Search Context and Subtree
      • ou=student,o=williams
      • ou=faulty,o=williams
      • ou=staff,o=williams
      • o=williams
  • Servers
    • nwldap.williams.edu
    • nds1.williams.edu
    • nds2.williams.edu

Service Location Tab:

  • Scope List
  • o=williams


Advanced Login Tab

  •  Use all defaults except for these:
    • Computer Only Login Default – Always
    • Forgotten Password Prompt – Off
    • Last Loged In User – Off
    • Logged In Profile List – Off
    • Novell Logon – Off
    • Show login Windows password sync – Off
    • Supress NMAS Support for Computer Only Login – On
    • Tree Box – Off
    • Use NMAS for Windows Login Default – Never

Once all this is set you need to save by clicking OK and then reboot.  Next try to log into Novel which will likely fail with can’t find the server … Then log into the computer and go back to Novelll Client Settings and set :

System Login Profiles Tab (this is not be available until after first login attempt)

  • Default – eDirectory Tab:
    • Trees = WILLIAMS
    • Contexts = williams
    • Servers = achilles

BootCamp – Imaging windows with winclone

Using a lab windows image on a dual boot mac —

  • Prepare a base windows image in Dell hardware and sysprep
  • Take an image with KACE/Ghost but don’t allow drive to boot after
    • With ghost you need to uncheck “Reboot” in the Misc Options before starting to take image
  • Physically remove hard drive from dell hardware and put it in a Mac Pro Tower but don’t let it boot yet
  • Use an external disk that has winclone loded on it to boot the mac
  • Take a winclone image
    • Before taking winclone image, set perferences to use the “special” format that is not mountable but is smaller and restores faster.

This image should then be restorable to any bootcamp windows partition using the external mac boot disk and winclone as above. After restore you’ll need to boot to the windows volume, letting sysprep complete and then run the bootcamp drivers disk for that mac model.

Add any additional software/settings, re-sysprep, and then take an image of the windows volume with DeployStudio.

Windows 8 – First Impressions …

Windows 8 is an interesting new windows version. Microsoft says this is “a whole new way to use Windows” and they aren’t kidding!

For long-time windows users it is quite disorienting at first glance. Just getting logged in presents a challenge of figuring out how to raise the “window shade” on the login window. Once logged in, you are offered the helpful “Start” window. Clicking on one of these presumably often used applications launches that app in a full screen. This then presents the challenge of figuring out how to get back to the “Start” window. Also, after clicking on several applications figuring out how to close those apps which you know are still running in the background is yet one more hurdle. No, there is not an “Exit” function anywhere to be found in those running apps.

From a new windows user perspective, I suppose, the interface is slick. All the confusing computer control functions like the Control Panel and Computer Preferences are so buried that you can only find them if you know they are there and have some clue as to where to look for them. Also, the new windows 8 applications like Reader have slicked down interfaces in full screens with features and options hidden. Other applications like Windows Explorer has the same “ribbon” interface that has become common in applications like Microsoft Word, etc. This, presumably, all makes the new Windows 8 interface more consistent and coherent to individuals that just want to get some work done.

For several “Getting Started” videos, have a look at:
http://windows.microsoft.com/en-US/windows-8/get-started?page=vid3

For a bit more advanced information, try:
http://www.techradar.com/news/software/operating-systems/50-windows-8-tips-tricks-and-secrets-1028220

Windows – NTLM Authentication Level

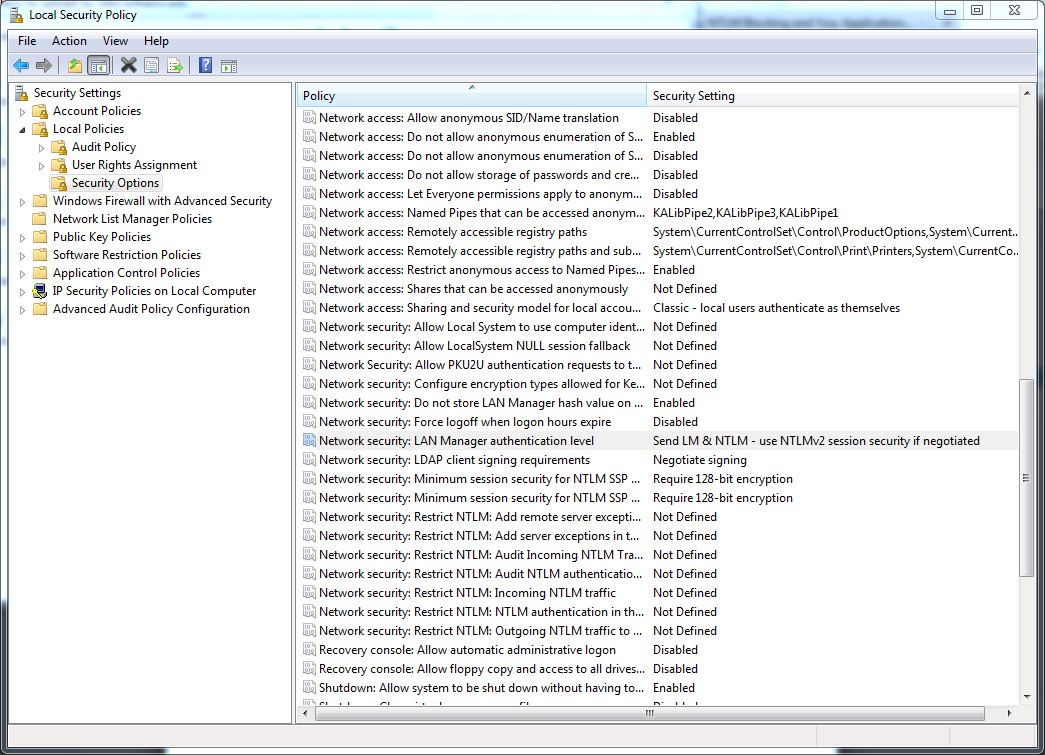
With the advent of Windows 7, Microsoft increased the default NTLM (a.ka. LAN Manager) authentication level required to connect to various network resources like file shares.  If you are running windows 7 and need to connect to older files shares you may need to lower the NTLM authentication on your computer to allow the connection.  If you are not able to log into the file shares from a windows 7 computer but are from other non-windows 7 computers,  try setting your LAN Manager  authentication level to …”Send LM & NTLM – use NTLMv2 session security if negotiated”

To do this  — In the Start menu search box type “Local Security Settings” (or look in the Administrative shortcuts) and then open the program …  this screen snip shows how to find this setting … no reboot is required …