Tag Archives: Windows 10

Windows 10 – Install to external USB drive

Update (Sept 2017) –

An even easier way to do this is to copy your wim image to a windows 10 computer and run the “Windows to Go” application.  In the Windows to Go app, choose the disk you want to install the image on and then choose the wim image you want to put on that disk.

The result should be a bootable windows 10 external disk that will boot on just about any computer!


Using a Windows 10 computer, follow the standard procedure to format the external drive and set it to be bootable in DiskPart:

Diskpart
Diskpart> list disk
Diskpart> sel disk 1 (be sure to select the correct disk!)
Diskpart> clean
Diskpart> create partition primary
Diskpart> format fs=NTSF quick
Diskpart> active
Diskpart> assign letter=g
Diskpart> exit Continue reading
Windows 10 – Installing .Net 3.5 Framework

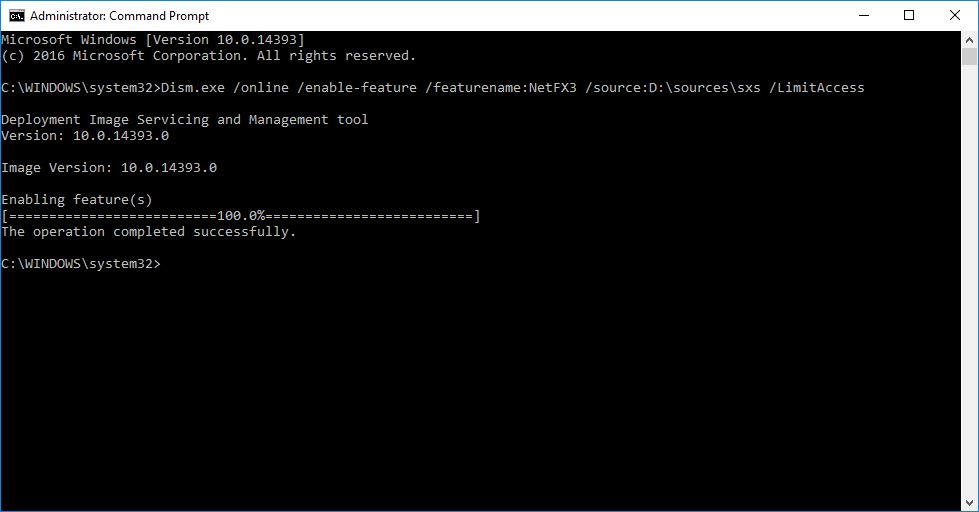
Only .NET 4.0 framework is included in Windows 10 by default. However, many applications still require the .NET 3.5 Framework so to enable/install this 3.5 Framework load your install DVD into the drive and give the following command at an administrative command prompt:

Dism.exe /online /enable-feature /featurename:NetFX3 /source:D:\sources\sxs /LimitAccess

net35install

For more details see:
https://answers.microsoft.com/en-us/insider/forum/insider_wintp-insider_install/how-to-instal-net-framework-35-on-windows-10/450b3ba6-4d19-45ae-840e-78519f36d7a4?auth=1

Windows 10 – Word could not create the work file error

After an upgrade to windows 10 LTSB 2016 “anniversary” edition MS word is giving the error:
“Word could not create the work file. Check the temp environment variable”

According to Microsoft this error occurs when Word doesn’t have permission to write temporary files. To fix this they suggest changing the location of the Internet Explorer Temporary folder or change the registry pointer for Word to a correct temporary location with:
HKEY_CURRENT_USER \Software\Microsoft\Windows\CurrentVersion\Explorer\User Shell Folders
Set the “Cache” to:
%USERPROFILE%\AppData\Local\Microsoft\Windows\Temporary Internet Files

For Details See: https://support.microsoft.com/en-us/kb/2285187

Windows 10 – Hide Disk Use Percentage Bars

The disk in use percentage bars can be alarming and inaccurate particularly for automatically connected network shares. Therefore, I find it is best to hide those from windows users on lab/classroom computers.

Open REGEDIT and navigate to: HKLM\Software\Classes\Drive
Right click on “TileInfo”. Remove the phrase “System.PercentFull;” from the string

For more details see:
http://www.instantfundas.com/2012/11/how-to-hide-drive-space-indicator-bars.html

Windows 10 – Windows To Go Enterprise Deployment Steps

Using a “Windows To Go” USB boot disk to provide course-specific windows programming environments

Microsoft’s overview is at: https://technet.microsoft.com/en-us/library/hh831833(v=ws.11).aspx

In the Fall of 2016 – Williams will be piloting one computer science programming course using windows to go drives.
In the Fall of 2018 – Williams also began using these to “Dual-Boot” macs!

To create the environment:

1) A very fast read/write USB drive is needed. In the above link Microsoft recommends certain devices, we used the Samsung T3 250 GB portable drives.

2) Create a windows to go drive using the windows to go control panel on any windows 10 computer. You can point this at a WIM file you created from a syspreped windows environment.

  • Do not encrypt the drive and do not set it to boot automatically

3) Once complete, boot that created disk on any device like an iMac.

For other ideas on deployments see the website at:
https://technet.microsoft.com/en-us/itpro/windows/deploy/deploy-windows-to-go

Windows 10 – Windows Update Delivery Optimization – OFF !

Under Windows Updates “Advanced Options” then “Choose How Updates are delivered” and you get to “Updates from more then one place”

Apparently, now, Microsoft believes it is wise to allow random PCs on the internet to distribute windows updates. Here is their information about this option: http://windows.microsoft.com/en-us/windows-10/windows-update-delivery-optimization-faq

I am much less trusting of random PCs on the inter-webs so, I have turned this new “feature” off.

Windows 10 – Prepare a system for cloning/Imagining with CopyProfile


My steps to prepare a Windows 10 system for cloning/imaging with COPYPROFILE:

Note: I make no claim that this is the recommended Microsoft way, I can only say this process worked for me!

  • I used a clean install on a formatted hard drive (custom install)
  • I choose the LTSB “servicing branch” for my highly controlled/managed computer lab environment. See the different servicing branches of windows 10 at: https://technet.microsoft.com/en-us/itpro/windows/manage/introduction-to-windows-10-servicing
  • I created a new windows 10 sysprep file from scratch that included the “COPYPROFILE” setting. (Specifically, I did’t have success using an upgraded windows 7 answer file. To create the sysprep answer file I used the windows 10 ADK and my windows 10 install media from step 1)
  • After I did the clean windows install, I installed the drivers for my hardware and then set the computer “sleep” value to never sleep, finally I let the computer sit for a week collecting windows updates. (I found the default “sleep” value is very low and in my experience that sleep state was preventing windows updates from completing! )
  • I created three administrative accounts. One for post-deployment automated scripts and management control. Another account for manual “admin” access when needed. The third admin account I used to create the default user profile so this was my “profile” account.
  • I logged into the “profile” admin account and set it up how I wanted the default user account to be. Config the start menu settings, pinned apps on the start menu and task bar, add icons to the desktop, change application settings like Chrome settings, etc.
  • I created a non-syspreped backup of my system on a device that I can use to quickly restore from. (i.e external usb 3 drive) It always takes a few tries before I get my sysprep answer file quite right and a bad sysprep file almost always causes an un-bootable system.
  • BEFORE syspreping the computer I do a complete shutdown. Not just log off or restart. I shut it all the way down. This was somewhat important in previous versions of windows, however, I now believe it might be a critical step for windows 10 to avoid a corrupted user profiles for any account you had logged into since the last full shutdown. I believe windows 10 has changed the way user profiles stay resident in memory after logouts and even during reboots.
  • After a complete shutdown, I restart and ONLY log into the “profile” administrative account. I opened an administrative command prompt, change directory to the sysprep directory and run sysprep. To do these two steps I use the commands in the admin command prompt:

    cd sysprep
    sysprep /generalize /oobe /shutdown /unattend:c:\windows\system32\sysprep\unattend.xml

    (You’ll need to change the sysprep command to point to your answer file. I’m not sure if it can live in any other directory. Also, remember the sysprep answer file is a vector for hacking, so you should do something to remove the sysprep answer file from your systems after you deploy your image …)

  • Sysprep completes by shutting down the system and I am now ready to capture an syspreped image.