Mac – Installing Spartan ’18 from JAMF

To install Spartan ’18 with a network license server correctly as a push from Jamf:

1) First create a package that installs the Spartan ’18 application to the /Applications folder and push that from Jamf
2) Create a script (example below) that calls the licensing script in that application
3) Create a policy to push the packaged application and then run the script

#!/bin/sh
cd /Applications/Spartan\ 18.app/Contents/Resources/Support
pwd
echo “running ./cliinstall.sh –network-server=lm3.williams.edu”
./cliinstall.sh –network-server=lm3.williams.edu

(You will want to change the network-server address to the correct address for you installation)

Posted in Labs, Software | Tagged , | Comments Off on Mac – Installing Spartan ’18 from JAMF

Windows – Setting Application Defaults

With windows 10 you have to create an xml file with the file associations you want and then import that using group policy …
see: https://blogs.technet.microsoft.com/windowsinternals/2017/10/25/windows-10-how-to-configure-file-associations-for-it-pros/

Posted in Articles | Comments Off on Windows – Setting Application Defaults

Chrome – Understanding Browser Policy Management

There are several ways to manage policies in Chrome on highly managed computers. See:
https://support.google.com/chrome/a/answer/9037717

Posted in Articles | Comments Off on Chrome – Understanding Browser Policy Management

Mac – Use PMSET for Sleep timers and Power Management

On the Mac there are a number of ways to control the sleep timers.  Some seem to work better than others.  For Mojave (MacOS 10.14.x) I have switched to using the command peset.

peset -g      shows a list of settings

peset -a       allows you to change those settings

Example:

bash-3.2# pmset -a sleep 120

bash-3.2# pmset -a displaysleep 120

bash-3.2# pmset -a disksleep 120

bash-3.2# pmset -g

Additional details on this are available at:
https://eclecticlight.co/2017/01/20/power-management-in-detail-using-pmset/

Posted in Labs | Tagged , , | Comments Off on Mac – Use PMSET for Sleep timers and Power Management

Windows – Windows 10 LTSC 2019 different versions

Apparently, there are a couple of different versions of Windows 10 LTSC (named recently changed from LTSB).  The “N” version is for European Union countries effected by anti-trust court cases. the “KN” version is for Korea.

See more details at:

https://www.itprotoday.com/windows-10/what-are-windows-10-n-and-kn-editions

Posted in Articles | Comments Off on Windows – Windows 10 LTSC 2019 different versions

Windows – Finding the right Windows ADK

When building a Windows PE (Preinstall Environment) or prepping systems to be imaged and cloned you are going to need a set of tools in the Windows ADK (or older versions of Windows AIK). The trick is that you have to use the correct version of these tools that matches the version of the Windows OS that you eventually want to deploy.

First find which version of the Windows OS you are planning to deploy. Right click on the start menu and select “System”. Find your system version in the “Windows Specifications” section near the bottom of the window.

Next, head over to the Microsoft Windows ADK website and download the corresponding ADK.
https://docs.microsoft.com/en-us/windows-hardware/get-started/adk-install

Once downloaded, go on to install the tools. Accepting the defaults is probably your best bet at least for your first try at this.

Posted in Labs | Tagged | Comments Off on Windows – Finding the right Windows ADK

Mac OS – SIP or System Integrity Protection

SIP (System Integrity Protection) isn’t a bad thing. It actually protects your mac from a whole host of otherwise nasty infections. However, it can sometimes get in the way of doing important mac management tasks.

To disable SIP:

  1. Boot the mac to recovery mode (boot while holding down control-R)
  2. In Terminal enter the command: csrutil disable
  3. Then reboot the mac to it’s normal OS.

Remember to re-enable SIP when you are done by booting back into recovery mode and giving the command: csrutil enable

Posted in Labs | Tagged , | Comments Off on Mac OS – SIP or System Integrity Protection

Mac OS – Kernel Extensions

In 2018 Apple introduced secure kernel extensions to their MacOS. Earlier applications could install kernel extensions without the user knowing or specifically being required to “approve” that extension. Think of kernel extensions like drivers and other very deep operating system code that controls significant parts of the operating system. The increased awareness and security of kernel extensions is/was required because malware had begun to exploit these extensions.

Since about MacOS 10.13.4, any kernel extension had to be “approved” by the administrative user of the mac. In general, users had 30 minutes after software install to “Allow” the installed Kernel Extension in the Security tab in System Preferences with a reboot or reload of the extension resetting that “Allow” clock.
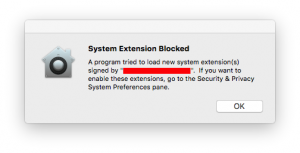
Additionally, Macs that are enrolled in an MDM server can be configured to pre-approve Kernel extensions.

Several things to note:

Kernel Extensions MUST be pre-approved prior to a pushed application install
In order to correctly install software that requires kernel extensions using an MDM server like JAMF, you must first pre-approve the kernel extension before installing the software. There isn’t anyway, either manually or automated, to approve a kernel extension after the fact for software installed with the MDM. Conveniently, newer versions of JAMF provide a very easy way to create a configuration profile to approve the kernel extension just with the associated “Team_ID”.
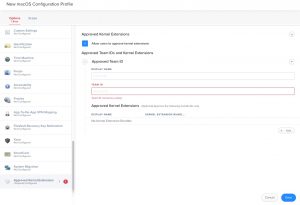
DEP enrolled Macs happy to comply, User-enrolled macs must be sure to “approve” MDM
For MDM controlled macs, only DEP (Device Enrollment Program) enrolled macs can be reliably configured to avoid asking the user to “approve” the kernel Extension. Macs enrolled in the MDM with any other user-controlled enrollment process (i.e. install package, email invite, etc.) can be in a state where the configured pre-approval of kernel extensions will not work. For example, if the user never approved the MDM profile. Look at the Profiles tab in System Preferences.

Pre-approval isn’t installation

You can pre-approve a kernel extension using an MDM server and that will appear in the “Profiles” tab of System Preferences. However, the kernel extension isn’t actually installed until you install it with the installation process from the vendor. Meaning that it won’t show up in the KextStat or Sqlite commands below until it’s actually installed. (That is probably obvious to most but I spent a good 10 minutes on this before it dawned on me!) Pre-approval of the kernel extension essentially avoids asking the user to approve the kernel extension with the 30 minute timer mentioned above. Essentially, the pre-approval process doesn’t load the kernel extension onto the system it just says that once the kernel extension is loaded/installed no additional approval from the user will be needed.

Uninstalling doesn’t remove from sqlite database

When you uninstall a kernel extension, while the extension may be removed the entry in the kextpolicy database is typically not removed. It can become important to remove these database entries. We have found that kernel extensions, even if unapproved, that remain in the kextpolicy database can interfere with the system when new versions of software requiring kernel extensions are installed. Deleting entries from the kextpolicy database can only be done with SIP (system integrity protection) disabled. See below for the details of deleting these database entries.

Some Commands to know:

Kextstat
Displays all running kernel extensions

kextstat | grep -v1 apple
Displays all non-Apple (3rd party) running kernel extensions


/usr/bin/sqlite3 /var/db/SystemPolicyConfiguration/KextPolicy 'SELECT * FROM kext_policy;'

Displays kernel extensions that are installed by the user manually. The returned format begins:
Team_ID | Bundle_ID | Approved (1=approveded, 0=not approved)

/usr/bin/sqlite3 /var/db/SystemPolicyConfiguration/KextPolicy 'SELECT * FROM kext_policy_mdm;'
Displays kernel extensions that are installed by the MDM server as part of a pre-approval process. The returned format begins:
Team_ID | Bundle_ID | Approved (1=approveded, 0=not approved)

To delete a kernel extension from the kextpolicy database: First disable SIP.
Once booted back into the running MacOS:

> sudo -s
# /usr/bin/sqlite3 /var/db/SystemPolicyConfiguration/KextPolicy
sqlite> SELECT * FROM kext_policy;
OR
sqlite> SELECT * FROM kext_policy_mdm;
THEN
sqlite> DELETE FROM kext_policy WHERE team_id = displayed_team_id_from_above;
OR
sqlite> DELETE FROM kext_policy_mdm WHERE team_id = displayed_team_id_from_above;
sqlite> .quit
#
Remember to re-enable SIP!

Posted in Labs, Software | Tagged , | Comments Off on Mac OS – Kernel Extensions

MacOS – Create a Virtual from a fully loaded Mac

Virtuals are useful for so many things. I often use them to have a clean OS on which to test the installation of various software applications with an extremely fast and reliable way to revert back to the clean OS snapshot.

I recently discovered that using Parallels Desktop Lite (free from the app store) in addition to creating Windows and Linux virtuals on your MacOS host you can also easily create MacOS virtuals.

This Mac on Mac virtualization was documented here:
https://engineering.rallyhealth.com/tools/mac/virtualization/2018/04/27/mac-on-mac-virtualization.html

Using the above as a jumping off point, I was also able to create a MacOS virtual from a disk image of a fully-loaded source Mac using the following steps:

1) Create a basic MacOS virtual (see above) using the same version of the MacOS that is on the source mac. Also, be sure to set the settings to a disk size that will accommodate your disk image. I set my virtual to use 128 GBs since my disk image was close to 95 GBs! I also increased the memory from 2 GBs to 4 GBs at the same time.
2) Complete that entire setup and boot the resulting virtual to ensure it boots!
3) Shutdown that MacOS in that virtual (not suspend, not restart, I mean shutdown!). Use “Shutdown” from the Apple menu!
4) In the Parallels Desktop Lite configuration settings for the virtual you just created, choose to boot the virtual to your bootable, external USB drive that has both the disk image of your source mac and your imaging software of choice (I use Carbon Copy Cloner). Note that I use “read-only, compressed” disk images for this and just about everything else.
5) Once your virtual is booted to your external drive, follow your routine for restoring the disk image to the drive in the virtual. I always completely erase the target drive with something like Disk Utility before restoring a disk image to avoid any strangeness with merged systems!
6) When the restore is complete, shutdown your virtual again.
7) Once again, configure the virtual’s settings, this time to boot to the normal hard disk rather then the external drive that has your imaging software on it.
8) Boot your fully loaded and now virtualized mac desktop!

In my case, I also did a happy dance!

Posted in Articles, Software | Tagged , | Comments Off on MacOS – Create a Virtual from a fully loaded Mac