Category Archives: Software

Posts about software and software distribution at Williams College

Linux – Install Linux on external disk

Note one –  To install the correct boot loaders and hardware drivers,  I recommend doing the actual Linux install on the type of computer you plan to run Linux on. Meaning that, I think, the installer will put boot loaders specific for the hardware you are running the installer on in the boot drive of the newly created Linux external disk. For example, I created an Linux (Ubuntu) disk on a Dell precision tower but it could not boot a Dell Optiplex of the same era!

Note two – Always use USB3 ports (marked SS for “SuperSpeed”) for all connections!

Note three – In the following steps you will be using two different USB drives.  One to use as the Linux installer “media” (the thing to install from) and another to actually install Linux on. It is extremely helpful to use two different drives of different sizes and manufacturers. This will help tell them apart so that you can choose the correct disk when installing.  In this example, I used a 1 TB “Seagate” drive for the first “Linux Installer” disk and a 250 GB “Samsung” drive for the second disk to actually install and run Linux from.

First – Create a bootable DVD/CD/USB disk with the Linux installer on it. To do that download the Ubuntu ISO or the Linux Mint ISO to a computer and then burn that ISO to disk. (On a Mac you can use Etcher to burn the ISO to a USB drive.) This process does NOT install Linux.  It only creates the media from which you are going to install Linux in the next step.

Second – (No matter what computer you used above to create the Linux install disk, move to the type of computer you want to run Linux on before proceeding. This is tested on both a Dell Optiplex and a Dell Precision.  Mac hardware will require extra steps to fix the boot loader after install. ) With the SSD external disk you actually want to run Linux on attached to a second USB3 port, boot to the Linux installer ISO disk you created above. This will bring up the “Grub” boot menu.

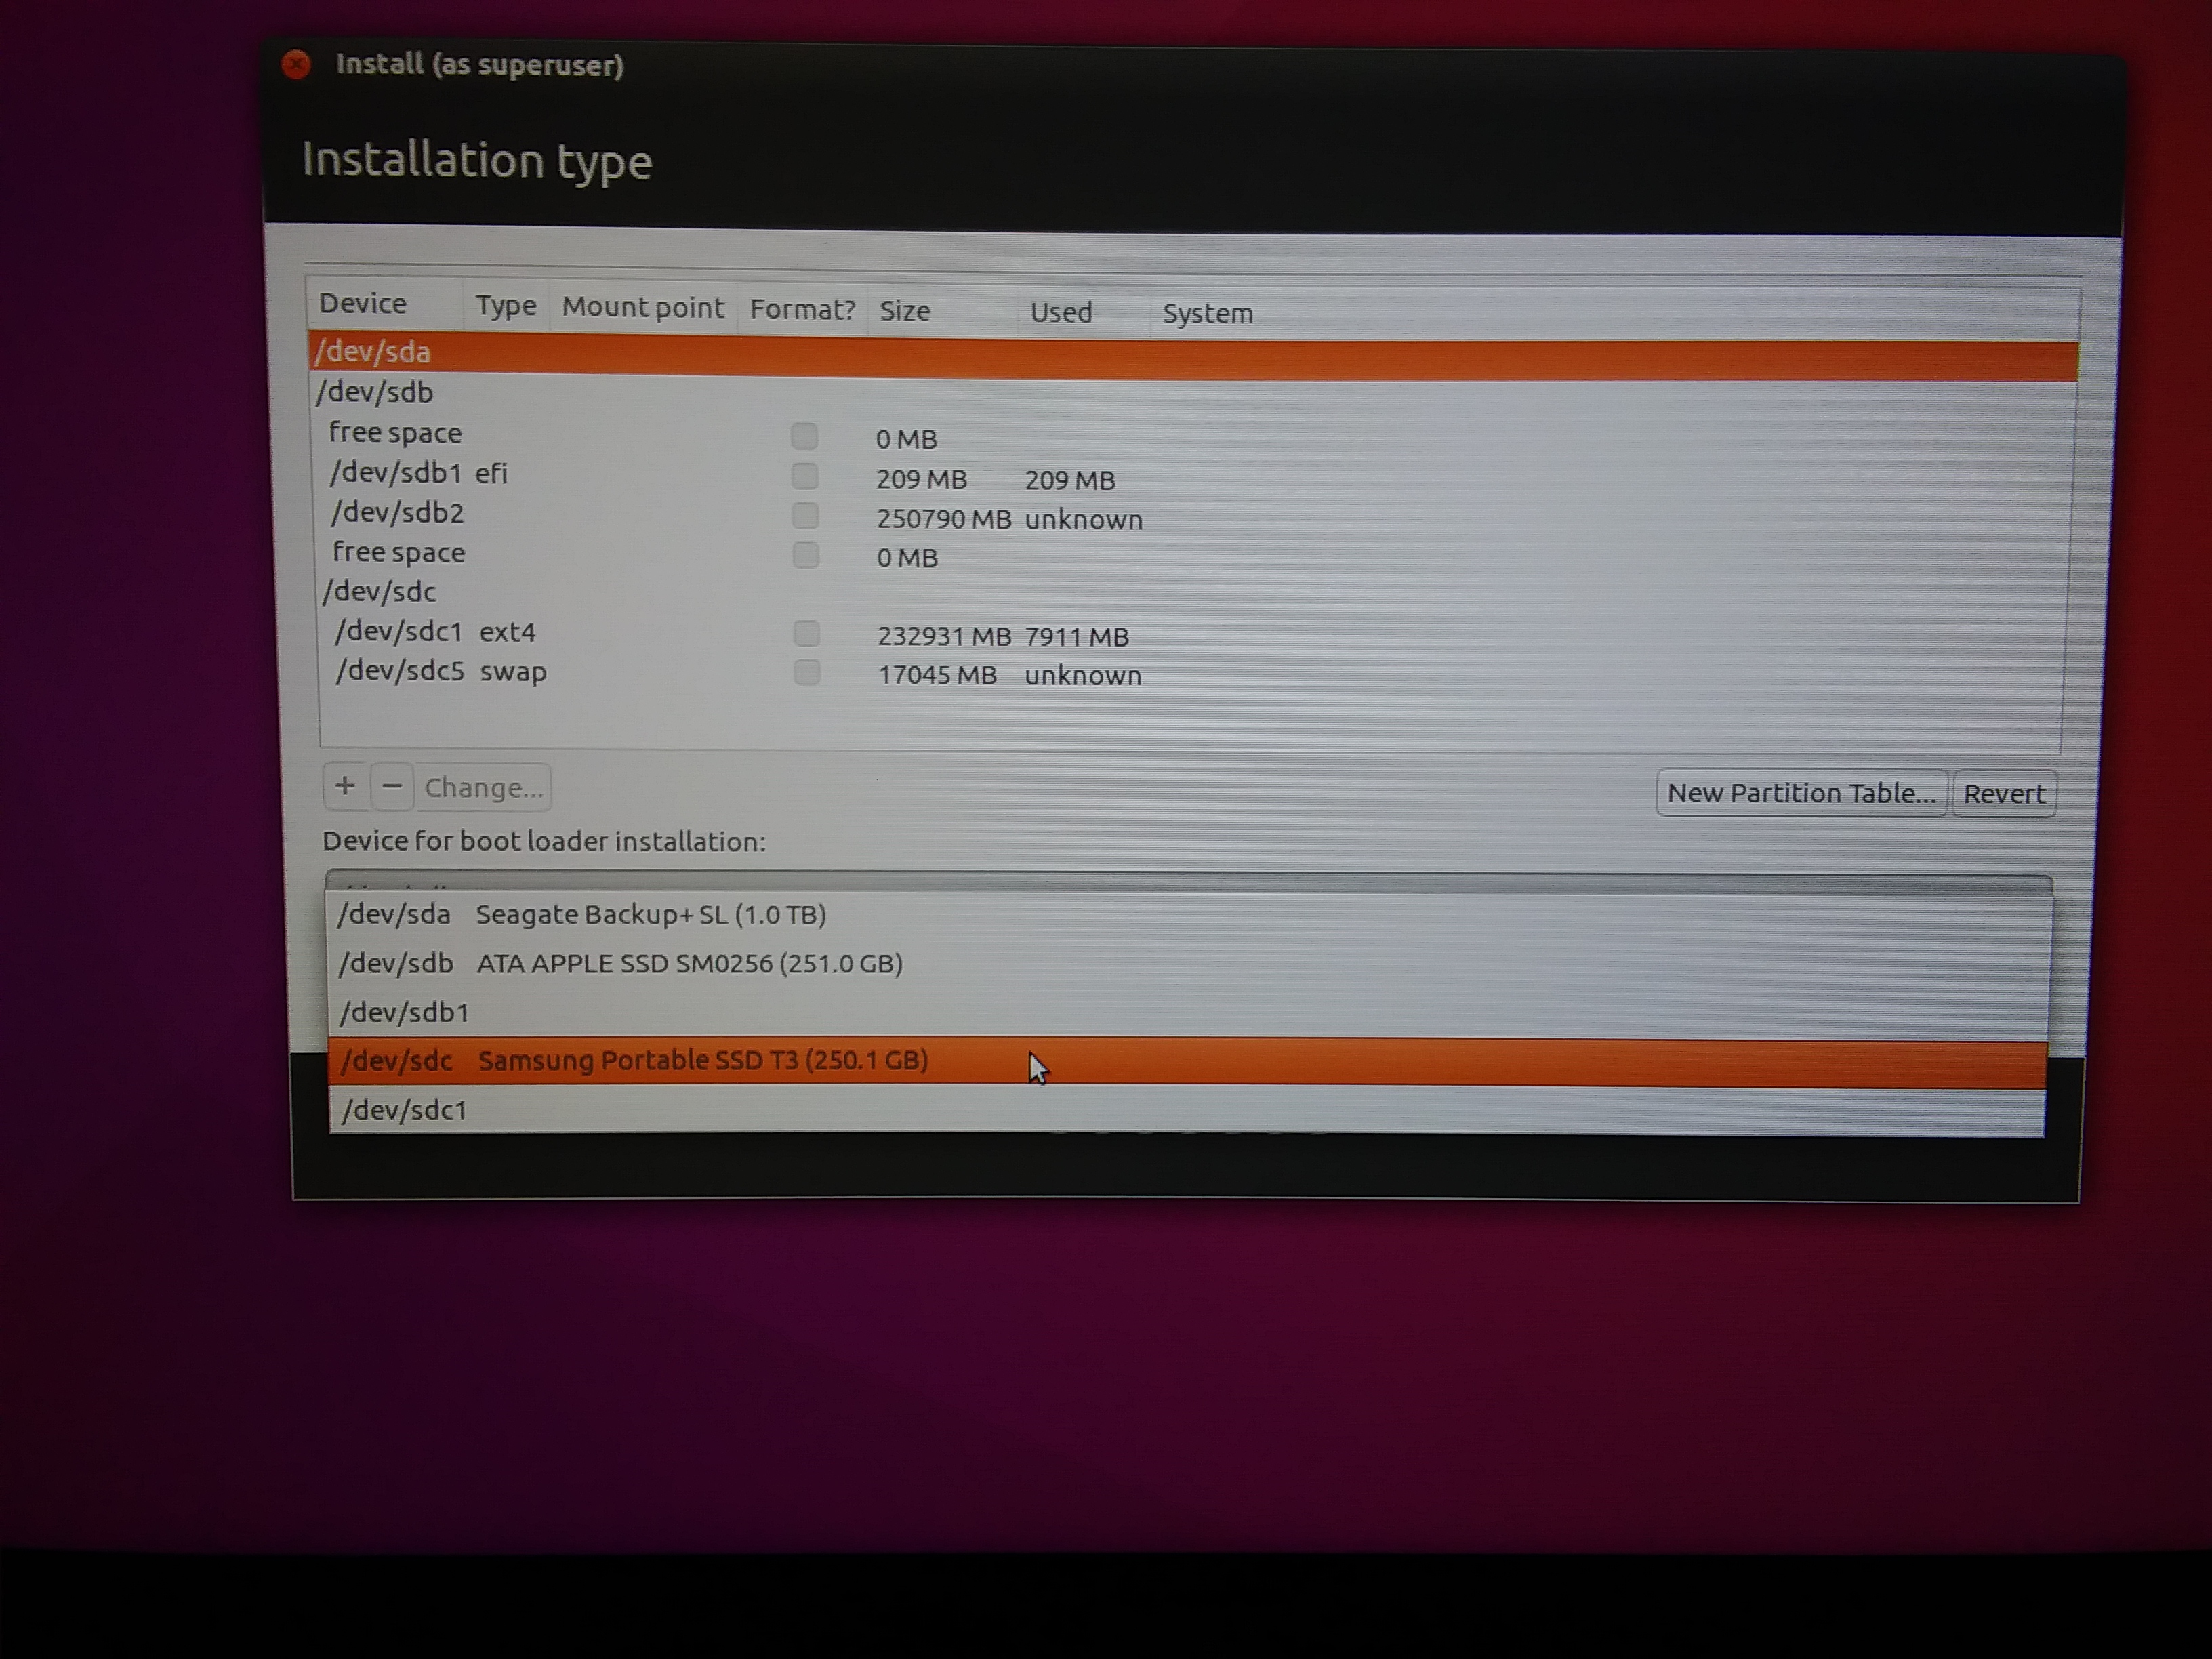
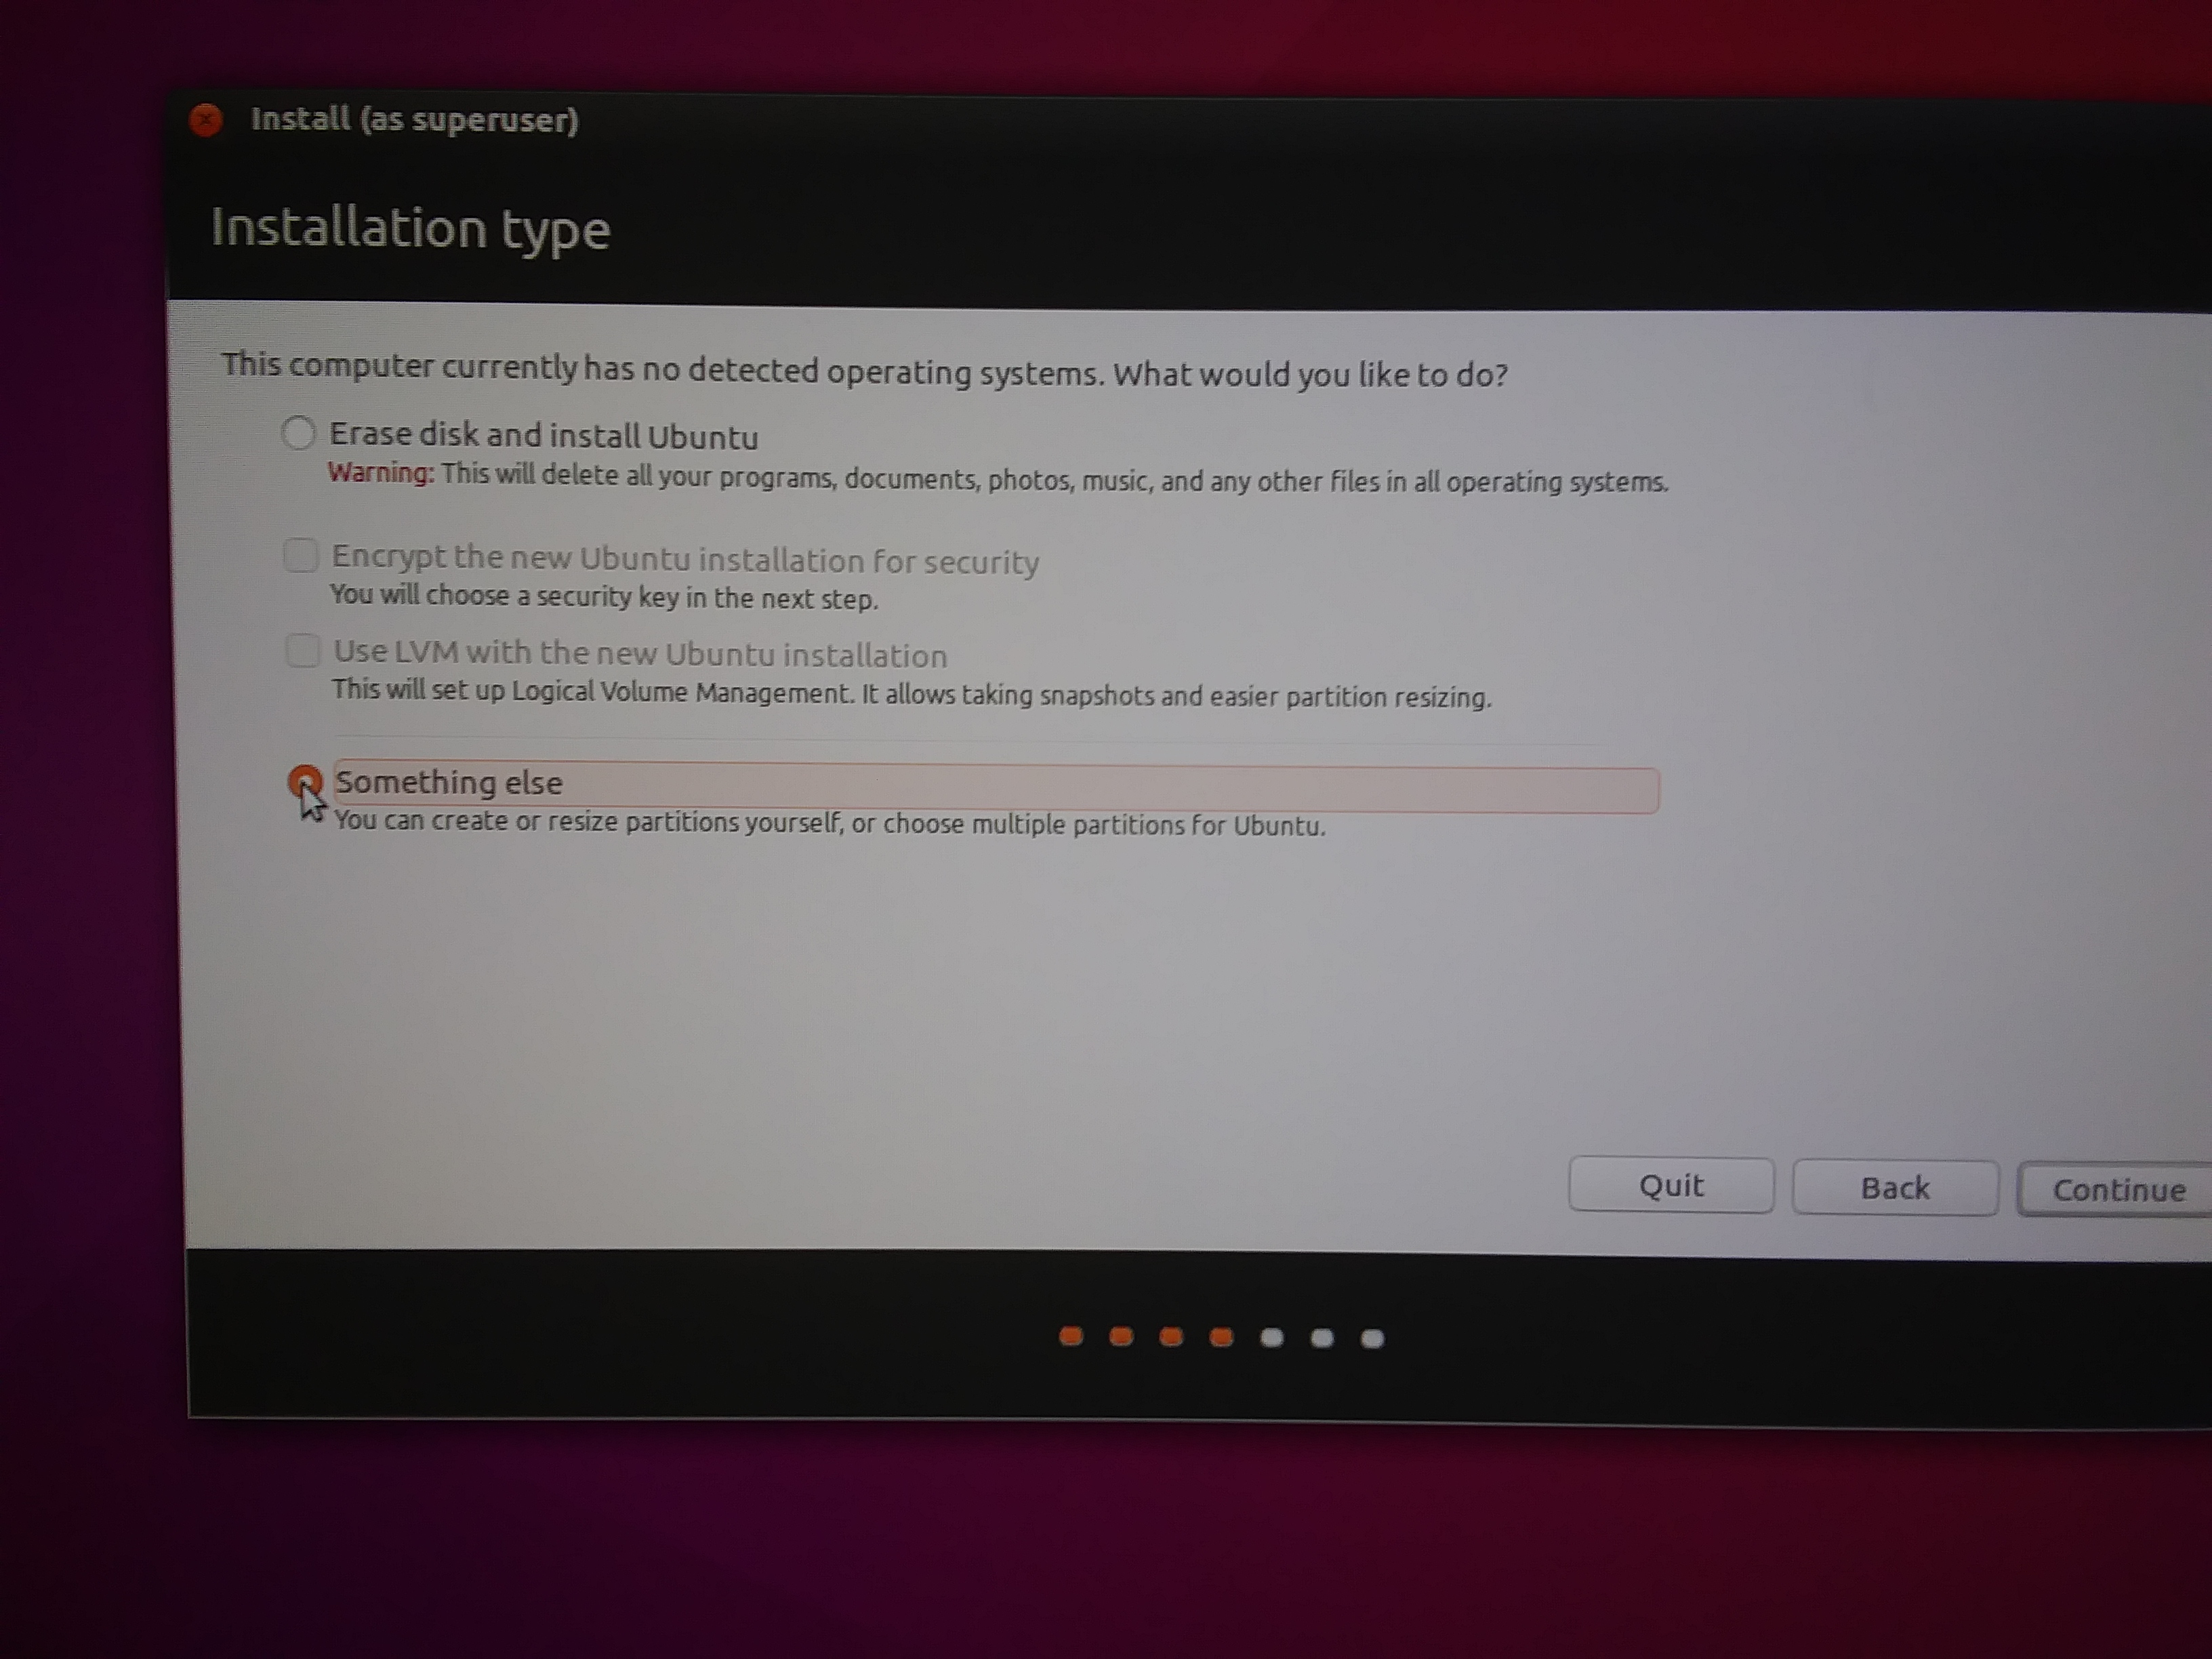
Third – Choose “Install … “. Follow the prompts slowly and carefully.  Before running the actual install step, select “Something Else” first and set the option to install the boot loaders to the external disk you will actually be installing Linux onIf you don’t do this you could screw up the internal drive’s boot loaders causing that computer not to be able to boot! Then click on “Back” and select “Erase drive and install …” .  Then again be careful to select the external drive you want to actually install Linux onAn erased, internal drive will probably make your day a bit harder then you wanted it to be!


Finally – Boot to the new, fully installed, external SSD Linux disk.

Mac – Burning ISO to USB disk – use Etcher

A great little tool to burn ISOs to external USB disks:
Etcher

Use Disk Utility to format the external as Fat 32 (may have to format as Mac OS first).

If Etcher doesn’t see the drive at first, use the gear to turn on “Unsafe” mode which lists all attached disks. Then choose your disk with care. “Etching” the ISO to the disk REPLACES the contents of the disk with the ISO image!!!

Stata – Creating an Installer

Creating an installer for the various versions of Stata:

On Windows:

  • 1) After installing and keying the correct version on a test PC, collect the keyed application and the “stata.lic” file (these are both different for each variant, IC, SE, MP)
  • 2) Place copies of those in the ./payload/wclicense/ folder in the installer directory
  • 3) Change the command in the “Install-RightClick-Run as Admin.bat” file to reflect the correct version.
 ./setupstata15.exe /qn /ADDLOCAL=Ado,Core,StataIC64
 or
 ./setupstata15.exe /qn /ADDLOCAL=Ado,Core,StataSE64

On MacOS:
Everything is contained within the Stata Folder in the applications folder.

  • 1) Install the correct version
  • 2) Key the app
  • 3) Package the Stata folder with “Packages”
  • 4) Zip the package and distribute

JMP – Creating an Installer

Creating an installer to distribute JMP

On MacOS:

  • 1) Install application
  • 2) License application (creates “jmp.per file” in /Users/labadmin/Library/Application Support/JMP/ )
  • 2) Key application
  • 3) Package keyed application and the /Library/Application Support/JMP/ folder
  • 4) Create a folder that contains:
    • Packaged installer
    • jmp.per file from user’s space above
    • Readme file to install (see previous year)
  • 5) Create a compressed disk image from that folder using disk utility (results in a .dmg file)
  • 6) Compress the .dmg file
  • 7) Post the zipped .dmg file

On Windows:
The “jmp.per” file can be included in the same folder as the “setup.exe” file.

Windows 10 – Get Windows Update Log

Apparently windows 10 changed the windows 10 log format and you now need to run a power shell command to generate the log file as a text file that normal humans can read.

Open Powershell with “Run as Administrator”
give the command:

Get-WindowsUpdateLog

Then wait until all the log files have been found and parsed and you get the PowerShell command prompt back. Below is an example.

If you find that your windows update log goes back to the beginning of time and the resulting text log file is too large to read, you can temporarily move older log files from C:\Windows\Logs\WindowsUpdate

More details see: https://support.microsoft.com/en-us/help/3036646/how-to-read-windows-update-logs-in-windows-10-version-1607

PS C:\Windows\system32> Get-WindowsUpdateLog

Converting C:\Windows\logs\WindowsUpdate into C:\Users\labadmin\Desktop\WindowsUpdate.log …

Input
—————-
File(s):
C:\Windows\logs\WindowsUpdate\WindowsUpdate.20171011.120412.263.1.etl

0.00%100.00%

Output
—————-
DumpFile: C:\Users\labadmin\AppData\Local\Temp\WindowsUpdateLog\wuetl.CSV.tmp.00000

The command completed successfully.

WindowsUpdate.log written to C:\Users\labadmin\Desktop\WindowsUpdate.log

PS C:\Windows\system32>

JAMF – DEP and VPP Certificate Renewal

For the JAMF server we have yearly renewing certificates that connect our JAMF server to Apple’s servers for our hardware (DEP) and software (VPP) purchases.

Here is how I did this process in May 2017:

  • 1) Log into our JAMF server ( https://casper.williams.edu:8443 ) with a full admin account
  • 2) Navigate to Management SettingsGlobal SettingsDevice Enrollment Program
  • 3) Click on Public Key to download our JSS key to the local computer
  • 4

  • ) Sign into our Apple School Manager account at https://school.apple.com/ with our AppleID of: [email protected]
  • 5) Click on MDMUpload Key
  • 6) Once uploaded you should be able to click on Get Token to download the new token
  • 7) Go back to our JAMF ServerManagement SettingsGlobal SettingsDevice Enrollment Program
  • 8) Click on Williams JSS and then Edit
  • 9) Then Upload Server Token

Remain logged into our JAMF server to update the VPP Certificate:

  • 1) Log into the [email protected] AppleId at the website: https://volume.itunes.apple.com/
  • 2) In the upper right corner click on [email protected] for a drop down menu, select Account Summary
  • 3) In the MDM section, click on Download Token
  • 4) While still logged into our JAMF Server navigate to Management
  • SettingsGlobal SettingsVPP Accounts

  • 5) Click on Williams VPP then Edit
  • 6) Finally click on “Renew Service Token” to upload the token you just downloaded from Apple

Phew. Done.
Log out of all accounts.

Mac – iWork – preinstalled on all new Macs

According to this link:
https://discussions.apple.com/thread/7708588?start=0&tstart=0

iWork does not come with Sierra but is preinstalled on all new Macs. Therefore, if deploying a Mac with a format and re-image process particularly with Casper imagine, one should decide wether or not to include the iWork applications (Keynote, Pages, Numbers) in the base OS image.