From Summer Sunshine to STEM Making: Makerspace’s Reflections on a Season of Innovation

Divine Uwimana ’27 and Qi Wang ’26 have an ice cream chat at Spoon Cafe on Spring Street with Makerspace Program Manager David Keiser-Clark.

Divine Uwimana ’27 and Qi Wang ’26 have an ice cream chat at Spoon Cafe on Spring Street with Makerspace Program Manager David Keiser-Clark.

Written by: Qi Wang ’26, Divine Uwimana ’27, Divya Sijwali’ 28.

What happens when you mix a dash of creativity, a sprinkle of STEM magic, and a whole lot of teamwork? Well, welcome to a summer at the Makerspace! Imagine learning how to 3D print parts for a science kit by day and swapping sketches on designs over ice cream by night. 

Divine Uwimana ’27 and Qi Wang ’26 worked in the Makerspace this past summer as student workers. They made significant progress on a Towards Inclusion, Diversity & Equity (TIDE) grant awarded to develop sustainable and reusable STEM learning kits for 5th-grade students in nearby under-resourced elementary schools. 

In the summer, Divine and Qi learned Fusion 360 (computer-aided design software) and advanced 3D printing, including calibrating printers and determining the most appropriate hot-end temperature settings. They identified and associated core curriculum science concepts with their STEM kit models and learned how to use rapid prototyping to test and quickly iterate on conceptual designs. By the end of the summer, they had developed three STEM kit models. Their kits centered on storing variable amounts of potential energy by using 3D printed torsion springs, gravity, and rubber bands. Their goal was for a single set of common parts to support all three models.

What Does Makerspace Mean to Them?

Divine Uwimana ’27 has worked in the Makerspace since the start of her first year at Williams. Divine believes that the Makerspace has offered her a place to learn and create. She said, “I love seeing the product of my learning, and it’s motivating to know that my summer experience will help elementary students learn.” As a math major, the Makerspace has allowed her to apply her skills in mathematics and be creative with them. She added, “I’ve also learned to pay attention to details and have noticed how you can see a huge difference when you change the smallest detail.” 

While working on this project, Divine felt a deep sense of excitement and responsibility: it was fun to make the kits, but making them for the kids made them more meaningful. Developing these STEM learning kits was a way to blend her skills with younger students’ needs, hoping it would enrich their learning experiences. Every design and every print felt a step closer to making a tangible impact. As she dove deeper into learning Fusion 360 and fine-tuning her 3D printing techniques, she felt a sense of accomplishment in turning ideas into designs and then finally into design models. Seeing the pieces come together was incredibly motivating for Divine; the process showed how small adjustments, like changing the length or thickness of a model or adjusting temperature settings, could make a huge difference in the final print.

The opportunity to work collaboratively in a focused environment manifested several “aha” moments for Divine. She said that the most notable was having first-time opportunities to assemble a mechanical Scotty dog kit (created at Carnegie Mellon University’s TechSpark Makerspace), a 3D printer enclosure kit, a wall-mounted tool rack, and a DeWalt shop vac. These assembly projects helped Divine conceptualize pieces that go together. It also helped her learn how to approach designing her own STEM kit models.

3D printed wind up car with an embedded rubber band power source

3D printed wind up car with an embedded rubber band power source

Qi Wang ’26 started working in the Makerspace this summer. She appreciates the existence of the Makerspace at Williams because of its real-world application. She said, “Williams is a liberal arts college but also very prestigious. The courses here often are very theoretical, while internships trend towards being pre-professional. The Makerspace is a rare space in between these extremes.” As a comparative literature major, she recognizes that Williams’ courses focus on literature critiques rather than creative writing. The Makerspace offers a space for applied hands-on academic work that requires learning how to research and implement STEM concepts while utilizing her creative writing and thinking skills. Qi found this summer work filled a gap that had been missing in her education at Williams.

Qi also points out the invaluable opportunity of full-time summer work in the Makerspace. She said, “During a typical semester, you see progress only after many weeks because you can only work for at most 20 hours a week as a student worker, compared to the summer, where we have been working 40 hours a week. I feel really good about our summer project in the Makerspace because we’re seeing so much success in just over nine weeks of work.”

Qi believes that the connection between Comparative Literature and the Makerspace is a blend of storytelling and science, like finding the plot twist hidden in a machine or crafting a narrative around STEM. In Comparative Literature, she’s used to dissecting stories, examining themes, and understanding every word’s purpose. At the Makerspace, Qi found herself bringing that same attention to detail and creativity to projects, as if each STEM kit was its own story waiting to unfold.

3D printed gravity-powered car

3D printed gravity-powered car

Creating STEM kits is like crafting a hands-on narrative for the elementary students who will one day use them. Just as she analyzes texts to bring out underlying meanings, Qi digs into her projects with a literary eye—considering how each part fits, how each mechanism flows, and how a simple change in design can rewrite the entire “storyline” of a STEM model. The Makerspace offered her a refreshing new way to put her analytical mind to work, letting her blend the theoretical with the practical and transform her love for literature into a hands-on learning journey.

How Was Their Experience Working Together? 

Qi believes that working with Divine has been one of the best teamwork experiences she has had at Williams. She said, “We each have our strengths and have learned how to contribute our ideas to each other’s established work. People often love to give advice, but we’ve figured out how to have our advice add value to our ongoing work.” 

“I’ve also enjoyed working on these kits with Qi and learned a lot from her,” Divine said. “She was always willing to help and provide me with honest feedback. She always had a positive attitude and always made the working atmosphere fun and motivating.”  

In the fall semester, they will hand off their work to two first-year students to develop it further. Divine said, “I am looking forward to seeing the impact of our work and to hearing feedback from both students and teachers at the Pownal Elementary School.” 

Alumni Reunion Weekend at the Makerspace

During the sunny and pleasant reunion weekend of June 7th and 8th, the Makerspace was bustling, offering tours and hands-on making experiences to over 200 Williams alums and their families. We prepared a hands-on project that would allow people to use 3D-printed molds to cast Makerspace-themed coasters, sourced from upcycled Amazon cardboard boxes. This fun experience allowed us to share and discuss an environmentally friendly DIY project that people could easily replicate at home. People can even create their own custom molds!

During the alumni reunion weekend, the kids seemed most excited to mix the ingredients, mold the pulp, and finally clamp the coasters. They also got to take home coasters that we had prepared (and dried!) ahead of time.

Alums in the Makerspace on June 7th, 2024

Alums in the Makerspace on June 7th, 2024

Recipe

  • Cardboard boxes (50g)
  • Water (170g)
  • PVA Glue (15g) (we used Titebond II woodworkers glue; Elmer’s white glue works, too)

Tools

Instructions

  • Cut the Amazon boxes into small pieces
  • Add into the blender: 50g of cardboard, 170g of water, and 15g of glue

    The kids were excited to mix the ingredients (cardboard, water, and glue)

    The kids were excited to mix the ingredients (cardboard, water, and glue)

  • Blend until it’s thick and looks like wet clay
  • Assemble the 3D-printed mold: we used and modified this Pulp-it model

    Kids took turns squeezing extra water from the pulp

    Kids took turns squeezing extra water from the pulp

  • Put the pulp in a cheese cloth and squeeze the excess water out
  • Fill the mold with the damp pulp
  • Press the pulp with your hands so that it is dense and evenly distributed in the mold

    And this is how you squeeze the clamps on the mold!

    And this is how you squeeze the clamps on the mold!

  • Attach the lid to the mold
  • Press the mold using a clamp
  • Let it dry for 24 hours
  • Carefully remove it from the mold and gently place it to dry in direct sunlight (or in front of a fan or heater vent) for about 6 hours
  • It should now be 100% dry and solid
  • Nice work!
Fusion 360 software: We ended up iterating and tried inverting the extrusion of our design. Which version do you like better?

Fusion 360 software: We ended up iterating and tried inverting the extrusion of our design. Which version do you like better?

The kids had a blast making the coasters while learning about how upcycling minimizes waste in our environment. This activity demonstrated how individual action, no matter how small, may collectively impact positive change.

A pile of upcycled coasters made by our alumni's children (from scrap Amazon boxes)

A pile of upcycled coasters made by our alumni’s children (from scrap Amazon boxes)

According to the Environmental Protection Agency

Packaging materials account for 28.1 percent of the total municipal solid waste (MSW), amounting to 82.2 million tons of generation in 2018. This amount poses a high environmental risk and requires systemic and individual actions to mitigate the risks.

A pile of Amazon boxes

A pile of Amazon boxes

We were inspired by this Pulp-it project, and then we modified their open-source parts by using Fusion 360 software to add the Makerspace logo onto the coaster. To do this, we added an image of the logo and then extruded (raised) it about 8mm. To minimize waste, we tested our prototype models by printing it at 15% of the actual size. 

Fusion 360 software: Before adding our logo

Fusion 360 software: Before adding our logo

Fusion 360 software: After adding our logo

Fusion 360 software: After adding our logo


The “Press The Button” Project

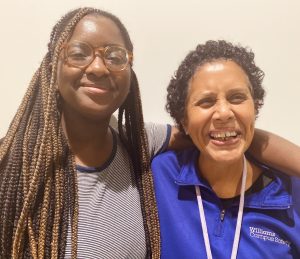
Pictured Above: Sam Samuel (left) and Nancy Macauley (right)

Pictured Above: Sam Samuel (left) and Nancy Macauley (right)

Route 2, a highway that cuts through campus, holds a degree of danger as students frequently cross to get to classes, dorms, extracurriculars, etc. Due to this, the campus provides three Rectangular Rapid Flashing Beacons (RRFB), yielding the right of way to pedestrians. Despite their ability to increase the awareness of drivers, it is common for students to neglect pushing crosswalk buttons with the assumption that drivers will stop regardless. However, as implied in the signs posted by Campus Security Services (CSS), the vision of drivers may be impaired due to solar glare or lack of lighting. This may present a danger to students who fail to push the button before crossing. Due to these concerns, Nancy Macauley, a Campus Safety Services Officer with CSS, reached out to the Makerspace with a project idea that she hoped might encourage more students to “press the button”. 

The Project

When I was first introduced to this project, I struggled with the direction CSS wanted to take, so I quickly set up a meeting to get a better understanding. I had my first meeting on September 29th where we discussed purpose, goals, and I shared a fair amount of criticism on the project from my perspective as a student. From there I concluded that:

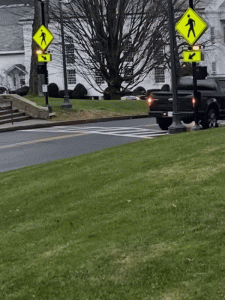
Example of a RRFB on Campus

Example of a RRFB on Campus

  1. This project began in July with a previously 3D printed prototype button that CSS mentioned contained two holes and was purple; I took that information into consideration when designing a new button. Nancy had mentioned liking the previous design but, since several months had passed, she was  unable to  locate or show me the original prototype. 
  2. An engraving that read either “push the button” or “press the button” was requested on the design and if possible painted yellow or gold once completed.
  3. A total of 50 buttons were requested as a starting point once design was settled.
  4. Students would receive free ice cream from the local ice cream shop after receiving 3 buttons and a pizza voucher after 5 buttons. Because of that, we concluded that we would need a design that could be easily collected on a keychain.
  5. Given that this project is just starting to get its footing it still needs to be approved within CSS. 
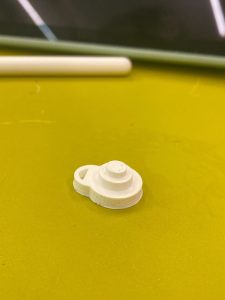
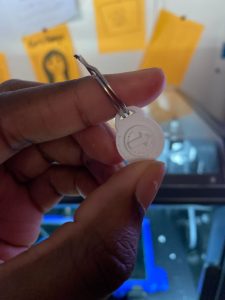
Figure 1. First Button Prototype

Figure 1. First Button Prototype

From there began the start of my journey. I first inquired with the Makerspace manager about the original prototype button from when this project was first pitched. Unable to locate it, I began researching appropriate sizes and other button designs for inspiration. After sketching in my notebook, I made four variations of my first design on Fusion360. I created multiple versions on Fusion360 because I wanted to test varying heights in extruding. I also attempted to approximate appropriate hole sizings that would accommodate a standard-sized keychain. I then attempted to add the text engraving and that was more challenging than I had expected. I was unable to include the engraving because of the relatively small size of the buttons. My first designs ranged in size from 23 mm to 34 mm, and were inspired by clothing buttons.

I decided to keep the small sized button because it would print quickly, requiring only 13 to 15 minutes each, and would reduce environmental waste as I anticipated students might throw away buttons or lose them. However, given some communication issues on my part, and due to me being sick for a period of time, there was an overall lack of in-person meetings. After a quick email interaction, I left multiple printed versions of my first prototype at the CSS office and later received Nancy’s overall feel on the design. Since she expressed reservations, I decided to build another design in Fusion360. This prototype attempted to replicate the look of the actual RRFB buttons students press at campus crosswalks. 

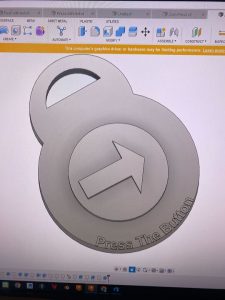
Figure 2. Fusion360 Design

Figure 2. Fusion360 Design

My attempts at implementing the engraving on the design included manipulating different methods of extrusion. According to the application ArcGIS, “extrusion is the process of  stretching a flat, 2D shape vertically to create a 3D object in a scene.” I first tried the inset and extrude combination method for the text which entails creating an inset on one of the object’s planar faces and extruding using that sketch to create a hole. When I extrude, I stretch it vertically inwards which cuts into the object. This would allow for the text to show as a hole. In the end, the surface area was too small for the Dremel DigiLab 3D45 printer to extrude, resulting in the text collapsing when I printed it. This also occurs when I stretch vertically outwards. This can be seen in figure 2 where the sketch of the text on the object’s planar face is raised by a height of about 1 mm. Extrusion actually occurs throughout the entirety of creation of the object! For example, to create the keychain portion of the object, a 2D sketch of an arc is needed to extrude the sketch outwards. Then the hole for the keychain is made by extruding inwards after making an inset on our previous sketch’s plane. Once printed on the Dremel, you are then able to insert physical objects (like a metal keyring) in and out of the hole, which was successfully done in each prototype.

Conclusion

Figure 3. Fusion360 Design

Figure 3. Printed Prototype

In my most recent meeting with Nancy, I learned that she had envisioned a larger button — one more similar to the silver-dollar sized prototype she had first received from the Makerspace last July. Hearing this from her helped me explain how the loss of the original prototype, combined with having scheduled only two in-person meetings, resulted in my providing her with prototypes that were both smaller and different in appearance from what she had been expecting. We ultimately decided to put a temporary pause on the project and meet in-person again at the start of the spring semester. During Winter Term, Nancy will share the current project and seek feedback from the rest of the CSS Staff. And I have many more ideas and experiments to try to prepare for CSS’s first launch of this initiative!