
So far, I’ve spent most of my time at the Makerspace fixing 3D printers. Here are some issues that I’ve encountered:
Clogging: How to avoid clogging a printer
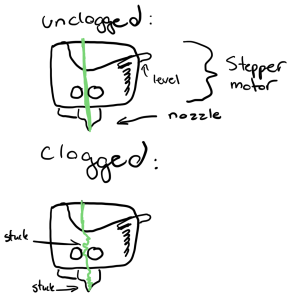
My drawing how filament can break or get stuck and cause a print to fail
Before starting any print:
- Check that the outside of the nozzle is clean. If there’s any buildup outside, this may be a sign of buildup inside the extruder/nozzle.
- Double-check that the filament type is suitable for this specific printer
- Calibrate/level before beginning your print
- Ensure temperature settings are correct
How to fix an already clogged printer
There are several ways a printer can clog. Only go to the next step if the printer is still clogged:
For the Dremel Digilab 3D45
- Turn on Dremel and press the “Preheat” option. Wait until the printer is preheated to the optimal temperature indicated on the filament. Press purge a few times until the filament comes out of the nozzle. If nothing comes out, go to the next step.
- Do a cold pull. Press down on the level and pull out the filament with pliers.
- Press the lever down and use the declogging tool to push down any remaining filament.
- Take out the stepper motor to see if there’s filament clogged there. Take out any remaining filament with tweezers. To learn how to do this, look at Option 4 in the guide below or see The Fine Art of Unclogging post.
- For visual help, here is a step-by-step guide to unclogging the Dremel: https://www.dremel.com/us/en/digilab/support/3d45-series-3d-printer/extruder/unclogging-extruder
For Prusa MK3S or MK2S
- While there is no “purge” setting, you can preheat the filament to melting point and then change the filament (the Prusa will use the other filament to push out the clog), which will generally unclog the extruder/nozzle
- If that doesn’t work, gently remove hotend using this guide (start on step 2): https://www.ifixit.com/Guide/How+to+Unclog+a+Prusa+i3+MK3+Nozzle/140666
Adhesion Issues of Model to Print Bed
Examples of bad adhesion to print bed:
- Nothing is being printed, or there’s just a blob (no adhesion)
- Model moves during printing (bad adhesion)
- Sides curl up (OK adhesion but can do better)
To fix these problems, check for these things before you print:
For the Dremel Digilab 3D45, check the following
- BUILD ORIENTATION: When orienting your model in 3D slicer software, ensure there is as much contact as possible between the bed and the model.
- CLEAN: The bed is completely clean and free of glue or dust, or filament. If it’s not clean, turn off the printer and wipe it down with alcohol wipes and let it dry.
- GLUE: Put glue from a glue stick on the bed area where the model will be printed.
- TANGLE-FREE SPOOL: Ensure no tangles or tension in the spool.
- LEVEL: When ready to begin your print, you must calibrate the bed to ensure it is level. You may do this by pressing the “Level” option on the screen. This provides on-screen instructions on how to level.
- TEMPERATURE: Ensure you preheat the temperature to the optimal temperature indicated on the filament in the “preheat” settings.
For Prusa MK3S or MK2S, check
- BUILD ORIENTATION: When orienting your model in 3D slicer software, ensure there is as much contact as possible between the bed and the model.
- CLEAN: The bed is completely clean and free of dust or filament. If it’s not clean, turn off the printer and wipe it down with alcohol wipes and let it dry. Note: there should never be glue on this printer.
- TANGLE-FREE SPOOL: Ensure no tangles or tension in the spool.
- TEMPERATURE: Ensure you preheat the temperature to the optimal temperature indicated on the filament in the “preheat” settings.
- CALIBRATE: Do a first layer calibration. To do this, press the knob, turn the knob and press “Calibrate” and then press “First layer calibration”. Follow this guide for a good calibration: https://help.prusa3d.com/article/first-layer-calibration-i3_112364